kelsey 6x10 platen back spring
please help me with this platen back spring.
I have trouble with restore the spring,
it’s so hard to push down.
hope anyone can tell me how to restore this part.
Thanks a lot !!
spring.jpg

spring 1.jpg
ffi |
fl |
5m |
4m |
’ |
k |
e |
1 |
2 |
3 |
4 |
5 |
6 |
7 |
8 |
$ |
@ |
# |
Æ |
Π|
æ |
œ |
|||||
j |
b |
c |
d |
i |
s |
f |
g |
ff |
9 |
A |
B |
C |
D |
E |
F |
G |
||||||||||
? |
fi |
0 |
||||||||||||||||||||||||
H |
I |
K |
L |
M |
N |
O |
||||||||||||||||||||
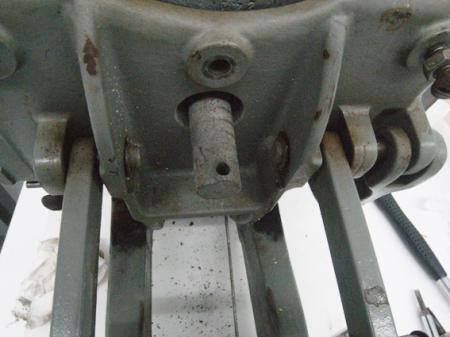
please help me with this platen back spring.
I have trouble with restore the spring,
it’s so hard to push down.
hope anyone can tell me how to restore this part.
Thanks a lot !!
spring.jpg
spring 1.jpg
Use a spring compressor from your local auto parts store.
Also, it looks like the spring is tapered — you have it large end out. Turn it around so the large end bears on the back of the platen support, or it won’t do its job. (If it’s not tapered you’ll want a washer between it and the platen support to prevent the spring from going into the hole it’s in now.) Advance Auto Parts and other stores loan tools — you should not need to buy a spring compressor (they’re used for valve springs).
Bob
This might sound funny, but when I did this to mine, I used two pieces of wood to push the spring down (one on either side of the metal post with the hole for the cotter pin) and hold it in place while I inserted the cotter pin.
get the correct size “roll” pin, sometimes called a “spring” pin, for this hole,(slightly bigger than hole size but made to compress and drive in easily) which is longer than the spring diameter. you might want to grind alittle off the end of the spring so it doesn’t “dig in” to the base metal, kinda like a snow ski.
Now the process is safe and simple especially if you have some help. oil the spring and its “seat” well. slide the spring onto the shaft and drive the pin into the hole, evenly spaced, centered in the shaft. start to turn the spring. you will notice that the spring acts like the screw that it is and will compress will it “climbs” up the pin. turn the spring until it is completely compressed by the pin.
it’s work!!
thank you eric !
I realize that Mr. Wu has fixed his platen spring, but I thought I would pass along how we did it at Kelsey. (I worked there from 1971 to 1979 building hundreds of presses). We disabled a drill press and made a heavy duty cup with a crosswise slot (for pin insertion). We laid the platen on the table and used the force of the drill press arm to compress the spring. We were then able to insert the pin into the hole. If I remember, we also whacked the pin with a chisel to create a crimp. (This was one of many “Kelsey Adjustments” made during the assembly of one of these presses).
Pete
I’d be curious to know of other “Kelsey Adjustments”.
From all the stories I’ve read so far, the old factory sounds like a very interesting and “innovative” working environment.
While we may have had a Bridgeport, a Cincinnati miller, a shaper, planer and several lathes, we certainly were not turning out aerospace products. The majority of the preparation of the parts was to take the raw cast iron casting, remove casting lines, deburr and then drill the pieces. I wish every piece had come from the foundry in good shape, however, especially towards the end, the patterns were not turning out good castings making them harder to machine or drill accurately. This wasn’t always apparent until it was time to assemble. Hole misalignment was common. It is a good thing that someone invented the reamer. Also, our goal was to have the handle contact both connectors at the same time and allow the platen to approach the chase bed evenly, but this often took a lot of grinding and filing. More manual labor went into the assembly than you would think. Don’t even bring up one of the 9 X 13 behemoths. It actually took a couple days just to assemble one of those, if you were lucky enough not to give yourself a hernia.
While there certainly were a number of creative ways to turn out the final product, I will admit that the true “Kelsey Adjustment” did incorporate a hammer, sometimes a big one. On more than one occasion, one of these “adjustments” required me running back into the warehouse for a new part.
Pete
Old topic I know, and I’ve posted this pic before of the improvised “tool” I made to deal with the platen spring on a Kelsey (5x8 model U)…
Used with two C-clamps on either side to compress the spring, makes the spring and pin removal a breeze…as well as re-installation.
It’s made of a thick aluminum commercial door kick plate:
Kelsey Tool.JPG
I know it may be a bit late to help Yihsin Wu with his/her press, but re-installing the compression spring is really quite easy - IF you know the trick.
- And you don’t need any fancy tools or dangerous procedures. - just a pair of channel locks.
And here’s the procedure:
1) Position the spring as shown in photo #2.
2) Insert the 1/4” pin into the hole on the shaft.
3) Tap it gently with a small hammer until it is centered.
4) Then begin to simply twist the spring *into* place - sort of as if it was a really big nut being screwed onto a large bolt.
5) When it gets hard to turn by hand, grab it with a pair of large channel-locks and continue rotating the spring until it twists all of the way under the pin and snaps into place.
I do this all the time as I restore these presses. It only takes a minute.
BTW - I didn’t figure this out by myself. I learned it from someone else. But it seems to me that it’s the sort of information that could help a lot of folks our there who are doing their own press restoration.
———————
BUT one thing I discover and figure out on my own: I have occassionally seen cracks in the casting where the spring presses into the platen holder. If the spring is not stopped by the casting, and instead screws through a wide crack and into the space between the platen holder and the platen, I will add a washer in front of the spring to protect the casting and allow the spring to rotate as it’s re-installed. If the casting is cracked or broken, the spring may go to far and actually rotate *into* the press, which makes it useless…
So.; whenever you remove this spring, be sure to check your platen holder for cracks in that very thin bit of brittle gray-iron casting that is intended to accept all the tension of that very strong spring…