C&P 8x12 OLD style
So, does anyone know a relatively quick/easy/inexpensive way to get the ink disk of my 8x12 C&P OLD style to be smooth?
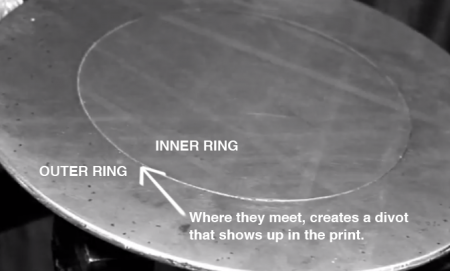
I’ve noticed while printing very large coverage areas that the rollers aren’t inking consistently when they roll over one half of the ink disk because the inner and outer rings are creating a divot in-between one another. A picture is attached.
If this isn’t an easy fix, does anyone have an ink disk for sale that will work on my C&P OLD style 8x12?
Will someone let me know if the NEW style disk will work on an OLD style press? Because I think I could find one off of a NEW style a little easier.
thanks,
TG
crinkpress.com
Screen Shot 2015-04-14 at 5.12.28 PM.png
Every ink disk I’ve seen has had that divot on it. I think It’s partially like that due to how the ink disk is made. I have also seen completely smooth ones, so I’m assuming you’ll have to purchase another one to fix that problem. Or use more ink, and rather than accentuate the divot it will fit it.
That is a two part ink disc. The inner circle shaped piece and the outer donut shaped piece are actually two separate pieces. Originally there was a gear system on the back of the disc which caused the two pieces to rotate in opposite directions, thereby achieving better ink distribution. Your two parts are probably pretty well stuck together now, due to ink and solvent getting between them for a long period of time. I had a working split ink disc on an 8X12 press built in 1911, which was the year they changed from building old series presses to building new series presses. My press had both old- and new series parts on it. I never tried to put a solid ink disc on my press, but I think it will fit. However, someone else on here will, I hope, give you a definite yes or no answer.
Do you know how the automotive body and fender repair people remedy cracks and dings and divots on a car to create a very smooth surface to receive new paint?
In the olden days they filled the low places with molten lead and then filed it down to match the other surfaces. Today they use an epoxy product like J-Weld or Red Hand.
Fill the groove and then sand it. Flat, flat is nice, but a slightly raised smooth joint should not be a problem.
I would suggest that you try to separate the two discs if they are stuck together. I am guessing that there is an accumulation of crud (dried ink, dust, etc) under the inner disc that is raising it up. If you can get it loose and remove it, clean out the under side of the inner and the area it fits into on the outer, I suspect you will find they fit together flat. If not perhaps you can determine where the additional metal needs to be removed and see if a machinist can carefully remove it on a lathe. Once you have it matching correctly, then you can epoxy or Bondo it in place. That will make a more satisfactory ink disc than just filling the edge.
Bob
There is probably dry ink build up in the center disk. Is it moving? You can try and find or order an oscillating roller.
If you need another disk I have one spare like that.
Finding it hard to comprehend from some of the posts above why it is thought desirable or even necessary to turn the clock back many many years, and isolate the Contra-Rotating ink disc option.
This was surely a vast improvement and a major consideration in marketing the M/c,s?
Even IF the facility to inch it round is missing, once freed the chances of it NOT revolving naturally are fairly remote.
It aint rocket science to saturate the underside with Nitro mors, Paint stripper, Genuine Roller Paste, (decontaminate) etc etc. around the hub of the disc (spiggot) where it enters the boss on the main frame.! or the hub of the outer disc.
Left to activate, to eat into the offending build up, hours, overnight or longer, and then the (un) seized disc drifted out from under with copper drift and hide hammer + assisted with plumbers sink type plunger, STUCK to the disc to facilitate gentle minute rotary action.
Once it is freed and removed, the chances of needing turning etc. are probably remote.
Use a Rotary (Brass bristle) wire brush down the spiggot hole in the base/frame in an ordinary hand held electric drill, with just a few passes it should be possible to achieve 12 Gauge or 410 Gun barrel shine.
Finally Linnish the spiggot that was seized, to match the shine in the bore, and last move, FILE a flat on the spiggot along the full length, about 1/8” wide to produce an oil channel, virtually never factored in during manufacture many years ago, and subsequently every 3rd, 4th, wash up, just a minute squirt of of thin oil (3 in 1) etc down the spiggot.
This very operation has been done and advised to be done on Adana,s here in the U.K. for some considerable time.
Adana,s are notoriously prone to the Ink Disc, (steel stub)
seizing in the aluminium main frame.
In essence same syndrome as above.
Fortunately, being steel in aluminium and fairly light it can be gently warmed up and drifted out from under-neath, even when the aluminium disc has inadvertently been wrenched from the steel stub.
In the event that it is not practical to access the stub from under to drift out, it will probably involve line of sight to the teeth on the centre disc or the dogs of the original ratchet drive, again drift-able with rotary action.
Willie -
Yes. There is a very easy way to resolve this problem. I have done it myself, and it requires only some heat and some good oiled tympan paper.
No machine shop work, no welding, grinding or anything like that at all. It’s really quite simple and will cost you nothing but a few sheets of oiled tympan.
Here’s the story: My shop is in a relatively unheated barn. The Heidelberg has its own heated room, but my old 10 x15 hand-fed C&P sits out in the colder area of the shop. As a result, when I want to hand-feed a job when the outdoor temp is below 50 degrees, I use an old trick taught to me by an old Romanian printer who I met in 1964…
“The Ink Candle”. He used it as a boy in an unheated Romanian print shop prior to 1900… I learned the trick in when I was boy and he was an old man - in 1964… I place a big, fat (3” dia. ) “Ink Candle” beneath the ink disk to keep it warm while I’m printing.
But, to save time and warm up the ink disk before relying on the candle alone, I often remove the disk and place it on a propane heater I have - not a radiant heater, but what’s called a “trash can” heater, because it looks like a small trash can. It warms up the disk nicely and then I remount it on the press and the candle will keep it warm as I print. But enough of that….
One day last winter, I placed my two-piece 10x15 disk on the heater and after the shaft & main disk warmed up, I heard a surprising sound as the larger disk dropped free of the inner disk and disk post. ‘bang’
I was a bit surprised at first, but then pleased when I saw what had happened.
Finally, for the first time in 50 years, I saw how this unit was assembled. Beneath the inner disk were a few sheets of regular oiled tympan paper. I replace them with fresh sheets, re-assembled the two disks and rotated them until they were perfectly level. (They had not been prior to this.)
You can do the same. If you don’t have a trash can heater, soak the split with solvent and use a razor blade or Exacto knife to remove some of the accumulated ink and solvent - or simply set your ink disk on a stove top burner for a few minutes until it, too expands enough to drop off of the inner disk.
Once the two disks are free, clean up the edges of the inner disk with some Scotch Brite pads and solvent. That will remove the accumulated ink and solvent that had kept the two pieces from moving freely in the past. Then cut some new tympan sheets as shims (round, with a 2” hole in the center) and add enough tympan so that the two disks are level with each other.
You may need to rotate the disks to find the flat spot, but you can do that in seconds.
Once you have leveled the two disks - using only tympan paper, you can reassemble the unit and have a very nice and level two-piece ink disk that will serve you well for perhaps the next 50-100 years….
However - important note: If the built-up solvent/ink has been removed, this small gap will accept solvent as you wash up your press. Be sure to note that ring of solvent and wipe it dry before re-inking the press or you will see curved lines of solvent mixing in with the ink - not a big thing, but something worth keeping an eye out for….
Have fun, do it yourself to save money, and happy printing!
- Alan Runfeldt
http://ExcelsiorPress.org
Mick on Monotype, are you nipping on the type wash…
again…james
James B. Close but not quite. Probably come into the class of *Closet* Cellulose Thinners Sniffer!!
Dont smoke or drink ever, but >(greater than) 40 yrs on the Monotype have played havoc with the lungs.
But still have not learned the lesson,? still try to make a good job of repairing vintage machinery, including small presses and more.
Consequently frequent visitor to the local Paint, Cellulose, Lacquer, Coach Enamel suppliers.
Off course one has to purchase adequate supplies of thinners, as propellant, washing the Gun out etc etc.
But seriously the Company can match virtually Any colour, including taking into account Age Fading.
Presented with a small representative part or even a small chip of paint from the M/c they can match (within reason) any colour.
It is presumed that an updated version of the Spectrometer is used.
Spectrometer or variant as was used in conjunction with Pantone (type) Colour Books and progressive proofs, when L/press was king.
ANY Corroboration might help the New ones navigate the minefield of colour matching, colour mixing, etc.
Are modern Spectrometers down to reasonable price, for tight budget, New Devotees.???
I appreciate all of the advice. I’ve taken a closer look at the disk and it appears that the “divot” was filled with lead or brass in order to fill the gap created by the two disks because they seem to not fit flush against on another. I fear that if I try and remove the inner disk that it will create an even larger gap because of the lead that is in there now might be pulled off during removal. I think i could fill it back in again but I currently don’t have to supplies, nor know-how to do so… I think I’d like to be able to have a back-up disk if I’m going to experiment with this one.
If the disk gap is filled in with molten lead after it is freed from the outer disk, how then is it supposed to rotate freely?
I like the idea of an osculating, or rider roller. But haven’t found any that have been manufactured. Can anyone point me in the direction of one that would fit an 8x12 Old style C&P? I understand that there will probably be some “customization” that is required, but I would at least like to see an example of one before trying to figure out how to make one myself.
Also, can anyone send me a video of a double ink disk that is freely rotating separately? I just haven’t seen that before. Every press that I’ve seen that has a double disk, is fixed and both disks rotate together.
thanks again,
tg