Restoring a Farley Proofing Press
Hi Everyone,
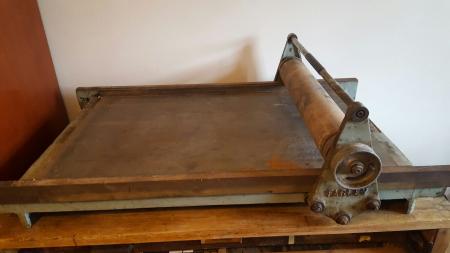
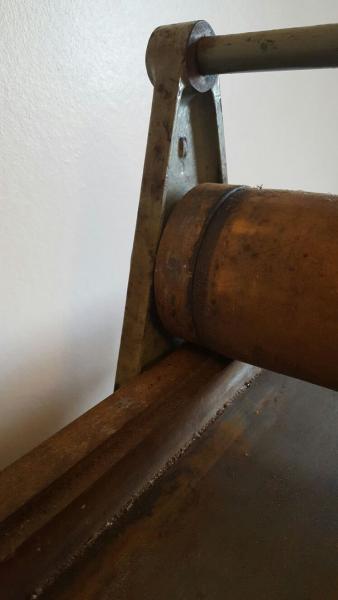
After years of searching I’ve finally managed to get a hold of a proofing press. It’s a bare bones Farley no.12 and i’m now looking to restore it to its former glory.
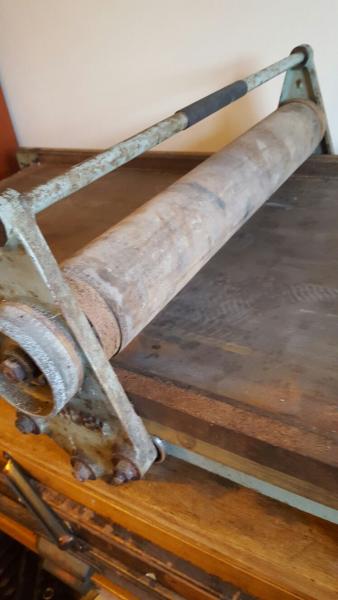
The whole thing is a bit grimy thanks to years of attic storage, however the roller moves, if a bit stiffly.
I’d be grateful for any suggestions regarding the best materials and methods to clean it up, and also some advice on raising the roller height - it seems to be just below type high at the moment.
Thanks very much in advance!
Cheers,
John
IMG-20160829-WA0002.jpg
IMG-20160829-WA0000.jpg
IMG-20160829-WA0001.jpg
IMG-20160829-WA0005.jpg
IMG-20160829-WA0004.jpg
John, Give us a call via the B.P. means of communication.
We are in Sunny Brighton, just down the road from Croydon, where the Farley,s were built, We have rescued one or two and have a fair *Dossier* to fall back on. ….. Mick
Hi John,
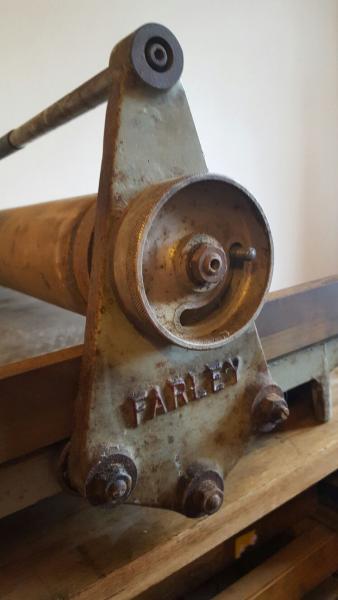
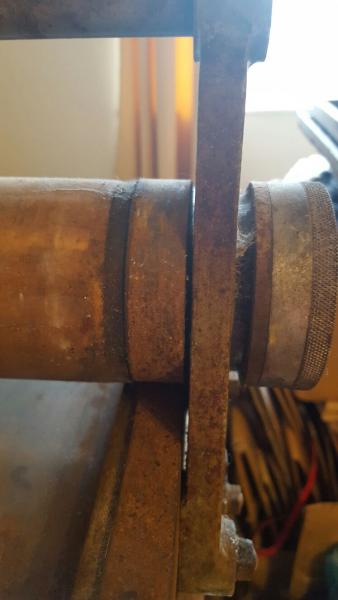
WD40 / white spirit and some fine wet and dry will go a long way. The large wheel on the side is the type height adjustment to allow for type directly on the bed or on a galley.
It appears the locking nut is missing. I removed the bearings on mine to grease them up. here are my before and after pics plus a leaflet.
Frank
farleyleaflet.jpg
farleyafter.jpg
farleybefore.jpg
Thanks very much for the advice Frank. Your before and after shots are great - gives me something to aim for!
I’ll pick up some WD40 and white spirit this week and give it a shot. Which areas would you recommend using the wet and dry on? I’m guessing that’s how you got rid of the rusting on the sides? Also do you think it will still be possible to adjust the height without the locking nut?
Thanks again for your help.
Cheers,
John
A good way to get rid of rust is the vinegar-lemon juice mix, wet some Scotch brite sponges, clean your surface rust away with it, wipe clean, and use the WD40 to stop further rust.
John,
Thomas’s comments are good. You will need a lock nut of some description to hold the setting. I’m sure a local engineer could make you one. It’s only done up finger tight
Frank
Thanks very much Thomas, I’ll definitely try the lemon juice/vinegar mix. The press is in a small space so it will be better than filling the place with white spirit fumes.
Frank - thanks again for your advice. i am looking into the locking nut now.
I hope to get working on it this weekend and will post some after photos when I’m done.
Thanks again for all the comments!
John
The locking nut is no problem for the time being. it WILL BE an imperial thread, any, Motor Factors will supply of the shelf, probably 1/4” …3/8” (witworth) or thereabouts, ideally YES, a knurled nut in the fullness of time,! but a socket spanner of the right size and a simple *T* bar will perform perfectly.!!!
When the Rails are cleaned, steps be included to take any side play out of the carriage, when it traverses for the impression, the reason being that, (by default usually) the carriage is pulled along, not via the ribbed grip at centre, but by the point of the cross bar nearest to the operator, reasonable mistake in the early stages, but if there is even a little side play, and very little lubrication to the side stanchions and the side rails, it (the carriage) will bind and slew the proof. … Side play normally only taken up by spacer(s) / washers on the Top, and only, transverse Tie Bar. Generally?
Under ideal conditions, (Not easy or expected,) and with a minute amount of lubrication, usually dab of grease, to either side rails, from one end facing, with the side stanchions gripped with both hands, tested for side play, if a sliver of credit card or a 2 Point lead, can be pushed into any gap, exposed between side stanchion and rail, usually that gap is Too Much
With regard to the Rails, Above & Below,! that carry the carriage for impression, when the rails are as clean and flat as can be acquired, the Cylinder Bearers run along the top (to view!) and to all intents and purposes, are fixed in time and space, ex factory.
Type height to print, is governed by the eccentric adjustment of the Impression Roller, controlled by the Missing nut as above.!!
The constant contact of the Cylinder Bearers to the Rails at all times, IS achieved via the 3 Bolts on either side which are *ECCENTRIC* with lock nuts and screwdriver slots, to facilitate close overall contact along 100% of the rails, via the bearings, not always possible admittedly, finnicky at the best of times.!!
PLUS!
With just a little extra effort and foresight, as the bearings involved are fairly easy to remove, even if the carriage is removed which is not *Rocket Science* in its self.??
The bearings 50/50 are, open ball races OR sealed, makes no difference, even *Sealed for Life* eventually leech out the grease, hence it is quite common, even desire-able to merely place every bearing with its bolt, if tight, in a can (Bean tin is excellent, other cans are available???) 1/2 - 3/4,s full of >high melting point grease< or >Vaseline<, just as good, warm the whole shooting match up with D.I.Y gentle blowtorch, (NOT boiling) effectively re-greasing the bearings from without.?
Dunked in cold water, to seal the new grease in.!! refitted, and then adjusted for absence of free play in the Roller Carriage.
Entire Roller Carriage normally only retained by Bump Stops at either end, usually Leather faced, replaced x 4, for a few pence.?
One last one (hopefully not) BUT IF the impression cylinder appears to be damaged within the working area, through cutting rule or pefrorating rule etc. in the hands of the previous un-educated users, sadly, …… Perhaps call up >Reliant Rubber Engineers West Yorkshire< They *Reliant* re-cover, re-manufacture, Rollers for virtually everything. See their Web Site. It is just possible that they may suggest, (if all else fails) within certain limits, re-grinding your roller, even in hard rubber form.
Hi All,
It’s taken a bit longer than expected but yesterday I spent the day cleaning up the Farley proof press.
I started by using wet and dry sandpaper to remove the rust on the rails, the metal edge of the roller and on the faces of the bearer screws. The rust came away relatively easily with the coarse grade sandpaper and I then used the finer grade to smooth it off.
I then set about it with a vinegar/lemon juice mix, rubbing it in to everything bar the rollers and polishing with a clean paper towel, before applying a little WD40 to smoothen the action.
Overall I’m quite pleased with how it all came out, especially the main dial on the bearer and the rails themselves. The roller carriage now has a much smoother movement, whereas before it was jerky to say the least.
I’m now looking for a way to give the bed a really good clean before starting to print, so if anyone knows any other good methods then I’d be grateful to hear them! Likewise for the roller - are there any methods that might reduce the staining?
Once again thanks to everyone for their advice, especially Mick on Monotype, Frank Hemmings and Thomas Gravemaker - I’m very grateful to you all.
Here’s some before and after shots. Apologies for poor quality phone pictures!
Rails before and after
Bearer before and after
After cleaning
Before cleaning
J.F. Tread a little carefully with the Impression Roller.!
Although it is hard rubber, it/they have been on the road along time, … Possibly *Mangers Sugar Soap* liquid or paste, baste the roller for a few hours, and then with care (Gently) rub it,The roller, down with an ordinary dish/plate cleaner, but only in *Longitudonal* movements, first with the Nylon scrim side, and then wiped clean with the softer side, (like You would with the “Willow Pattern” tea set.)…Then wiped down with warm soapy water, lots of paper towel on the bed, of course.?
THE BED.!!! . . (And we have on a Farley before).
Beg, Borrow, Steal, even purchase, a Reciprocating Sander, smaller variety, with clip on sheets in the order of,
9” long x 4” starting with medium grit, down to finest grit, small amount of metal polish, Bluebell, etc, on the bed and again in longitudonal, passes and gradually traversing from one rail to the other, polish away down to (hopefully) shiny metal or at the very least down to comparable appearance to the flat surfaces of Your Rails.
2 Reasons for the reciprocator, A. Makes a comparatively Hard Job >easier<, and B. being a perfectly flat surface from the abrasive sheet, takes of the higher spots down to the base material, as opposed to doing it by hand, where the finger tips etc, tend to follow the higher spots and the dips.… Learnt this with the first few (Futile) attempts at Blocking *down* resprayed Cars, WITH Reciprocating AND Orbital sanders, = No contest with the correct info.???
Good Luck, Mick.
Hi Mick,
Thanks very much for the helpful comments,
I’ve looked about for a reciprocating sander but it seems like they are quite hard to get a hold of. Would a small belt sander be a good substitute?
I’ll have a go with the sugar soap on the roller and post another update.
Thanks again!
John
John, Yes Reciprocating Sanders are slightly less available than Belt Sanders, the main reason for Reciprocators being that the action, makes them effectively *Float* in a static position and enables finger tip control, with virtually no pressure, to polish, out and down, very precisely, and right to the edge of the workpiece, the abrasive sheet(s) will hug the Rails right to the edge, whereas the Belt Sander will do the job, but have Power bulges (slightly) on both sides, and restricts over all finish, but still do a good job.
One more to perhaps check on, look up ***Detail Sanders*** from virtually every D.I.Y. store = Recirprocator Sander but very Small, with triangular (Velcro) abrasive pads, *grit* down to 1,000, You could almost polish the *Family Silver* with that, after You have finished the Farley.!! … Good Luck Mick.
Hi. I too have a Farley 12 I just picked up and have a couple of questions as I strip down to do a quick clean and lube.
1. Should there be screwdriver slots both sides of carriage? I only have slots on the one side (the height adjustment side)?
2.The other side is proving tricky to remove. Because there are no screwdriver slots perhaps? I can’t seem to wriggle it off. Also the alien key just turns the height adjustment - Which is good as I couldn’t see how the this adjustment worked.
Which leads to third question….
3. I have the locking nut but when I set a height nothing visible changes - the roller doesnt move up or down. It seems to only move when I turn the Allen key on the opposite side, So a bit confused.
Anyone happy to take a phone call from Sydney?
Matt
Matt, apart from the cylinder height adjustment which is only controlled from the front (facing) side, the bearing rollers should be completely identical on each side, i e. the screwdriver slots are the outer ends of the eccentrics that rotate inside the bearings, in each case 2 above the track and one below, (mirror image from back to the front of the entire carriage) not difficult but fiddly to synchronize, to achieve NO free play but still working clearance - see many posts above.
Setting the height? yes look carefully, the knurled/serrated *wheel* only effects the eccentric central shaft within the cylinder, but You should be able to detect the variations, on the >Pulls< and impression.! The outer steel bearing faces abutting the compound of the impression roller stay constant, the Cylinder proper obeys Your input.!!
Usually works in conjunction with Type/Image matter straight onto the Bed, Or when using a Bed plate or standard Galleys, or complete Formes/chases locked up for the press.
If You like, contact me through B.P. channels, happy to swap info via landline, seem to remember Many moons ago talking to a fellow *Monotype* owner/operator in Toowoomba, QLD. our late P.M. His early A.M. possibly!
The ramble re the Farley from memory only.
Good luck. Mick
I think I sent a Mesage to you on BP but can’t seem to see it. Can I ring you to discuss press?
Matt
Matt, G`Day sport, Can not see Your message either, but No Worries perhaps call me up on international code
Oz - U.K….followed by 01273 278639.
Time factor no problem, if I dont answer the phone, probably means I am out in the W/shop on the Monotype during the night hours, on Economy 7 night rate (Electricity) 1/3 of day rate. Mick
Matt t, there should be one bearing on each side with the screwdriver slot and they should be on the same side of the main roller. If you are still having difficulty removing the bearings you may have to release the nuts on the bars top and bottom so you can gently ease the side frame off on that side. Then you can switch the bearing with a screw driver slot so you have one each side. Hope this helps.
I love my Farley and it is a great friend but I have a recent problem. I see that the front bearings on the right hand side of the roller (underneath) is no longer making contact with the rail above. So when I am using the press only three of the four bearing discs rotate. I have oiled everything and can hand rotate the offending disc but would love to resolve!
At a first guess and as You say You can operate the *offending disc* by hand, would imply that, that, bearing eccentric has worked loose, check that the lock nut is tight, or that the screwdriver slot can be turned even gently,! if there is some movement in the eccentric, just tweek the screwdriver slotted eccentric up till small resistance is felt, with an open ended spanner/wrench.
Cycle the carriage, 2/3 times, L/R preferably with a large **Type Or Image** medium on the bed to simulate actual operating conditions, observe ALL outer tracks, (outer bearing races) are rotating.
(Author) My best shot, above, Apologies for Rubbish.