Treadle hook solution for any chandler & price floor model letterpress
My press is a 10x15 chandler and price floor model with the serial number: C55857 on the chase surface and 1006a on chassis (can anybody tell me what these numbers mean or what they correspond to as far as dates or anything?). It has the u shaped crankshaft(foot treadle operation, will not be possible using the traditional movements of the press if yours has the straight crankshaft).
I got it for free with everything I needed to make it work, and only had to pay to have it moved. It didn’t have the treadle hook but did have the original foot pedal. In its previous setting it was used commercially with a motor. I intend to use it for artistic purposes and dont need to run large editions requiring motorized operation.
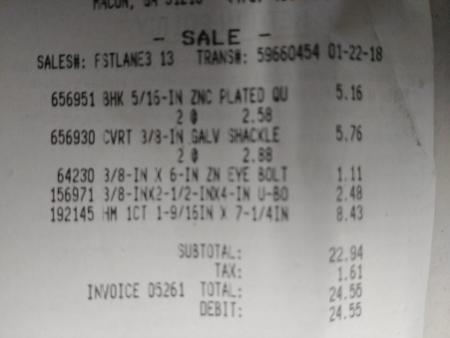
My solution for a treadle hook is a simple one that may actually provide more efficiency than the original design or any design created by metalworkers currently, due to utilizing a spring. All of these items were purchased at Lowe’s home improvement in the hardware section and most of it was found on the same rack
I used:
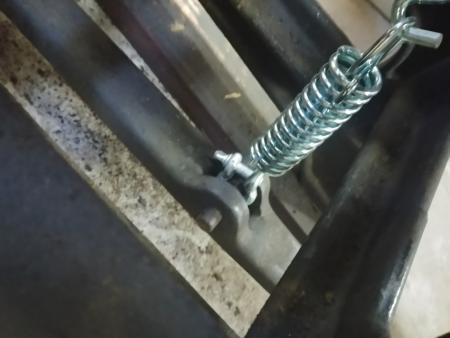
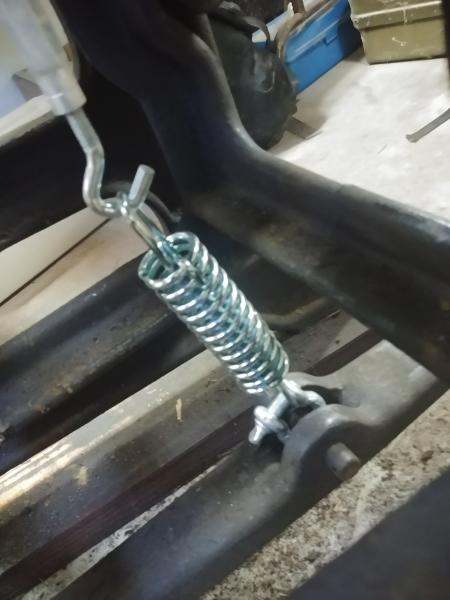
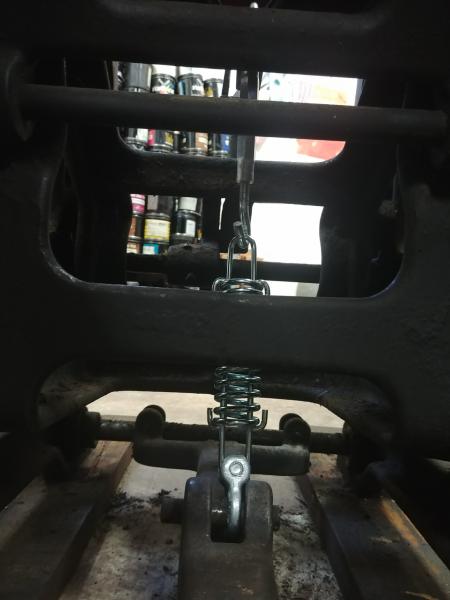
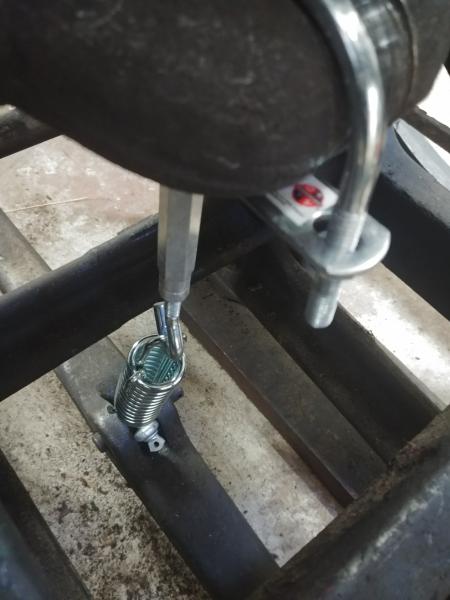
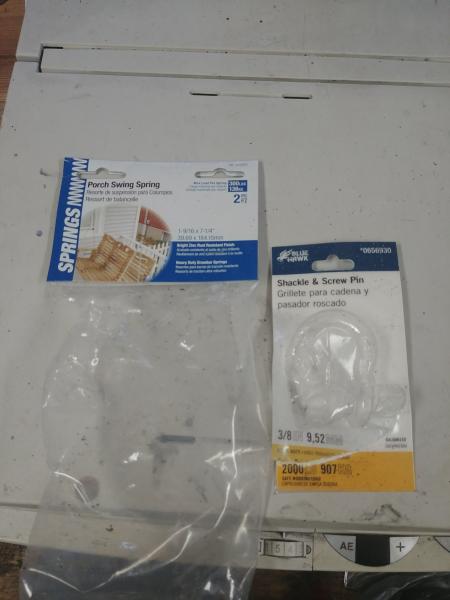
1 heavy duty shackle and screw pin for the pedal eyelet and pin (3/4” inner diameter hole)
1 porch swing spring (they come in packs of two for about 10 bucks and this was found elsewhere in the hardware section)
1 heavy duty turnbuckle with a hook on one end to allow for the treadle hook to diaassemble in the event of a pinch
1 u shaped, threaded hook (it needs to fit onto the crankshaft, which in my case was 1.75” in diameter)
The eyelet is installed by hammering out the pin in one side of the pedal eyelet and hammering it back in, through the shackle and screw pin from Lowe’s. Unscrew the bolt in the eyelet to accept the porch swing spring and replace the bolt. Screw in one side of the large u shaped threaded hook into the loop side of the turnbuckle and discard threaded closed loop part. Leave the small turnbuckle hook part attached to the other side of the turnbuckle. Install the large u shaped threaded hook onto the center of the crankshaft and let the turnbuckle hang with the turnbuckle open hook pointing downward. Fiddle with it before putting it on to get a nut and the flat piece that closes the large u shaped, threaded hook installed to keep it from coming loose. Lift the pedal to be able to put the hook through the top loop of the porch swing spring.
The adjustability of the turnbuckle allows for the treadle to be lengthened or shortened to match your height.
The spring allows you to manipulate the momentum of the press more easily (Ilet my 63 year old mother test it out so that I could take photos and videos and she was surprised at how easy it was to pump it) and you can really get the thing going fast when you get the timing right.
The open hook on the turnbuckle that attaches to the porch swing spring allows for the treadle hook to fall away during a pinch (which hasnt happened yet at all) or for it to simply be disconnected in the event of installing a motor.
I looked for people to create a treadle hook online and found someone that manufactures them for $40 but they admit on their actual website that they probably won’t fit and will require modification.
I also found full kits with replacement pedal and all from the same companies for $300. If you call them (i won’t name the company(ies)) they will tell you that theyve downsized their facilities and only want to sell the inventory that they have instead of creating something for your press that will fit. If you continue your inquiry, they take your information and say they will pass it to the owner when he comes in, but you will not get so much as a smoke signal ever again from them.
I purchased 2 hooks and 2 shackles so that I could have replacements, but if you only buy what you need to make this treadle hook, you will spend $19.04.
I will attach images for reference
Here is a youtube link to a video of my mom using it. Don’t judge me, I still have to clean and lube the press.
https://youtu.be/gcRMBxPJyF0
https://youtu.be/DaTd-iBYhls
Another interesting thing to note is that it wouldn’t take much modification to my design to fit it to a homemade foot pedal that could probably also be built using things from the Lowe’s hardware section. For instance, Lowe’s has 12 gauge, 3 foot long, threaded rods that would make a great replacement pedal shaft
Good luck!
treadlehookspringviewb-2080x1560.jpg
treadlehookspring-1560x2080.jpg
treadlehookfull-1560x2080.jpg
treadlehookdownviewc-1560x2080.jpg
packaging-1560x2080.jpg
receipt-2080x1560.jpg
Let me know how it works for you!
Your u bolt might be of a harder steel working against a probably softer metal cast or wrought iron and a smaller surface area than the original so it might wear more quickly if stahs in one place whilst runningand can oscillate….maybe you can affix the ubolt to a bearing of sorts that is the full width of the bearing surface of the crank.
This was a major problem with the cast iron hooks from the foundry in Idaho — they wear the journal of the crank into a groove, due to having too little and uneven bearing surface against the crank. Jonathan’s thought is a good one. The originial hooks are curved to match the journal and are about 3/4 to 1 inch wide.
Bob
Thank you for your feedback. I do intend to modify this to fit the crankshaft better. But for now, this works. Does anyone know how to install a bearing onto the crankshaft without taking thw press apart?
If I were you I would get a square block of hardwood like maple or oak, that is the same width as the bearing surface on the crankshaft. The square of wood should probably be about 3 inches bigger than the diameter of the crankshaft. Then I would measure the diameter of the bearing surface of the crankshaft, and drill that size hole in the middle of the block. Then on one edge of the block, PERPENDICULAR TO THE GRAIN OF THE WOOD, I would drill two bolt holes which are on either side of, and outside, the center crankshaft hole…..5/16” or 3/8” bolts should be ok. Then I would cut the block in half so I could place the two halves over the crankshaft and bolt the block back together. You can secure the rest of your rig to one of the bolts. Before installing it, I would also drill an oil hole through to the crankshaft hole, in the middle of whichever edge of the block is up, and keep it oiled.
Since the saw kerf (amount the saw took out), will make the center hole smaller, you might have to put a washer or two between two halves of the block to keep the bearing hole from being too tight.
Another advantage of this is that the wood is softer than the crankshaft so whatever wear occurs, will be to the wood and not to the crankshaft.
Good luck and always ask yourself before doing anything, is what I am about to do safe? We don’t want any injuries or accidents.
Geoffrey and Theald
what about a block of nylon similarly treated…………
Thanks again! That is a great idea. Wood I’m not fond of, but treating a nylon block in the same way is a great idea. I will update! Yall are great and I plan on,learning more every time I do something with this.
Whoa! Whatever block material you use. Cut it in half FIRST. Then drill holes and bolt the two halves together,Now you can drill your center hole without any loss of diameter caused by the saw kerf.
Rick
I would suggest a wood that is probably pretty hard to get but will outlast just about any other possible wood for such a use — lignum vita. It is very hard and durable and was used for bearings in such applications as water turbines. Should outlast the press.
Bob
I think wood is better than nylon because it will absorb some oil and keep the bearing lubricated better. And I don’t think you will ever wear out maple or oak by treadling your press, if you can’t get the wood Bob suggested. Believe it or not, I had some pine acting as bearing material in the belt drive system of a C&P 8X12 and it was still fine after 33 years of occasional use. Some of the bearings in folders were wood for many years. People nowadays have an (I think) unfounded dislike for wood machine parts when wood parts will do perfectly well in many applications. Don’t forget the first presses were wood, and we use wood for furniture, reglet and type.
Rick, that is a good idea to drill the large bearing hole AFTER cutting the block in half, but I wood drill the two bolt holes first. Then they will be perfectly aligned, plus you can bolt the block back together to hold it tight while you drill the center bearing hole. All this should be done with a drill press and a drill press vise for accuracy, of course.
Update! This works just fine. It’s made out of nylon. No metal touches the crankshaft. It barely has clearance. Thanks for your advice. I think it runs smoother now.
nylonhook-1560x2080.jpg
nylonhook2-1560x2080.jpg
The problem that I encountered had to do with clearance around the shaft. The space will not accommodate a block shaped bushing. For anyone else attempting something like this, try to figure out how much clearance you have around the shaft.
Your solution may be to machine a more round bushing that a metal hook can seat into; or possibly. A nylon-lined hook, similar to what I have resorted to. With some grease applied, nylon works smoothly and I don’t expect any unnecessary wear on the shaft anymore.
Keep in mind that solid nylon can be expensive.
Love the creative solutions on this thread.
In reading this - makes me think of the wooden ink drum bearings in our Vandercook Universal I. Going strong since 1964. Wood definitely doesn’t get the credit it’s due.
Mike