Craftsmen Tabletop Restoration/Repair
Hi,
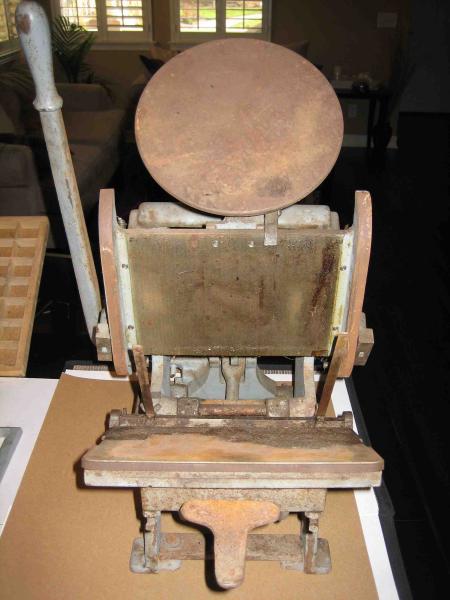
I recently purchased a CMC tabletop press (my first press) and have the following questions. Can someone help me to understand if this is the Superior or Imperial press? I’ve been told it is an Imperial but just want to clarify. Also, any idea as to when this press was built? The only identifying numbers I see seem to be individual part numbers. The side piece has “30-4” on it.
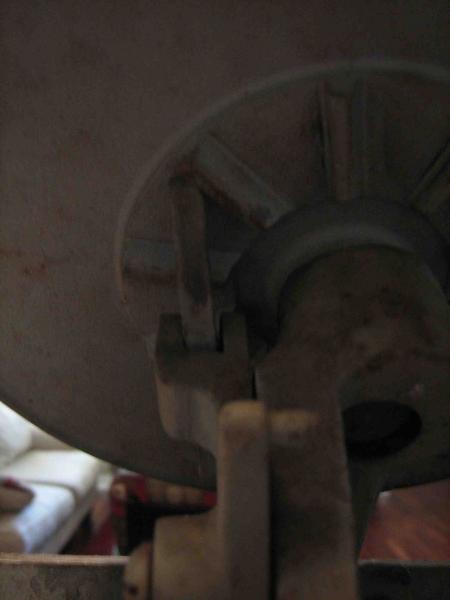
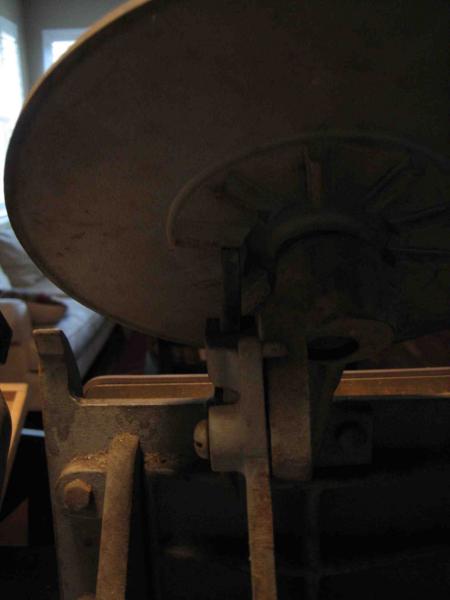
The press appears to function very well with the exception of the ink disk not rotating. Please see the pictures below that illustrate the problem. The lever that is in contact with the ink disk splays out preventing the ink disk from rotating enough for the lever to “catch” the next rung. Any feedback on a solution for this would be greatly appreciated. There is a pin holding the lever in place and I’d like to learn more about the best way to remove/alter it to fix this.
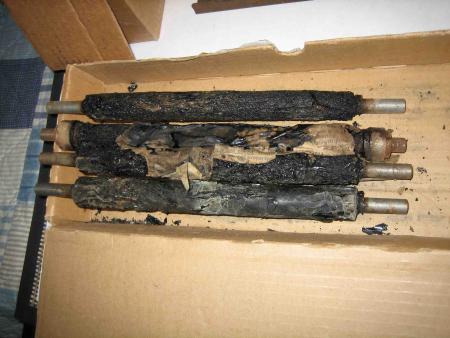
Second, I am planning to disassemble, clean, prime and paint this press. Any recommendations for an approach to cleaning/removing rust would be a great help (eco friendly solvents, etc.). I’m planning to get new rollers or have these rollers restored. I appear to have two different size rollers. Which should I use?
Finally, I am going to purchase a base from boxcar press. For this press, would you recommend the deep relief base with thicker plates (KF152) or the standard base with 94FL plates? It appears as though the deep relief base is the way to go but I thought I’d ask for some feedback on this.
Thanks so much for your help and for your patience with my newbie questions!
Joshua
front_open_lr.jpg

side_open_lr.jpg
ink_disk1_lr.jpg
ink_disk2_lr.jpg
rollers_lr.jpg
50/50 lemon juice and vinegar to get the rust.
CitriStrip to get the paint.
Industrial grade enamel paint (brushing is usually best).
I would recommend the deep relief base from Boxcar… just make sure you pair it with the proper KF152 plates.
Also…
David Hauser at Tarheel Roller should be able to sell you rollers and trucks for use with this press.
Your press is the Imperial model. It shares a basic design with the Sigwalt Ideal and the Golding Official. One of the advantages of these presses, is that you can print paper that is larger than the platen. The mechanics of the press don’t get in the way.
As to your ink disk, I don’t have a solution. Will it rotate at all, or just not automatically?
I just painted my Superior press with tractor paint. Brushed on. Rustoleum or similar industrial paint usually contains a leveling agent like fish oil. It allows the brush strokes to disappear. It can be used with or without a primer.
Thanks for all of your insight into this, everyone.
To answer the question, the disk will not rotate at all as the lever will not advance the active rung far enough to reach the next rung. It appears as though I need some kind of washer setup or something to prevent the last lever (sprawl?) that is in contact with the ink disk. I may capture a quick video and upload within the next day or two to help illustrate this problem.
Try this from the Briar Press Yellow Pages….Craftsmen Machinery Co.
http://www.briarpress.org/1496
They claim to have rollers, trucks, chases and spare parts for the Craftsmen line of presses.
If your ink disk was higher, would the ratchet pawl be able to slip under the next notch on the ink disk?
My disk has a small nylon washer that places it up about 1/16 inch. The previous printer had used 4 or 5 layers of tympan to increase the height even more.
That might work, I’ll test that and let you know the results. Thanks for the idea.
For getting rid of rust you should search the database at:
http://www.owwm.org/
(Old Wood Working Machines.com)
They have a lot of experience in getting rid of rust on old machines. They are friendly and as enthusiastic as this group is in preserving machines of old.
Many of them use an electrolysis tank that involves a plastic tub (big enough to fit whatever cast iron parts you are wanting to remove the rust from) and a battery charger. You should check out their resorations, they are impeccable
There are many other methods that they use to get rid of rust. I tend to use scotchbrite pads or scrape rust with razor blades combined with WD-40.
Thanks, RMG. What a great resource OWWM is!
I’m looking into comparisons of the electrolysis method versus lemon juice/vinegar. Any additional insight into this would be appreciated. Can all parts be treated with either of these approaches? It appears so.
If lemon juice and vinegar. What kind of vinegar? Also, what is the ideal ratio? I have heard 50/50 (above) and also 1 part lemon juice to 4 parts vinegar.
If I go with electrolysis, I’m trying to learn if this is something I would have to do myself or if I can pay someone locally (Denver, Colorado) to use their setup. The lemon/vinegar approach is the most economical but I’m willing to do what it takes for the best results.
Thanks everyone!
Josh
The most efficient ratio is 4 parts vinegar/1 part lemon juice.
The electrolysis approach will yield the better product. It does, however, require equipment not needed with the simple immersion process of the chemical bath. If you have access to an inert container, suitable electrical power unit, adequate cathode/anode/attachments, and balanced solution, the finished object will yield superior result. Unlike the bath, though, electrolysis will remove good metal if not carefully monitored.
For simplicity, the vinegar/lemon approach will most certainly suffice. Although slower than electrolysis, it cleans almost as well and, as the object under discussion is a small press, the molecular advantage of the electrical exchange vs the chemical conversion of the immersion bath is too small to really be considered.
With either technique, one ‘must do’ applies: oil all machined surfaces immediately upon exposure to air. Not doing so will see rust forming before your eyes.
In my opinion your press is not that rusty. I don’t think you need real drastic approach. Looks like just surface rust on the painted surfaces. Just clean them up with a maroon scotchbrite pad and whatever cleaner you want. If you want to, paint it after it’s cleaned up.
The unpainted surfaces on the ink plate, chase bed, and platten were originally machined to tight tolerances. For these surfaces I would pick up some maroon scotchbrite pads and have a go at it, I like to use some WD-40 but the vinegar/lemon formula above would work really good too. I usually do some scraping with razor blades too, liberally soaked with WD (or vinegar/lemon formula). Some people put salt on there too, but not for long.
It really isn’t hard to do, just messy, time consuming and your wrist will cramp up.
You have the advantage with the unpainted parts that they are small and removable from the press, so you can take them over to your favorite chair and just sit there rubbing on them with a pad (or eventually some steel wool) while watching tv or whatever. It is going to take some time, but there is clean metal under there, just takes some patience.
I had the EXACT same problem with my CMC, 5x8 Imperial. When I removed the round head machine screw that holds the pawl to the stem (the stem has a 3/4” apprx. hole which supports the pin of the ink table-see picture attached, hole is in center at top of pic), I found that the machine screw was bent. At first I thought that it was from prior careless handling. But, after trying a new machine screw, I began to understand that it was bent on-purpose! I eventually found that there was a proper position for this bent machine screw which caused it to align the pawl in such a way that it worked correctly. I did have to add a washer to get it to stay in the right place, but it then worked correctly. As Microsoft would say, this bent machine screw was a “feature” and not a mistake. Someone once told me that machines of this era were assembled by skilled “fitters” who used files, nailsets, paint and other “stuff” to get these machines assembled. The problem with that is that if you take them apart, you may never get them to work properly again. Much of it is in the proper “alignment” of the related parts. When iron castings cool, they often warp a little, making the job of the fitter even more difficult. One story I believe had to do with automobile assembly lines where they would use sledghammers to make doors “fit”. I’ve owned a few of those cars.
Here’s how to “adjust” the machine screw:
1) Put the assembly back together.
2) Try the press to see if the ink table moves
3) Use a screwdriver and turn the screw by the slightest amount
4) Try the press again
5) While trying this procedure, watch how the mechanism moves. Is the tip of the pawl getting closer to the ink table or further away?
6) Finally, you might try a new machine screw and bend it even more than the original. DON’T bend it in the iron casting (see following). Bend it in a pair of Vise-Grip pliers or in a table vise.
There were some other alignment problems due to the fact that a prior owner had taken the press apart and painted it. Maybe that’s why he sold it, because when I got it, it was not making a good impression (no pun). The ink table stem, for example, did not fit very well and I glued a small piece of .001 brass shim (hobby store) to take up the looseness. After all of this, the press printed like a craftsmen.
One caution: these presses are made of cast iron. Cast iron and china dishes have something in common-if you whack them, they break. Don’t try to bend cast iron parts. Cast iron is extremely strong under compressive loads, but weak under tension. Cast iron will bend a little, but then it suddenly breaks. Never hit cast iron with a hammer.
Rear.jpg
Thanks so much for your feedback. This is a huge help! I’ll definitely use this as I reassemble the press. I’m derusting and stripping now. Can I ask what paint you used on yours? Not sure if I’ll go with the battleship gray or switch to black. Thanks again. Josh
Just one other question regarding the process of removing rust and paint. What do you experts recommend for storing the parts after removing of rust and paint but before priming and painting? I am using the lemon juice and vinegar approach for the rust removal and citristrip for the paint removal.
I have been letting the stripped parts sit with a coat of light weight motor oil until I prime/paint. Before priming/painting, I was planning to clean each piece with mineral spirits then dry completely. Any suggestions for this entire process or am I on the right track?
Thanks so much for your help.
Josh
Your on the right track!
Because cast iron tends to be a porous metal I would have real problems coating stripped parts with oil. On my presses I used chemical strippers afterwards washing the parts with water and a stiff wire brush, then blow-drying with an air compressor. I live next to an ocean and I guarantee any exposed metal rusts quickly. Remember, rust is a surface process and any light rusting that might happen in a day or two can literally be brushed off. I would only strip parts that could be painted the same day or perhaps the next, rather than stipping the whole press and then painting the entire press at once.
A primer is designed to have a ‘tooth’ that not only adheres to the metal, but is receptive to the coating paint. If a piece is primed and then left for a few days, the prime coat should be roughed up with Scotchbrite pads (try to use the finest grit available) before painting. The same goes with finished coats, if you can’t repaint in a day - rough the surface for the next coat. The paints today are much thinner and flow better than old lead-based paints and I personally find myself using three or more finish coats to get the quality of finish that looks right.
The restoration is going very well. I’m at a point in the process where I need to decide if I should completely disassemble the parts of the press that are adjoined with cylindrical “pins”. Obviously trickier to disassemble these than the nut/bolt joints that I have already removed. I have successfully derusted and removed paint on these pieces.
I’d prefer to disassemble the remainder of the press to remove any rust/paint in these joints that can’t be reached without disassembling (using the same approach as above). Any advice? If I do remove these pins, can you explain the safest approach with C clamps? See attached for some pics of the pins.
If I don’t disassemble, is it possible to soak the entire press (see attached) in the vinegar/lemon juice solution, then citistrip? Or, will that cause further rusting in the hard to reach areas that I can’t prime/paint?
Any help would be greatly appreciated. I really want to restore this thoroughly but want to avoid any problems with reassembly.
IMG_2303_lr.jpg
IMG_2298_lr.jpg