New Chandler & Price cutter - help needed in the NW
So I bought this chandler & price, 19” cutter yesterday. Looks to be in great condition, but needs the blade sharpened and the cutter stick replaced. It came with nothing but a back ache, so I have no idea if there is anything I should know about removing the blade or the cutter stick besides being overly careful about it. Do I need to remove bolts while it’s in the air or in a certain order? Also, anyone have a recommendation for getting the blade sharpened in the state of washington? This is my first cutter and I’m pretty excited, just trying to take care of it and get in back up and running. Also, if there is a site out there with a PDF manual or any kind of maint info that would be helpful would make me smile as well.
thanks for any and all help!
dustin
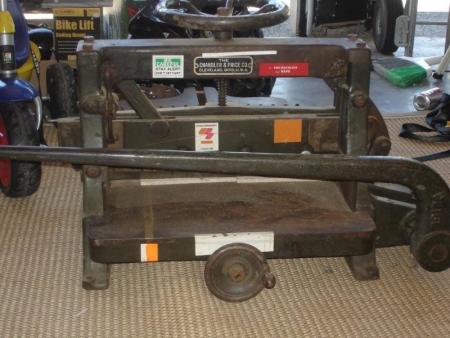
swap 024.jpg
swap 023.jpg
I have a Word file copy of cutting, jogging, drilling and maintenance tips from Challenge that I can send you if you email me at:
[email protected]
It doesn’t cover changing the knife but I think you will find it extremely useful in maintaining and using the cutter.
As far as changing the knife, there are some basic principles that should be followed after which people have their own preferences. Here’s basically how I do it. Some will agree and some disagree.
1. The knive retaining bolts should be removed with the knife in the down position. While the cutting stick is adequate for the edge to rest on, while doing this I like the added insurance of a piece of plywood for a larger area of coverage of the table. Any thickness will do, 1/4, 1/2, etc. I don’t want to take the chance that while I’m removing or installing the knive I accidently hit the edge on the cast iron table and chip it. It is more expensive to have a chip ground out and reduces the life of the knife faster. And it will ruin a newly sharpened knife and it would have to be resharpened. So I have a piece of plywood the width of the table and long enough to cover the table from under the paper clamp out to the front edge.
2. I also have two 4” long bolts with the same thread size as the knife retaining bolts. After the knife is free of the carrier it is bolted to, these will be screwed into two of the holes in the knife and act as handles.
3. Make sure you have some kind of knife carrier to which you can bolt the knife once removed and which keeps the edge covered. This keeps everyone safe and the edge, once sharpened, sharp. I won’t go into what these look like now but if you don’t have one they’re easy to make.
4. Put the plywood if you’re going to use it on the table and tighten the clamp slightly to hold it in place. Pull the knife into the down position so the edge is on the plywood/cutting stick. Remove the retaining bolts and lift the lever back up making sure the knife stays down on the plywood. Screw the two 4” bolts into holes a comfortable distance apart and carefully remove the knife. Place it in the carrier and bolt it in place.
Replacing the same knife after sharpening is basically the reverse. Installing a different knife is slightly more involved because it almost certainly will be a different width adjustments will likely need to be made to compensate. It’s not difficult but that can wait for another post.
Congratulations on a great cutter!
Rich
Front Room Press
Milford, NJ
http://frontroompress.com
http://frontroompress.blogspot.com
Changing the guillotine blade on a Challenger:
Q: How many bindery workers does it take to change a manual draw blade Challenger?
A: Three. One person to read the instructions, one to lose a couple fingers, and one person to dial 911.
No more punchlines, or jokes. Just be aware that a blade - not sharp enough to pull through an inch of card stock smoothly - is still sharp enough to shave facial hair.
Jim Chase
Hi, Dustin—
In Portland, Oregon, we use Messenger Knife Grinding, 834 SE Mill St, 97214. Phone 503-236-2012. I can’t seem to intuit what section of the Yellow Pages they are in—I looked at knives, bindery, and printing equipment without seeing them. Didn’t try “grinding”. They pick up and deliver, for us at least.
The knives are transported in a sort of guard or scabbard that consists of a board larger than the blade all round, to which the blade is securely bolted, with one bolt through a reversible tag marked “Dull” on one side and “Sharp” on the other. A piece of moulding is attached to one edge of the board that covers and conceals and protects the sharp edge. The grinder may be able to supply scabbards, additional blades, instructions and advice.
You might look on the Yellow Pages of this site if you haven’t (I haven’t). Or call a few of your local printers and ask who they use.
Also, it’s useful to have several blades. While one is being sharpened, you can use another. A dull blade can be used for nasty cutting jobs too—laminated stock, adhesive material, etc., to keep your good knife sharp.
Safety first, Brian
I was able to find a place in Seattle and got it sharpened. A second blade is a little more than I have to spend and would cost me as much as the cutter cost me.
I do have a couple of new questions.
Blade is in. I broke a bolt holding the blade though, any ideas where I can find a new one? They are these fancy bolts with threads missing out of the middle of it. Would I be able to use a higrade standard bolt in it’s place or do I HAVE to have the fancy bolt?
Also, the blade doesn’t meet the stick, so the bottom papers aren’t getting cut. I can’t see a simple way to adjust the cutting height or is there no way?
What grease should I use on the hand crank underneath the cutter for paper adjustment. It moves, but it’s tough and slow. Should I grease anywhere near the blade(behind it, on it)
thanks!
dustin
There’s probably a techincal reason the knife retaining bolts were made that way, or the bolt that broke could itself be a replacement. I can only speak for myself but if it was me I’d go to the local hardware store and buy a regular bolt as a replacement. It seems that stock bolts are too long so you would probably have to grind it down some but that is not a real problem, just clean up the threads on the end. I’ve seen a number of cutters with replacement bolts like this including my 26” C&P.
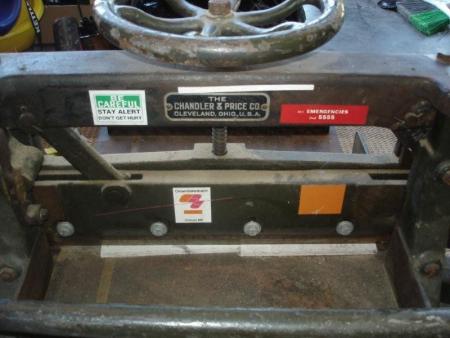
There are usually two rows of threaded holes running the length of the knife in which the retaining bolts go. The bottom row is used when the knife is new and as it gets ground down over time the upper row is used to adjust for the smaller size of the knife.
On the top of the knife carrier (what the knife gets bolted to) are usually two screws that back up the top edge of the knife and keep it from shifting in the carrier. I don’t see these on yours in the photos. It’s possible that model didn’t have them or that they’re in a place that can’t be seen or that they’re missing or broken off in their holes. They’re not essential but they do provide the knife with extra stability and do assist in adjusting it. Since C&P made good cutters, if yours never had them I wouldn’t worry about it. In any case, when a knife is replaced or after reginding it is usually necessary to adjust these up or down to compensate for the new height of the knife. You will also notice that the holes for the bolts in the knife carrier are slotted to allow for adjustment.
It’s possible that the knife is ground down to a point that it simply is no longer able to reach the cutting stick. That would mean it must be replaced. There’s no way to tell from the photos.
You don’t want the knife to dig into the cutting stick but just kiss it. You want to cut through the bottom sheet of a stack of paper but no farther. Inevitably the knife will touch the stick and make a slight line but it should be as minimal as possible. In use, when pulling the lever through its arc to the far side, that’s the point you want the edge to kiss the stick and complete the cut. In other words, you don’t want to have the knife adjusted in such a way that you cut through the paper and still have further you can pull the lever. Otherwise you’ll be gouging the stick evey time which will pull the lower sheets into the cut in the stick and dull the knife.
Depending on how ground down your knife is you may want to start on the upper row of bolt holes in the knife. Make sure the cutting stick has a fresh edge exposed. With the bolts slightly loose so the knife can move freely up and down in the carrier but is not sloppy, pull the lever down slowly until the edge of the knife touches the cutting stick and keep going until the lever stops in its arc without applying pressure to it.
If you have the two bolts on top of the knife carrier this is the time to screw them down until they touch the top edge of the knife. They will help keep the knife from shifting when you tighten the retaining bolts.
Starting from the outside and alternating back and forth left and right, tighten the knife retaining bolts working towards the middle. The knife has a tendancy to shift when the bolts are tightened and doing it this way minimizes that.
Cut a test stack and see if you cut throught the stack all the way. You can adjust the knife up or down slightly by loosening the retaining bolts and turning the top bolts a little in the appropriate direction.
Others have different methods but this works for me.
I don’t use grease because it attracts and holds dirt. There are two places that need lubrication:
1. The place directly behind the handwheel where the shaft goes through. There is probably an oil hole in the housing.
2. Where the threaded portion of the shaft goes through the gauge carrier under the cutter. A little bit of oil should be all that’s needed. Wipe the length of the scew down with an oily rag. If it’s all gunked up clean it first with WD40.
When I got my cutter I completely disassembled it and thoroughly cleaned the gunk off the screw, etc. If yours is stiff and you aren’t going to diasssemble the cutter for cleaning you may want to shoot some WD40 in those places first. This will break loose grease and other sticky stuff and for a few days provide lubrication. After a couple days and from then on use oil. If you add oil right after the WD40 it will break it down.
Rich
Front Room Press
Milford, NJ
http://frontroompress.com
http://frontroompress.blogspot.com