Removing the flywheel
I have removed the paper table assembly, side table, air pump and clutch lever. But I still need it narrower to fit through a door 920mm wide
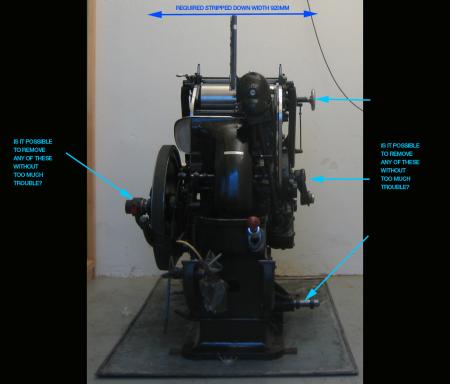
Does anyone know if it is possible to remove any of the parts I have pointed out in the attached photo? Preferable how to remove the flywheel axel. I guess all I am after is confirmation that it can be done and if there are any special tools needs ie: gear puller.
A larger photo can be viewed at www.halfnine.com.au/width.jpg
Please note this is not my platen but I have mine stripped to the same state.
width.jpg
The flywheel axle goes into the main workings inside the machine removal I think would be very difficult. I worked with these machines for 30 years and still own one although my business is closed now. I am no expert on what you are trying to do never had the need to do it. The only person that would be qualified to answer your question correctly would be a Heidelberg engineer.
The hand wheel on the upper right is held on with a tapered pin, just drive the pin out and the wheel should come out. Make sure you drive the pin from the narrow end.
The pivot bar for the air cylinder is held on by a set screw if I remember right. Loosen the set screw and use the shaft collars to pry against and the bar should pop right off.
On the flywheel side there isn’t much you can do. I removed the clutch mechanism but it only gained me a 1/4” or so. I believe you just remove the three screws in the cap and the mechanism all pulls off. I never figured out how to get the flywheel off.
I hope this helps some. Here is a picture of my windmill going though the door!
IMG_1749.jpg
Joe is the floor level on both sides of the doorway, looks like a stairwell on one side in the pic.
It is in a basement. I covered the steps with a couple of 2 x 10’s and plywood. I had to lay the press on it’s back because there wasn’t enough vertical clearance on the doorway when we started heading up the steps.
I give you guys credit you are a lot more determined than I would be.
I say give it a try. Tearing the press apart let’s it know who is boss and builds a lifetime on mutual respect.
The key is to have enough pulling power at the top of the stairs. Here is a picture I snapped of my winch at the top of the stairs.
ayrshireb.jpg
If the press doesn’t go back together you will have plenty of spare parts. Also if you break the winch there will be plenty of steaks. Good Luck Dick G.
A bull winch very handy, after you have finished you can throw a few steaks on the hotplate and have a beer.
Good luck, Chizz! You have an interesting idea of the meaning of “without too much trouble!”
I’d sooner open up the door… one needs to think ahead to when you’re going to need to get a guillotine through there too.
My press went back together very nicely and prints like a dream ( I just need to get some new rollers). It helps to photograph everything and even have an assembled press nearby you can look at. I live close to Alan Runfeldt’s shop and he was kind enough to let me scope out his press to help with the re-assembly. When I get home tonight I will post more pictures of the press move. The only casualty of the whole move was the back door on the windmill, it got broken in transit. I am still kicking myself for not removing it before we laid the press down.
Joe, i think i have an extra back door, if interested let me know. Dick G.
Thanks Joe, I have gone this far removing everything so there is no turning back. The press is covered in grease, rust and dirt not being used for years, so taking it apart and re-lubing everything is beneficial.
The air cylinder pivot bar is stuck but I will keep at it. I did try tightening the collars up tight and using a lump hammer, but I’ll try a pry bar next time.
I have photographed everything as I take it apart.
Chizz have you printed out the parts book on here.
Chrisxprinter, I have downloaded them and I read them daily.
I have the grand total of two weeks experience on all letterpress matters so they and this forum is my vade mecum. I’m having fun learning though. I am realistic that I have a long way to go, not just in learning to print but getting to know the printer as well. Pulling it apart to restore it is great way for me to get to know the press at this stage.
I just wanted to confirm the air cylinder pivot bar can be removed before busting a sweat.
Here are some pictures of my windmill teardown and moving.
Chizz, I also read the windmill manuals over and over in anticipation of the teardown and move.
You can see my actual winch system below. It is a little older than the oxen, but no less powerful.
The pictures seems to have loaded in reverse, so turn your monitor upside down to correct for this.
IMG_1770.jpg
IMG_1762.jpg
IMG_1756.jpg
IMG_1754.jpg
IMG_1750.jpg
IMG_1747.jpg
IMG_1746.jpg
IMG_1740.jpg
IMG_1684.jpg
IMG_1648.jpg
Hey Joe, I reckon most people would say you could not have moved that windmill up those stairs. But I little ingenuity, practical thinking and hard work can go a long way.
Did you have to replace your shear collar. I am wondering should I pull mine out to check if it needs replacing. A post said they should be replaced every few years.
I was able to remove the air cylinder pivot bar and hand wheel, but I still need to remove the cylinder closest to the ink well to get it down to fit through my door.
The ink area is a mess with old ink. The press hasn’t been used I think for 10 years or more and the well was left with ink in it. It was even still a bit smudgey because it had a crust keeping the inner part moist.
You said you have the parts manual, just go to Table F Inking Apparatus and remove parts T0601 and T0602 that will allow the ink ductor roller to come out.
The shear collar is a shear collar only needs replacing when it needs replacing like when it is sheared.
I ended up removing the whole ink apparatus. Four bolts (F1 and F8) were all that had to be removed. This then gave me access to clean the central lubrication properly.
Chizz, didn’t think you would go ahead a pull the whole inking unit off but its the only way you can get the ductor roller out. I read the posts on the shear collar do seem to be cases where they fail but not the way they would normally, checking or replacing it is probably a good idea but I would wait until you get it back together again and test the machine.
Thanks Chrisxprinter,
here is a photo of the press finally moved into the studio. It took me around 20 hours to strip it down and clean up the base to a point where I was happy to move it inside. It was in such a mess to begin with. Having an air compressor with an air duster to blow out the inside and between all the tight spots was one of the best investments I have ever made regarding tools.
How do you check a shear collar to decide whether it needs replacing other than testing the impression once it is running?
heidi.jpg
Nice carpet, hope you put a drip pan under the press, if you don’t kiss the rug goodby. Dick G.
Wow… my hard work quip earlier asside, I really am envious of how intimate you’re getting with your machine. If our shop’s platen (and myself) didn’t have work to do I’d love to spend a couple months stripping and rebuilding. Good for you!
Wow, I lowered my Heidelberg down a flight of stairs as well, removed everything that was bolted on to narrow the width.
Took the “swinging platen” out too for weight issues.
Two of us did it, a ramp and a ratchet hoist, with beams across the doorway.
Going up will be another matter when the time comes!
Dan
Dickg, there is no rug. The floor is polished concrete and press is sitting on a pallet. I do have a drip try ready to go. Hopefully once I have it back together and oiled up it’s not too drippy.
The windmill is designed to drip, though.
That’s why they supplied a pan with it!
Just get a 4x4’ sheet of galvanized or whathaveyou, and bend up the edges… your floor will thank you ;-)