Adana HS ink plate ratchet problem
Hi,
I’m new to letterpress, and have been trying to set up my newly acquired Adana HS2.
I’m having trouble getting the ink plate ratchet to actually move the plate around. No matter which position I put the ratchet arm in it doesn’t seem to be capable of moving the plate.
Could anyone advise on the correct position for the arm?
See attached photo for current position I have it in (which I’m sure is wrong!).
Cheers,
Richard.
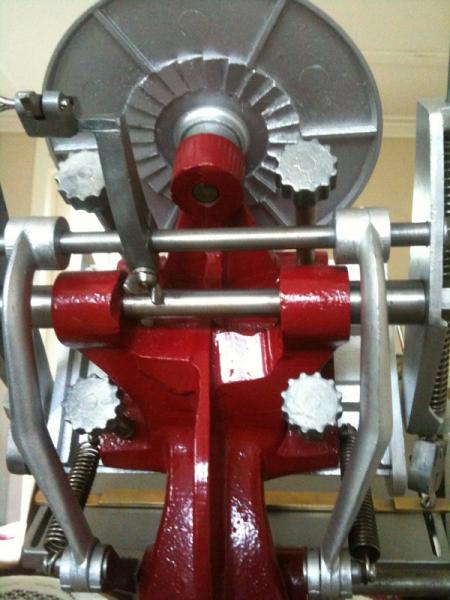
Picture 003.jpg
I’m not familiar with adanas but that ratchet should hit the teeth near the center of the disc. It would seem like that part that holds the ratchet is on wrong. Dick G.
Hi Dick,
Yes, I think you are right. I swapped the ratchet arm over to the position it is in this photo to see if it worked any better - it didn’t!
The problem is even with the arm the other way around I don’t seem to be able to get it into a position where the ratchet works. When the press is closed the ratchet moves away from the disk and doesn’t seem to come back far enough to move the disk no matter how I have it positioned.
Hopefully someone with an HS2 can help me!
Hi Richyvk,
It is obvious from the picture that someone has dismantled the Press in order to repaint it. That is not a bad thing to do but it does leave you with several problems.
Firstly it has been reassembled incorrectly. Because of this there is no room for the ratchet to be put where it needs to go.
Can I suggest you proceed as follows.
1… Remove the ink disc and put to one side.
2… Remove all four of the bed pressure screws, the big knurled screws you can see in the picture.
3… Remove the ratchet arm.
4… Examine the ratchet. It is about 1.5 inches long and is trapezoid in shape with a hole near each end.
5… The ratchet operates on gravity, the SHORT end engages with the teeth on the rear of the Ink Disc. Make sure the ratchet is inserted in the Ratchet Arm so this happens. The longer part of the ratchet is to the rear.
6… From the front of the machine, the ratchet goes on the left. The Ratchet Arm should be roughly parallel with the type bed with the short end of the ratchet pointing towards you and upwards
7. If you now push the ratchet down (the short end) gravity will return it to the correct position.
8. Now look at the Impression Screws. Two are longer than the others. The SHORT ones go in the top two holes. The long ones go in the bottom.
9. You have now created enough space for the ratchet to engage the Teeth on the Ink Disc.
10.. Replace the ink disc and depress the handle as far as it will go. The ratchet will push the ink disc round one sixteenth of a turn.
11. Lift the Handle and the ratchet returns to its home position with a satisfactory clink. Push the handle down again and adjust the Ratchet Arm so that each operation of the handle produces that Tinkerbell clink. Its a wonderful sound.
Now come the really hard bit, and that is adjusting the Type bed so you get a proper impression.
There is no short cut. It takes time patience and gallons of tea. Take your time and you will soon be able to print.
You will need a good chase and some large type — 24 point or above — some furniture and quoins.
If you need further help let me know. You can email me at the Cockleshell Press, England through this site.
Happy Printing and good luck
Richyvk,
I have just noticed the Ratchet Arm in your picture is the wrong way round. It needs to be turned so the part facing back is facing forwards and, of course, on the opposite side of the Press. You will have to change the thumb screw as well so it is still pointing to the rear of the machine. Hopefully it will just slide out and you can put it back in the opposite direction.
Sorry not to have noticed this earlier.
I would send a picture but my camera is not working. I can repair Adanas but know nothing about electronics.
Mike
Richyvk,
A couple of photos of the ink ratchet etc. You’ll find the HS manual here on Briar Press as well.
Thomas
HS2_4.jpg
HS2_3.jpg
HS2_2.jpg
HS2_1.jpg
Thanks so much for all you help guys! So very helpful.
Thomas - I note that your ratchet arm is actually different to mine - maybe I have a later or earlier model than you?
Mike - you instructions are so very helpful - thank you so much! I was looking at my machine for ages thinking to myself “if I put the ratchet arm in the position it should be it’s not going to clear the bed pressure screws” - why I didn’t think to switch the long screw for the shorter ones is beyond me - so thank you so much for pointing out what was staring me in the face!
I hope I’ll now be able to get the press up and running ready for my first printing :)
I’m interested as to your comment on large type - is it the case that the Adana prints larger fonts better? I have what i’m assuming is the original fount that came with the press - not sure what size this is, 12 pt?
Anyway, thanks again for all your help!
Richard.
Richard,
When you set up the press you will need to create a forme by placing a large piece of type in each corner of a chase and one in the centre. To do this you will need five large types — I use 36 point bold dots — some furniture and quoins.
Mike
Hi Mike,
Thanks for that - I have a lot to learn!!
I can report though that, thanks to your help, the HS ratchet is now working perfectly - complete with tinkerbell chime :)
Richard.