Help identifying these borders, milled bottom: perhaps European?
I’m helping a friend identify some borders, and while I’m pretty good with American type, these have me stumped.
No pinmarks whatsoever. All the bottoms are flat, no grooves, but interestingly the bottoms have marks like a saw blade would leave (sorry, no picture of this, but think arc patterns like on wood type) which leads me to believe that the type was milled down to be American type high.
Any thoughts on foundries or otherwise identifying these borders?
Thanks
Euro-mystery1-small.jpg
Euro-mystery2-small.jpg
Euro---mystery3a-small.jpg
Euro-mystery4-small.jpg
Part of the answer, (possibility) with conventional Micrometer or Precision printers type high gauge, ascertain if it *mikes*?
up to .918 plus/minus .001.?
If so, probably indicates that it has been milled down from Continental height, French etc
We have performed this operation several times in the past.!
The method is to Lock up whole fonts, Face Down in a completely slab side chase (no lugs or cut outs),
Bolted down (face down) on a conventional Milling Machine and just milled down, to .918 (point nine one eight)
We use a Kearney & Trekker 2 C.E. universal milling M/c.
The milling machine produces in virtually all cases, Facsimile of circular saw cuts, in horizontal form.
There are 2 fairly well documented forms:- Conventional Multi-fluted Cutters, which have to traverse the item in equal increments, on automatic advance, OR Fly Cutter, which is in essence, One cutter Tungsten, Carbide, sometimes Diamond, mounted and counterbalanced in a large hub.
Because of its nature it traverses the work (whatever) describing an arc with every pass, (hence saw blade syndrome)
,
We have tried with both type cutters, and found that the Fly Cutting method works best,
The multi-fluted cutters even on Automatic advance tend to leave very small but visible Tram lines & because of the Rake of the teeth do not disperse the lead swarf as well as the Fly Cutters.
This procedure partially failed just once, (Thomas Gravemaker can probably Cross the *t*s and Dot the *i*s) re Continental Heights, if possible and Thank you.)
The type was probably French, probably a Didot size and because we were trying to mill off/down a fairly substantial amount, with some of the wider Cap characters we broke into inclusions/bubbles in the body.
Perhaps, Monseigneur Pierre had a bad mixture Day?
Lead content OR dodgy French plonk!! Maybe.
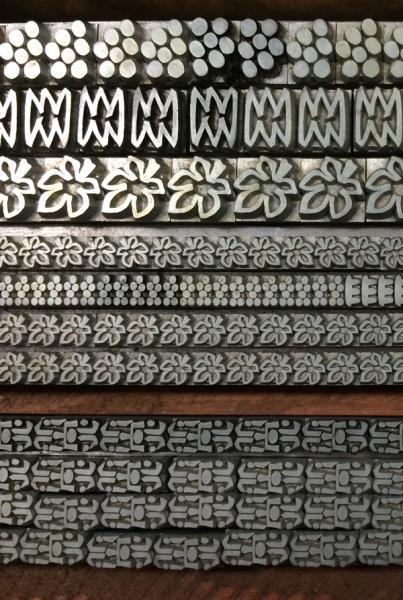
Most of these are in the 1967 catalogue from Stempel.
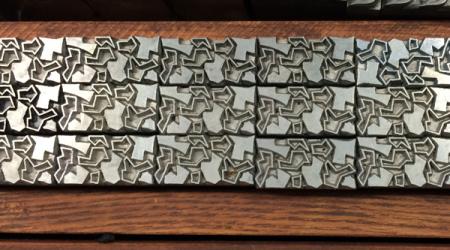
Pictures 1 and 2 are part of a set called Pan.
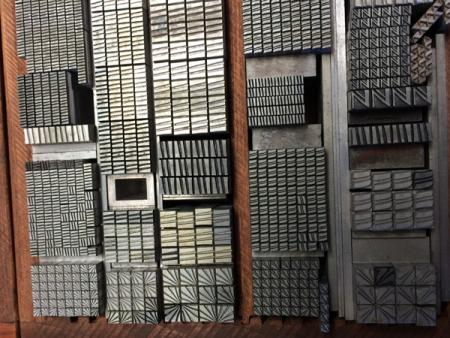
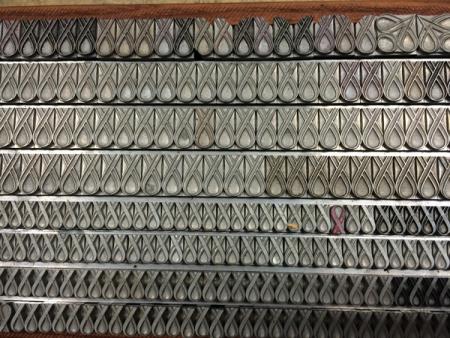
Picture 4 is Cocktail. I can’t find anything that looks like the third picture, though.
You guys are good. Well done!
Mick, yes I think that’s exactly what was done with this type. It was previously in a shop that would have access to such tools, or it could have been done before they acquired it. And good point about using a micronometer to check what to double-check exactly to which height it was milled.
Alan, excellent. Thanks so much, I really appreciate it.
So at least for photos 1, 2, and 4: German, Stempel foundry (with the names that Alan listed). And German would mean type at .928 inches, which would explain why it was milled down for American use. And most likely mid-20th century.
On next visit to my friend I’ll look for more clues about photo 3, but if anyone else has guesses, feel free to chime in.
Laura, one more blast from the past, which possibly the New Ones are not up to speed with YET.!
Hopefully you have passed this point already, but it has been achieved many times (of necessity usually).
If the point is reached where some really nice type is available but higher than normal and the option to have it milled down is not possible for whatever reason-Follows.
Make ready Line by line or paragraph by paragraph, *only* all standard height images, type blocks etc, all made ready to + .010 (.918 + .010) and then normal packing adjusted accordingly.
Laborious and tedious but satisfaction at the end when The beautiful type has been pressed into service.
Our (generally) older L/press guys are (in essence) doing this all the time, i.e when a letter or letters have been battered or badly worn and/or consequently low, needs must, often to make ready one letter/character with tiny piece of, acrylic sheet/litho plate/pen steel shim,***footnote etc to bring the battered letter up to height.
Unsavoury perhaps, but it was/is quite common practice for the minder to just spit on the back of the forme exactly where the low spot or character is, once the forme is snapped into place the make ready stays put, including down to the extent of one letter, with tissue paper as make ready.
***Litho plate, generally, clocks in at .090… Acrylic sheet is normally obtainable in a wide range of thicknesses .005 through .015 from stationers/photographic studios.
Pen Steel shim as used for protecting the Bed when cutting, creasing & perfing, also normally available in varying thickness from Graphic Suppliers. (possibly)?***
Mick, good point about raising .918 up to height of other taller type.
I have raised worn type many a time (although I have yet to try the spit adhesive technique! - we have vaseline and gluestick at the shop at school). But yes, interesting to think of doing that with mixed height type.