Golding Pearl No 3 Ink Disk Turning Assembly, arm, lever, pawl
Hi everyone!
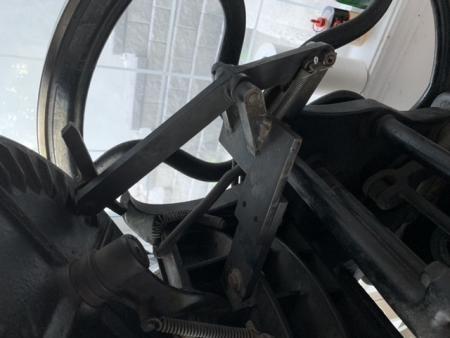
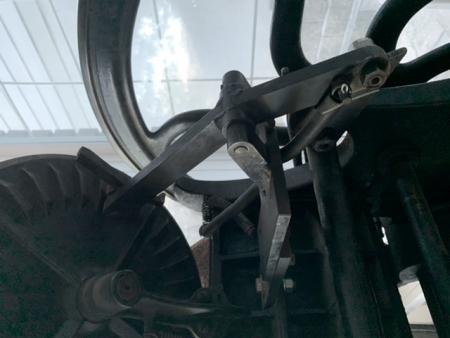
I was looking for some insight on the disk turning assembly. I purchased a Golding Pearl No 3 and everything works except the turning mechanism on the ink disk. I have researched online and it seems the assembly in the back is not original and was created in place of the original piece (see picture attached). I’m assuming this reconstruction worked at some point but does not work anymore. I’m looking to fabricate the original piece but I don’t have any measurements or an original piece to copy from. If anyone out there has any photos of the piece (and accurate measurements) and the back of their Pearl so I can see how it originally worked I would really appreciate it. I would love to get this press up and running!
As always, thanks to this amazing community!
EEA0EB39-A804-451E-B4AA-E20429D0C8C2.jpeg
1E0D2011-AD27-4215-A526-546198E8C19F.jpeg
Only observations I have are- that whole arm should move at some point in the cycle-the little pawl on the end should normally balance so that the point that engages is up, I think. Maybe it is installed upside down, or the other end has broken off, so isnt heavy enough
I have a couple of these No 3s and would be glad to take pictures of the original parts and how they work together if it would help.
In the original configuration, the assembly is composed of an arm that mounts to the top of the print bed, a lever, and a pawl at the top that engages the ridges on the ink disk. An elbow-shaped flange on the roller carriage engages the ink disk advance lever which drives the pawl and spins the ink disk forward, one notch at a time … at least that’s how I’d describe it.
The first thing I notice about your pictures is that the top of the lever is hitting the ridges on the ink disk, while the pawl is facing downwards. Is there any way to position the pawl so it engages the ridges as the roller carriage assembly cycles?
The fabricated pieces on yours look pretty stout and ingenious to me. Seems like it should work unless the geometry is somehow wrong. Also notice that the assembly is mounted lower, on one of the ridges at the rear of the print bed rather than the top as the original would be.
Best regards and good luck!
Chris
DSC_0207.jpg