Creasing, perfing and die cutting all at once.
Hello,
This is my first day here in this forum but I’ve been letterpressing off and on for a few decades.
I’m usually the one educating people on letterpress matters but now I’m in need of some education of my own.
My newest letterpress is a Heidelberg Cylinder press. I’d never seen one before 6 months ago so it’s a new animal to me. I have it pretty much figured out but the company has bigger expectations than I can deliver with my platen experience.
What I am having problems with is diecutting along with scoring at the same time.
I have scoring matrix available in all sizes so that’s no problem. I’ve muddled by so far producing a few hundred jobs but I’m not happy with my corners.
When a scoring corner comes together, no matter how I cut the scoring matrix, I get a buckling of the stock. Most stock I work with is between .012 and .024”. All of the jobs I have done on this machine have passed to the customer but I’m not terribly proud of all of them.
Adding to that issue is I have a difficulty getting a flat score near a cut as well.
Recently I had a situation where the stock was tearing near (not on) the score. It’s like the paper was being stretched when being scored but stretched beyound it’s limit.
On one job I was unable to compensate and had to have the die reruled from .895 rule to .885 scoring .024 stock. The other job I was able to shave the matrix a little near the tearing section to reduce the profile height from its 2.4X.070 std matrix. That time I was able to produce the job on .018” stock.
The next project I have to figure out how to do involves a perf at a 45° angle to a corner score. The sample that was provided from the last run (die cut at an outside vendor) showed the scores as being nice and crisp. The die cut was nice and clean. The perf, at the 45° angle in the corner of the scores was dimpling as if it wasn’t cut directly to the jacket.
So, I guess my question is, “is there a product or procedure I need to use to get the buckling to stop? And is there a product or procedure I’m missing that would allow me to perf at a 45° angle out of a corner score? How do I get my combo scores to be clean AND lay flat?”
I am attaching a crude example of what I’m describing.
Thanks for any help.
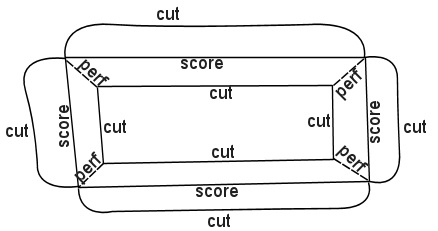
lpressdemo.jpg
hello , are you sure you have your pressures set correctly?
I don’t use a heidleburg cylinder, but rather a miehle 29 for die cutting, my standard knife height is .937, for .024 pt board I use a creasing rule that is .907, with a bobst matrix that is 0.5 x 1.7. for .018 stock, and .973 knife I use .912 crease and a bobst matrix of 0.5 x 1.5, your perf should be the same height as your cutting knife.
Yes, I have correct pressures. And, yes, the perf would be the same height as the knife.
I didn’t run the job that’s represented by the diagram. That was run by an outside vendor but the GM wants me to be able to match the results.
With the .024 stock I would use my 2.4 width matrix. I have a .918 knife and .875 score.
I am trying the .024 stock job, that I had reruled, today and will report back results with a photo of the issue as well as a photo of my matrix setup.
Thanks
When you have your position up on the sheet and before you add the matrix take a pull and be sure you have no distinct contact from your crease rule , a slight blemish here and there is ok , however if you can see the score clearly in most areas rule a wee bit lower still , you must bear in mind that the thickness of the stock matters in your calculating the two rule heights (cut /crease ) .Also the thickness of the base of the matrix
Your matrix width is best gauged thus …. .two thickness of stock plus one third of your rule thickness ,you will get a little less stress in the edges of the matrix and reduce your splits .
Twin rule crease is a dog even on good days ,good old fashioned planing down is important with this and invariably you have to chamfer the matrix in the grip .
Where your matrix butts a cut rule i mitre it even for a right angle meet and just scrape the surface off the matrix a little at the meet point .
Cut the matrix with a scissors to angle it where the rules meet.
Then cut the matrix a little short where the rules meet and use a piece of sand paper to lower just the edge of the matrix where the rules join up.
I have a matrix cutter that makes 45° angles on the matrix so that’s not an issue. I used to use nippers to make the cuts manually.
I tried shaving the end of the matrix a little yesterday but I think I shaved it too much. The score fell off a bit but the product was still sellable. I was still not proud. Maybe next time I won’t use a coarse bit on the dremel to shave the matrix.
I’ve always followed the rile of the matrix channel width being 2X paper thickness plus 2pt for the rule. That gives a clean crease. As for the height, if I see the score on the sheet with no matrix then I know the rule is too high. I usually do my setup just as you, Peter, have suggested with the die cut being the first setup (for position) and then doing the score.
It’s comforting to know I wasn’t doing anything horribly incorrect. It seems like the main thing is getting experience in sanding down the matrix when needed and knowing how close or far from the die rule the matrix should go.
If you leave too much gap at the end of the matrix when it butts to a cut you may get a bit of cracking but you have been there before me thinks ! As for sanding the matrix i try to shave it by scraping with a bit of old cutting rule so as to avoid abrading the cylinder jacket ,its a bit of a thing i have , I dont know what they cost you but they are about £150. each in the uk ,i can usually keep one on the go for a couple of years or more ,unless i get a dodgy die with a bit of wrong font in the rule !! The reason i dont allow for the full rule thickness is because the work edge of the rule is rounded so the full width doesnt actually sit within the matrix, however it was meant as food for thought not some draconian instruction .
Do you use steel backed matrix (like “channel” ) or do you use the “”cito” type with a plastic backing to it ?
I use 3 different types (and 4 brands) of matrix.
The 2.3 (which I have been saying was 2.4) is a cito type.
I generally use a 1.9 or 1.5 channel type matrix for just about everything thinner than 18mil.
Then with your selection you have options to swap around to find what suits the job in hand , i think at this point you are more than equipped for it you just have to take on a bit of patience and self confidence , do remember that a flat sheet as sent out after process may not look at all bad when assembled , a minor blemish at the foot of a crease is glaring at you on a flat sheet often dissappears once the fold is made .
Cracks between twin or capacity folds are a differing grief there is a trick for the really narrow capacity folders that require you use the plastic cito style matrix ,i will if you are in trouble with one of these i will try to get some photos done and get a mate to ppost on my behalf for the benefit of our watchers !
Have re read your original post again ref a pile laying flat , well next week we are posting how to turn water into 100 octane fuel …………
It is a “thing” of horrors to move a cylindered job across a yard on a pallet truck i liken it to moving a stack of un wrapped jelly , dropping half a ton of die cut work on a wet yard is a definate suicide inducer ,i have come close to tears because of it in the past!!
I reduce the handling of cut work to the minimum by not using the wheeled boards in the delivery of the press but to lower the delivery down to the max extent without over running the delivery hang wire , place a B2 pallet in the space on the floor in the delivery area , get two square section 1”” steel posts that will span the delivery carriage , put pallet in on the floor and pass the bars between the carriage and the pallt and wind the board up on the carriage ,this way you dont have to keep un loading those dreadful steel trolleys that wont wheel very well and invariably tip the job up if yo hit a join in the floor . you reduce handling to the extent that you can run two presses side by side without the grief of handling the die cut stock at all. Once the pallet is full you remove the bars ,remove the sheet stops and put in a pallet wheels lift board and wheel out of the machine , no stacking off!
Good ideas on the delivery.
I was just planning on getting some decent wheels and making new boards that will span my small pallet jack.
I have 2 three wheel boards that look almost as old as the machine. I also have 2 four wheel boards that appear to have been manufactured by a drunken chimpanzee out of particle board.
I won’t often have more than 8 lifts worth of work so I plan on 8 boards. I’m sick of building pallets of die cut stock just to have someone off load it onto the cutter. I want to eliminate some of the work from the process. MY work, to be more precise.
Just get some planking that spans the delivery carriage and add feet that your pallet truck will fit beneath ,if the idea makes no sense let me know and i will add it to my photos on the phone and get it loaded on here for you to suss out .
Your idea makes sense but it’s not practical for my work environment.
I just picked up some casters for $6 per set of four. I can get a 4’X8’ piece of 3/4 inch maple faced plywood for less than $50.
I think I can get 6 delivery boards from a one piece sheet for a total cost of less than $100. My employer should go for that. They probably wouldn’t blink at three times that cost.
And since I’m building them, I can make them work with both the pallet jacks I use.
Anything that reduces you having to handle the stock is a good turn , I hate stacking off just to move a job from one building to the next , if its an out work job you shrink and strap onto the pallet straight out of the press (just how lazy i really am !)
Hi
After looking at many of the comments on here for a while i thought i would add my contribrution to the site.
Firstly a little bit of background: I started my life in print on 19th July 1973 and have ran some sort of print press every working day for the last 40 years. I learnt letterpress at print college. Vertical Miele, 2 rev Miele, auto victoria, thompson platen and of course heidelberg platen and cylinders were all learnt in time. Make ready using primaton or chalk relief methods were still taught! As was running four colour process on the cylinder using klischograph engraved block sets. Seems really slow and strange now but thats how it was done untill the mid 70’s! I ran litho most of the time at work, plus some experience on flexo. ( envelope machines). Now amongst other things I run Heidelberg cylinders ( SBB and SBG) on cutting /creasing.
Fold flat cartons, covering sheets for rigid boxes plus envelope blanks are the general mix. Anything from 70 gsm bond, up to 500 gsm board. This is the setup i use which i hope may be of use to people still learning to cut/crease on a cylinder. By the way i use the word crease rather than score as strictly speaking (in the uk anyway) a score is a cut half way through thick board.
Firstly fit new steel jacket packed level with bearers, this should last at least two years with care ( as peter luckhurst says), (he is the fount of all good knowledge on this site by the way)
All cutting/ creasing formes are 23.30 cut height. crease height (up to about 300gsm) 22.80. For thicker stuff up to about 500gsm i use 22.60 crease With a ground bed, under the forme is the steel plate plus 7 sheets of packing. Lock the forme up on the bare bed and plane down well
I used CFB NCR sheets for packing, one ream will last me a year at least. I use cito creasing matrix, cut with a proper cito matrix cutter so angles are allways perfect. (I almost always use the same size of matrix for material between 120gsm and 220gsm, its the cito pro grey size.) Cut the matrix just 1 mm shorter either end of the crease and press it on firmly , take backing paper off and roll the press over. ( on light forme) Normally the matrix sticks to the cylinders ok but if it doesnt just drop it on to impression for one revolution. . With the forme I almost always take the cut blade, parallel to the grip edge, out. This keeps the blank in the sheet ok, no nicks are needed and you can run the machine faster. Plus you can knock up really easy, so I run one trolley full of work, swap trolleys over and knock up completed work on a table and place on pallets. So easy to guillotine then, just pick a wedge of work, place up against back guage, cut and strip away waste. Of course if the cutting forme has a rounded blade then you will have to nick the blades to keep the blank in the sheet, then I just strip out the first trolley, while second trolley is running. I rarely have any problems with this way of working, I can makeready a B2 sheet with an average forme in about 20mins but of course it all depends on the type of work you are doing. Hope these comments are usefull for someone, but often what works for one in this trade doesn’t for other as there are so many variables, but there basic rules of the trade we should all try to follow, beginner or old hand alike.
SteveT
You are die cutting heavy stocks for a cylinder. I have to die cut heavy stocks also on my cylinder. I can’t use ccm matrix on those jobs. I have found a much more reliable matrix from Schreiner. It is a low profile matrix that holds up beautifully on long runs. It is all plastic so it can be cut on the cylinder. The impression is solid from end to end the full length even on a score that has a tab knife at each end there is less trouble with the knives bearing off the score impression. I cut with scissors getting close as you can to the knife by cutting first end then laying matrix on the score then push down on matrix at other end so the knife that the score it is meeting marks the locater showing you where to make the end cut on the matrix. Then cut your corners, put the matrix on the cylinder. If you are too long you can cut it on the cylinder easily or you can use a fine file to clean up the edges if needed. They sold me 3 sizes of matrix that will work on text stock thru 24pt. They made it pretty simple. I find this matrix is also better than Cito. I cut 918, score 890 vertically and 900 horizontal. Keep in mind that a lot of the paper we have to score is recycled stock and then you have printers adding coatings and heat which makes for brittle stock. Do yourself a favor get the Schreiner matrix, it is also cheaper so your boss will like it too
If saving cost is your thing then buying matrix in coil form would suit ,its plastic backed and comes in the same size range but you have no off cuts . Cito i use only because one of the companys i work on their presses also cito on the offset litho in the print pass and they prefer to keep the same supplier .
As I am based in uk I cannot buy Schreiner matrix. Ive used channel or cito for years but prefer cito pro. I use the white matrix size on on the heavier boards, never really have any problems. Its normally WLC ( white line chip) or FBB ( folding box board). We also cut 1000, 1500 and 2000 micron grey boards. We use the heidelberg platen for 1000 micron and a crosland hand fed platen for the really heavy weights.
Actually cost saving is just an unexpected benefit. When I put that matrix up it goes up perfectly because the locater is IN the channel, not welded across the top like the other two brands mentioned earlier. Also, There is a big time savings for me because I rarely have to work on the matrix once it goes on the cyl. I appreciate what you are saying but changing over worked well for me
Steve t
Ever tried green when the stock is really thick using 2 or 3 pt rule ? Channel type .
Peter
Green original matrix is fine but I used to use pink.
They are both 0.58 deep but the pink is slightly wider- 2.1 instead of 1.9. All depends on the material really. I only used to keep about 4 sizes of the shelf. One almost always suited any material from 80gsm to 485gsm! (approx 700 micron)
I get the occasional job for tight register folding that require narrow rule and gold matrix creasing 120gsm designers sometimes dont realise what they ask of us ,few of them ever saw a folding machine nor understand even how they work but they ll design it that way any way !!
Peter
You have spoken with wisdom. There in lies the cause of many a pressman’s grief and lost hours of sleep.
I suppose I should look into Schreiner matrix.
The stuff I have been using is left over from a shop that closed over 5 years ago.
On a different note…
I also believe a jacket should last a couple years but yesterday I actually cut through my best jacket. The press has a “repair” in it that I’ve never had to cut on top of. Yesterday I was cutting and when I was done with the 15,000 run the jacket had cut through.
Oh well, now I get a new $500 jacket!
Thanks for the help, guys.
I would remove a litle packing in that area if it is cutting through the jacket , i dont think ive had to die cut on a bad cylinder except one ,that machine is out there somewhere waiting to go bang !I have just finished a full out B2 ,also 15000 run there is just a shiny polished outline on the jacket ,there should be no discerning cut mark at all , It is a good run and consistant height , I have to re run these dies regularly and although the jobs must cut through i am more conscious of the jacket and die as cut jackets kill any die set upon them and the start of a life of expensive misery , If you are setting six runs a shift at a cheap die cost of £1000.you get to re use those dies if you have good jackets , a die should run ten set ups and ten runs of 3000- 7000, copies each run , re using dies is the bigest saving any finishing department can make , i have run dies that were over £5000,each run 40000, you would buy new jacket and bed blate before you ran it , we did four styles of that job and if you dont want to waste money you sometimes have to spend it . Get an engineer to look at the cylinder , in house die cutting is a must in our environment and a little expense is to be lived with .
Good luck .
I agree with you about the cost of dies and jackets.
I looked at the die that cut through the jacket and it still looks new.
The cylinder was built up with a soft tape so I think that allowed the jacket to flex back and forth.
Most of the jobs I run leave nothing on the jacket for damage. I always tell my boss that you can tell a good setup if, after the run, you can see the die outline on the jacket but you can’t feel it.
I run about 30% acid etched dies and those have to be reused over and over. They are the most fragile and I’ve not killed one yet.
One of these days I’m going to do an epoxy repair on the cylinder so it’s neither high nor low in that area. Luckily it’s at the tail on the last 2 inches so I can avoid it with most jobs.