Uneven inking & printing large patterns
Hello!
I was wondering if there are some well seasoned printers out there who can help me decipher my 2 issues
uneven inking… how do you know if your platen isn’t parallel or if your rollers aren’t even or if you have too much ink? (I have a crap load of tape down to get the rollers high enough)
One side of my print is perfect and the other side is too heavy.
I wiped the ink off and printed - same thing happened. I flipped the chase, and same thing again (which you can see in the print:) But that still leaves my rollers or the platen.
The second issue, my guess is that I chose a pattern to heavy & large for my press, but not sure. I have seen samples others have printed, maybe they had a larger platen that could put out enough pressure for a large pattern. Some say you can print 1/2 the size of your platen, and others say 1/4.
I have and old style C&P 8x12.
printing a 5x7 600 lb. lettra
Packing tympan, top sheet, 100lb sheet and a piece of press board.
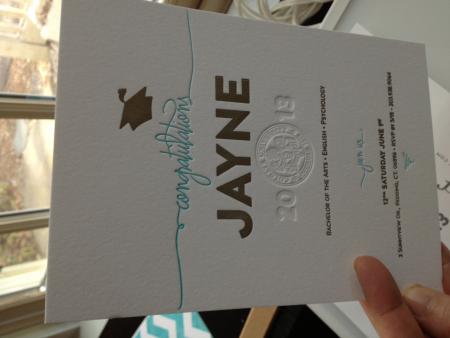
photo.JPG
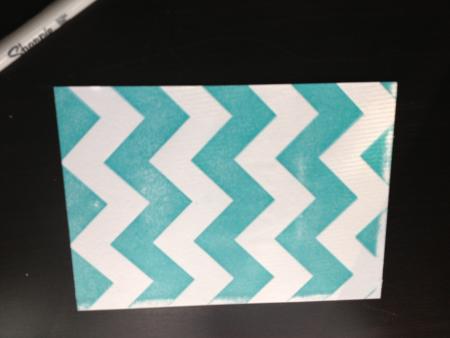
photo1.JPG
Yes, printing large solids in my experience is much more problematic than printing text or small images.
My suggestion would be to double or tripple-ink.
That means skip feeding one or two times.
See where that gets you.
Definitely on impression is going to be harder for the press, so you might not want to strive for the same result in pressure on the front as in the back.
But it looks more like an inking issue than a pressure issue.
That’s all the advice I can give since I’m still learning myself :)
I don’t have a C&P, but I do have a Windmill, so some of the packing issues are similar. From the image of the reverse side, it looks like your packing is out of alignment, so you’re not getting the full impression on two edges of your print.
As for ink coverage, Enrique sounds about right to try double rolling/skip feeding.
If you don’t know if your platen is leveled, then go through the steps to insure that. There’s a number of descriptions on how to do that in the archives, but basically lock up 4 large pieces of metal type in the corners and adjust the impression screws until they all print evenly and well. Your packing seems a bit heavy to me. I use a manilla folder and two or three sheets of 20# paper.
Also make sure that your printing area is completely on top of all of your packing.
If you have a type-high gauge, check the height of your printing surface (in multiple places) to make sure that isn’t the problem.
You might try roller bearers, instead of the “crap load of tape” to see if roller height is a problem. multiple pieces of metal rule can be used for this in a pinch.
You are asking a lot from that 8x12 with that zigzag pattern. You might want to cut it in half and print in two passes.
My guess is you are printing with photopolymer and looking for a deep impression. An 8x12 is a bit underpowered for that with large solid areas such as the zigzag.
You might want to try the thick plastic tape that NA Graphics sells. 1 piece of that and a few pieces of masking or whatever tape is probably better than dozens of pieces of masking or whatever tape.
Interesting! I will try the tape! I think I have 6 layers of packing tape on it. no joke, but that is what it took to get the right stripe on the roller gauge.
I did tripple ink, but maybe I need more ink on the press entirely. I always go light, cause its easier to add then take away.
@jonsel: I didn’t set the plate exactly to the edge cause I was afraid of marring the bc base with the gauge pins. but my compressable pins just arrived, so I should be able to fix that. they are great!!! I super glued them to the tympan, cause they do tend to slip and that held them on, but they can still move.
I do need to adjust go through the steps to adjust the platen, and conquer my fear of making it worse!
Do you have a even and stable packing? From the print looks like the papers inside the packing are not in line.
I believe you mean 600 GSM or 220# Lettra. ;)
I agree that something funky is going on with packing or something on the edges of the second side…. however…
Considering the amount of impression, you may want to compare the problem areas in the middle of the press sheet to the location of the printed areas on the first pass. If they match up, it may be due the the differences in the compression of the fibers from the previous side/run. You will probably see that the areas that are blank on the opposite side will tend to get better and more consistent inking vs the areas that have been hit on the opposite side - blind hit or with ink. This is a great candidate to print each side on 110# Lettra and then duplex. Your results will be much more consistent.
It does look like the impression on the reverse of the zig zag is showing in the copy you show ,also if you have it shown in the same plane as you printed it i think you can see the roll out (ink lightening as it goes down the inker travel and the rollers literally run out of ink). As suggested above go through one thing at a time ,level the platen , even if you have to hand ink the form , then you have your roller height to deal with ,dick ge made a good suggestion ref tape he puts it on the trucks (roller bearers ) rather than the rails/runners (bed bearers) My little treadle i had the roller covered to my spec to ensure that i would not need to tape anything ,maybe if you get through this job and find you are running the press with miles of tape you should look to do the same .
thank you all so much for the advice, it was so helpful and I was able to sort it out and print it perfectly (well close to perfect hehehe).
@babolina please share what the offending issues were and resolution so others can learn from the thread.
The quick solution was:
heavy ink and 2 impressions to get ink coverage, and a little make ready. just to get the job out the door.
then I solved for my rollers… I found that my press is inking unevenly because the rails seem to depress more in the middle. A combo of rail and truck tape seems to be it for me. Taping trucks alone wouldn’t solve it, and very carefully staggering the tape on the rails alone was a time consuming disaster. So a combo of taping the trucks to get the top and bottom to 3/32 on the roller gauge and then solve for the middle by a few layers of staggered tape on the rails.
photo copy.jpg
Patience and dilligence will get you there every time .