Community Art Event: A follow-up
Briarpress,
After a bit of discussion here before this event happened I thought I would provide a follow up for reference and response to those who initially provided their thoughts.
A grain of salt (or whole dang tub): I am, without doubt, a new printer: went to school for engineering, and my experience in the printing world involved a short internship in Minneapolis a few years ago. Furthermore until 21 months ago I hadn’t touched a press in over 5 years. I’m an experiential learner and took on this project to learn more about my press and gain experience in community art involvement. It was also a potential dry run for an upcoming project next year both for me, and to see how responsive the family demographic in our community was to printing.
The Idea:
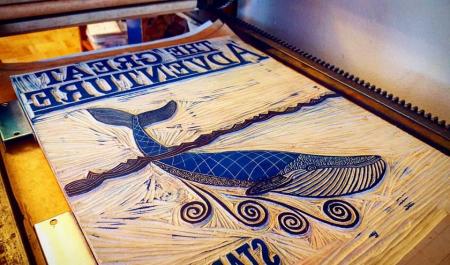
Create a movie poster that the kids could add their names to as the ‘star’ of the show. This would involved both the understanding and demonstration of traditional printing methods, and a chance to play with large type. It also allowed for a unique and personalized product they could take home.
The Type:
Using regular wood mounted linoleum we used an X-Carve CNC machine to mass-carve the letters into the blocks. The files were created digitally, mirrored on Illustrator and exported as an .svg file to the Inventable’s software Easel. We experimented with a few different pass techniques, I’m sure any type producer would be able to better explain the use of different bit sizes and such but it wasn’t too tricky using a robotic router. Props to all who do this by hand! With the CNC running, a good 8 hours later we had a full 7A font of 10-line type (Gothic Condensed). With the help of Rick Allen at The Kenspeckle Letterpress, we cut apart the letters on a furniture saw, that alone took a good 2 hours or so, though I think with a better layout of letters we could cut that time down. To finish the letters I sanded the sides, and also trimmed/cleaned the letters both in corners and to remove any remaining lino bits from the routing process.
The posters:
Hand-inked 12”x18” lino block, single color, printed 175 posters. Having used Rick’s vandercooks before I had an idea of what kind of packing was needed, getting the ink quantity down didn’t take too long. With the help of a friend we finished them in a few hours. For a first go with my own vandercook, it wasn’t bad. I made my own pin registration system which helped, the original design had two colors but due to time it just wasn’t worth doing. Pick your battles they say, or time is money and I have loans to pay.
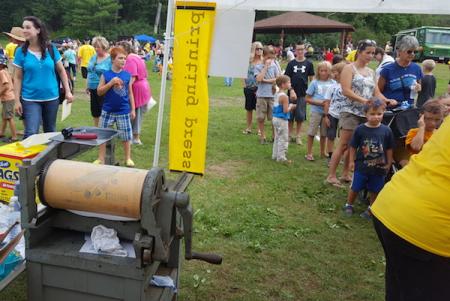
The setup:
I have a 1937 Vandercook No. 1 single truss with a weight of 260lbs or so and a table it comes off of that weighs about 50. Having moved it from the original owners home it stayed in my living room (fantastic conversation piece) until moving it out to the SUV, and into the park. We placed it on a leveled sheet of 1” plywood. Leveling and plywood are both important. Grass is a pain.
The operation:
For the event we had four volunteers at the booth not including myself, which was more than enough. Essentially it worked as such: kids would one at a time enter the booth and with the help of one of the first two volunteers, spell out their name in type and place them on a galley. Gloves were used and only the volunteers touched the letters. The letters got inky and we didn’t want a ton of kids getting inked up. The kids then carried the galley over to me at the press and we set up and locked up the letters, showing the kids that everything went in backwards. After a short narration about ink the letters were inked, the preprinted poster (with the main image done) was added to the press and while holding on to the poster myself, the kid and I grabbed the handle and ran the poster through. With a grand TA-DA we showed the kid their poster, the parents took a picture, and we rolled up the poster to dry.
You heard that correctly. With the design we had, their name was at the bottom of the poster, so it could easily roll and as it was the only wet item, they could carry it around to dry, hands untouched by ink.
Safety:
Most of the objections to such an event of this forum were about safety. Honestly, outside of carrying, the risk was little. I had an extra hand at all time to keep an eye on the kids and the press, honestly their parents were even more-so guarded about the kids only touching the press/handle when I allowed them to. We also had the volunteers who were helping them set type explain that they could only touch the handle. Having the kids carry their own galley was also beneficial as it kept their hands full and away from anything else while I was cleaning the type between each use. The only injury that happened was to me, when I didn’t explain to a few guys who were helping me carry the press back to the vehicle where to grab. I got pinched very briefly, bled, but have frankly injured myself doing dumber and more obvious things.
Conclusion:
Hauling 300lbs of press and materials to the middle of a park is totally worth. Yes it was heavy. Yes it was a pain. Yes I printed stuff basically for free and probably could have made more, but the event paid for all materials, and honestly, seriously, a kid’s smile is so dang priceless. Emotionally gratifying, Yes. Financially worthwhile, doubtful, and that’s why I have a full time job, and most definitely not the point. We had a good dozen parents ask for knowledge of local framers for the poster, and I got a couple of clients out of the deal too, so maybe not that financially irresponsible after all….
Lessons learned:
-Don’t use water based Speedball Ink at the event, it drys in minutes and gums everything up. After a short switch, we returned to an oil based process blue.
-Don’t forget solvents for the event. Duh. Luckily I live 6 blocks away and my brayers were forgiving.
-Print more posters, in the 5 hours we were there, we had 165 (make-ready and demos took up the other 10), and could have easily done 250.
-Take more pictures.
-Bring shim blocks, twigs are rather inconsistent.
-Kids freaking love printing, we have a good 3 potential events going on next year in addition to returning to this event.
-Bring more cleaning materials than expected, it never hurts to have hand wipes, wet wipes, rags, towels, and a full dispenser of solvent on hand, just… just in case. Not that we used them, but I’m glad they were there.
Thanks for reading this dumped out barrage of my thoughts at 11pm, hopefully it provided insight and perhaps if we’re both lucky, some help, or entertainment to you veteran printers…. watching a green printer run about.
Cheers!
mnreggie
ArtInMe.jpg
ArtInMePoster.jpg
Congratulations on what looks to have been quite a successful venture! The poster woodcut is really great — I would love to have a copy my own self! And you are totally right — the grin on a kid’s face when he/she gets that print is near priceless. Especially if he/she actually printed it. A lot of work and, it seems, a great reward in satisfaction. You are to be admired for wading right in and doing it instead of hesitating based on the comments. Well done!
Bob
Bob,
Thank you for the kind words, message me your address, I’d be happy to oblige! All in all it was a great way to learn a ton of things all at once, although admired probably wouldn’t be the right word, I definitely made plenty of rookie mistakes along the way.
Cheers!
Reggie
I agree with AdLibPress, that was a fantastic and informative post sir. I had fun just reading it. As a newcomer to letterpress also, community events really interest me as well. Such a great opportunity to expose others to the process. May I contact you for some more information?
Tony
Tony, of course!
Shoot me an email if you want:
reggie [ at ] pressdunord.com