How to free up impression lever on Farley Model 2 proofing press?
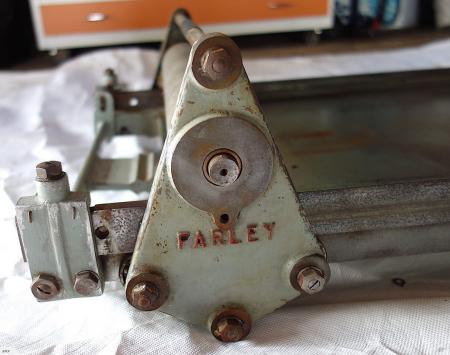
Hi, I have acquired what I think is a Farley Model 2 proofing press. This model has moving bearers and a lever to set the impression to with galley or without galley. See the pictures.
It does not have the common impression dial which some models have on the side arm of the impression roller assembly.
Here is a link to a catalogue page featuring the press.
https://www.flickr.com/photos/160661384@N06/31365764827/in/dateposted/
I think the photo at the top of column 2 belongs to the press listed at the foot of column 1, but I could be wrong!
On my press, I cannot move the impression lever. It is either rusted or gummed up or somehow set in position.
Before I try to drown the press in WD40, I would like to know:
—On these models, do you have to undo any bolts or whatever when shifting the impression lever from one option to the other? Or should the lever move freely between the two options?
—If the impression lever is jammed up, what bolts should I undo to free up the mechanism?
—If I undo bolts and loosen the bearers, how hard is it to reset them? Or, more usefully, what is the process to reset them?
Thank you for any help and information you can give me on this press.
Roger
945699110.jpg

945699156.jpg
A few humble and basic comments which may or may not help, apologies if the later applies.!
Stuck/seized on one of two possibilities, (A) straightforward rust accompanied by oxidization between the (Steel) Rails and the (Alloy) side stanchions - never a good combination, slightest damp in the environment and the Steel sweats.?
(B) Stuck rather than seized from congealed lubricant leeching from the tracks of the eccentrically (adjusted) bearers. The bearings/ball races are the open type pictured just! as opposed to the packed for life variety, but can be turned to advantage >see under<***
If You are not confident re dismantling, no too much of a problem, acquire just a shallow drip tray, even the liner from a redundant fridge door etc.,
*respecting the disposal of C. F. C,s of course*
In the appropriate area, sit the entire press in the drip tray, baste/soak the entire M/c., with as little as 1/2 litre of ordinary (auto) Diesel. or T.V.O. (pink or clear matters not) generally regarded as superior (by many) to W D 40, etc.,
it penetrates and creeps in everywhere, Yes, leaves a tiny oily residue which is not a bad thing.!!
The hard impression roller is virtually impervious to most all chemicals.
Allow the whole shooting match to drain down, 24/48 Hrs, longer if poss., Cotton waste for the final wipe down, and then, specifically, the Motorcycle Guys weapon of choice for lubricating the Chains on their M/c,s
I.E. AEROSOL propelled lubrication, can with the fine bore 1/16” extension tube fitted, will actually enter the gaps in the Ball Races/Bearings & the Imp., cylinder side gaps, for as much or as little quantity of grease as required.
Initial seize problem, once soaked etc., because the (arrowed) lever only has a minimal amount of travel (up and down) < - less than 2” maybe, and probably by design to allow only minimal pressure on the *PEG* that cranks the Rails up and down.!! again once soaked, gradually work the lever up and down until full travel can be obtained, assisted in most cases, by MANY small gentle taps on the ends of the bearer Rails with, at best, a small lump of lead OR small copper drift = end to end side to side ? treating THE operating pegs within the Yokes of the levers with care, of course.!
Once the carriage is traversing freely, it may be found necessary to take any slack/lost motion out of the carriage atop the bearer rails, (not too big a problem) via the eccentrically adjusted roller bearing races, under the Rails, they, the races/rollers, keep the impression cylinder in contact with the rails, (often need cleaning from rubbish dropping onto) adjustment achieved by progressively, and one at a time x 4, front and rear, slacken off the Lock nut(s) and with a normal flat screwdriver bring the eccentric spindle(s) up to gentle contact, in each case, possibly repeated twice, three times, to achieve overall end to end contact but without noticeable play in the carriage, even humble Proof Press,s with imp. roller in fair condition can produce passable proofs/pulls.
The above offered in good faith. Good Luck.
Thank you for all the info. A friend sent me a video showing how everything is supposed to move and it is all so much clearer now.
I don’t think I can upload videos to this site. So, if you want to see the video, send me a request.
For a while, you can download the video from: https://www.dropbox.com/s/hs4zore3wzm4hr6/IMG_0204.MOV?dl=0
Roger
Roger, your uploaded video is a perfect Visual example of my crude written description of the working of the *Pegs* within the *Yokes* adequately describing the need for caution and the delicate touch with seized items.
Thank You also. Mick. U.K.
Here are clearer pictures of your Farley, sorry bit late,
cheers John
SAM_0668.JPG
SAM_0669.JPG
Thank you all for your info and an especial thanks to John for his copy of the catalogue entry. Incidentally, where was the catalogue published?
I got the impression lever and everything else to work after spraying WD-40 everywhere, judicious tapping with a rubber mallet and slackening off the four top screws (one at each end of the two longitudinal bearers). They may have been overtightened before I received the press.
I will now try to print something and get a tympan and frisket made. If the impression is poor, I will try to follow Mick’s instructions about adjusting the screws I loosened.
Thank you all, again.
Roger
The information came from this book,
cheers John
SAM_0670.JPG