Arab platen press
I have been looking for something to occupy my time (30- years in prepress and pushed out when diagnosed with parkinson’s). I had been obsessing over treadle presses, and thought that using one would be not only be fun but would re-engage my brain, not working has been a far from pleasant experience. So through a bit of luck, I came across an Arab platen press for sale for the princely price of $1. It is a bit rusty, missing the treadle, a few ink rollers, has a repaired crack/fracture near the bottom the right hand side frame, and the wooden tray was broken during transport.
Dates supposedly early 1900’s or late 1890’s.
It is small about 900mm wide 1m long and 1400 mm high approx, the chase’s external measurements 375 mm x 290 mm…internal 325 mm x 232 mm (have the chase at home) …
It resides about 1hr 20 min from my home, getting it back would probably then be a 3-4 hr trip … what would be the safest way to place it on a trailer, use a skid/pallet or mount it on 6 x 4 planks? (the previous owner has offered the use of an engine block lifter to get it on and off) and strapping it to get it home in one piece…
As it is top heavy what are the best points to use on it to tie/strap it securely and safely.
Lastly if by luck all works and it arrives in one piece, what advice can you give me on restoring it?
I have alot of time and are very patient, it was pouring rain when I went to look at it and have only one pic but will be getting back to it next week
cheers and thank you
arab.JPG
Stet. !
Well done, for taking on what some would think of as a Big First step/Undertaking. Few wrinkles that may help:-
re the broken/cracked main frame,! unless You have access to Cotton Wool/Featherbed transportation, maybe a couple of steel Rods as *SPLINTS* around the break secured with 4/5/6 giant *Jubilee* (style) clips.
On a substantial Pallet including a sheet of Multi-Ply 10/12 ply, to spread the load over the feet/blocks of the pallet and to accomodate the legs of the fork lift or pump truck. !
And OR 2 substantial baulks of Timber/Lumber fore and aft under the feet of the press, with 2 transverse spacers, if poss.!
Generally a Bob Weight in the flywheel brings the platen to rest in the fully open position, if possible achieve this position, with smaller ratchet straps, tourniquet/anchor the Platen in this position, & again with ratchet strap(s) anchor the flywheel BUT only to the base/pallet material, via the periphery of the flywheel, (ideally 5 o,clock and 7 o,clock) never to the spokes sideways. ?
Strapping/Stropping down for transportation !
Usually Ideally Minimum of 4 Strops (viewed from above) in *X* format but again ideally Machinery moving strops which have >Factored In< sliding sleeves to protect/cushion the machine on the corners, + and very important, where a strop goes over the Mainframe or Components at least ONE turn around such points, centrifugal force and inertia are powerful adversaries, (author - learned the hard way once)
More info, as/when if needed. Good Luck Mick. U.K.
thanks Mick …after killing a 2 tonne engine lifter by some miracle it’s home in one piece …now to get dirty before it’s usable…:) will not complain about having nothing to do…
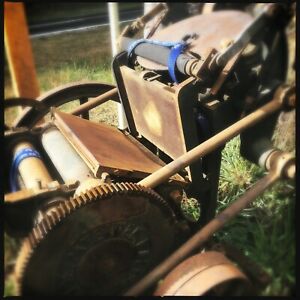
side.jpg
wheel.jpg
front.jpg
Well done. Now the graft really begins.
As it is under cover, but not yet in a confined space, and presumably reasonably well ventilated space, perhaps consider purchase of 1/2 Gallon of ordinary Diesel fuel, fraction of the price of proprietary brands W.D.40 etc.
With a *Coffer Dam* of redundant towelling or cotton waste etc., around the base, just baste/saturate the entire M/c. 2/3 days, with the diesel, it is excellent for penetrating everywhere, leaves a minute film behind, and acts as a lubricant as well. - The coffer dam retains the Diesel and with Rubber Gloves can be recycled over again.
The machine can be cycled by hand, via the flywheel, and the diesel can be seen leeching out of the all important bearing points, shafting etc., noting along the way where all the seen and maybe unseen oiling points, are inc. the (out of sight) brake shoe mechanism and the REAR low down treadle fulcrum, the shifter shafting, (fixed and free pulleys) for example.
Regarding the oiling points that are just recessed/concave oilers, as with the points on the connecting rods for the Platen proper, as a matter of course, we just wire a felt *torniquet* around such points, and oil the felt occasionally, system borrowed from our Thompson Platen, i. e. central reservoir with Felt Wicks supplying remote needs.
******
Grandmas, much loved >victorian< Felt Hat mysteriously disappeared early 50,s, the Moths got the blame, but She (Grandma) did NOT buy that one, probably because we inadvertently left the minute remains of some felt on the kitchen table, after making a tiny felt oiler for the Rotor Arm on the Triumph Thunderbird magneto. & Granny DID ride pillion, once without a Crash hat, Leathers, or Flying jacket.
******
Chris, - Good Luck. - Mick
Thanks Mick…Well it’s been a week, everyday I would spray/drown the little arab in wb40 and rattle the flywheel left and right , never getting more than an 1/8 of movement until yesterday when it finally did a full turn and now after another spray it moves freely, and the back half moves as it should, but the front is still stuck, the impression lever will not move. After giving it a proper once over/inspection my little arab has gone through hell, it looks as if it was thrown down a flight of stairs with all the little and big welds, not knowing the terms/names of the bits on it will make it hard but there is no giving up. The piece pictured has snapped off at some time does it perform anything vital in the running of the arab?
n.jpg
Somewhere on the web is a photo of all the separate parts ready to be packed it might help you to identify it…has been linked on Briar too….
Thete is a short vid on you tube of one operating…
jonathanjeclipse I have the parts list and watched all the vids …none show what it does
Chris, in Your shot above depicting the snapped part, can be seen a square headed bolt, which normally implies that the part and bolt in question has a tapered point on the inner end of the thread and locates in a corresponding concave recess in the shaft that it sits on, to effectively keep the part/section in timed and synchronised attitude, one with the other.
As their is no (apparent) room for lateral movement, even if it were free, the best guess, is that originally the snapped section and the shaft that it sits on would have described an arc, or at least a partial arc, on a horizontal shaft through and across the mainframe.
With a large pair of plumbers expanding *water-pump* pliers or a large self-grip wrench or even a chain wrench (as used to remove the oil filter on Autos) attempt to rotate the broken part and its associated shaft, whilst observing the other side of the main frame for corresponding movements, may reveal clues to its use, - belt shifter, handbrake, etc., all guess,s unfortunately, apologies.
As You imply that one main section is still siezed, with a small cable winch, or ratchet straps, torniquet/secure the 2 main sections together, just enough to take the pressure off of the 2 side arms, which can then be removed, - tapped off gently whilst, (the main parts) still anchored and retained by the cable winch/ratchet strap(s) both of which normally come with click stop adjusters, meaning they can be cranked UP & OUT one tooth at a time, with the side arms removed You should have the means to *inch* the sections together, slightly, >and apart< with a baulk of timber/lumber, via the straps or the cable winch, released one tooth at a time, begin the freeing process, including Coffee breaks, of course.!
What we have done, and still, in the past with stubborn seizures, mixed 50/50 Thin Oil 20 W. (ish) with liquid metal polish (U.K. Bluebell, Brasso etc.) and with a squirt can, even with a simple plastic extension, squirted the mixture into, and around every visible oil port, shaft points, bearing points etc.
Even using hydraulic brake fluid, which is normally crimson, or similar good thin lubricant and gives excellent visible results when leeching out and down the main frame.
Perhaps take a close inspection of the teeth of the main gear wheel and its associate pinion, the tooth, last but one going out of shot, looks a little suspect, or perhaps a lump of type/foreign body may be present,! cycle the press by hand and slowly/carefully, and check each tooth, including the teeth on the pinion gear looking for teeth worn to a knife edge, normally there is an odd number of teeth on the pinion gear ? to distribute the meshing of the 2 gears, on a constantly progressive mating/meshing cycle.
Whilst cycling by hand, and slowly, with a very narrow Brass (not steel) brush 1/2” wide at best, scrub the teeth out, with special attention to the >Valleys< of the pinion gear teeth.
Good luck. Mick
thanks Mick will give it a try tomorrow, as with the snapped part, I think that I am in the shit, see pic supplied, it’s going to slow things down a tad.
broken.jpg
Chris, From Your shot above and from the prior n jpg! My best guess is (and that is all it is at the moment) the section You have high lighted, we would normally refer to as the, Cam Track which drives in eliptical motion the Cam Follower, which is actually A hardened steel roller, rotating on a cast iron spiggot, that carries the motion through to the relevant part, which I believe would have been the missing end of Your broken section.
****
This whole sub assembly was/is crude at the best of times, because the reduction from the main gear wheel and the pinion is at best/worst in the order of 10-1, usually with little or no means to lubricate the Cam follower and Track ?
****
There is on the Monotype virtually the same system, but fortunately in horizontal form, and can be oiled fairly easily, BUT because of the massive drag and friction involved through the Cam follower and Track can noticeably make the drive motor labour, under adverse conditions.
****
When You are in the rebuilding stage take a close look at the edges of the Cam Track and with care & caution, remove the razor sharp edges of the Cam track, inner and outer, usually with strips of emery cloth on the face of a FLAT file, and again, when rebuilding, with a plastic spatula or similar, lubricate the Track & Follower with either *Copper slip* grease or at worst H.M.P. Grease,(high melting point) mixed with Graphite Powder, usually obtained in small cans, or plundered from You local Friendly Linotype operator, space-band cleaning equipment.
Pro Tem, My Mouse is reposing, Good Luck. Mick. ! ?
Yu might get a reply from Patrick at The Logan Press as he has restored and sold many…
And may have a spare part….
https://readingtype.org.uk/wwp/arab-instructions.html
Pin interest has a photo of an Arab that might show this part….by Phil McMullen
thank you Jonathan, I have been in contact with Patrick, he has an Arab with a similar issue, and he has the parts to fix, just waiting on a price to get them made (milled) and posted…:) All is not bad at least:)