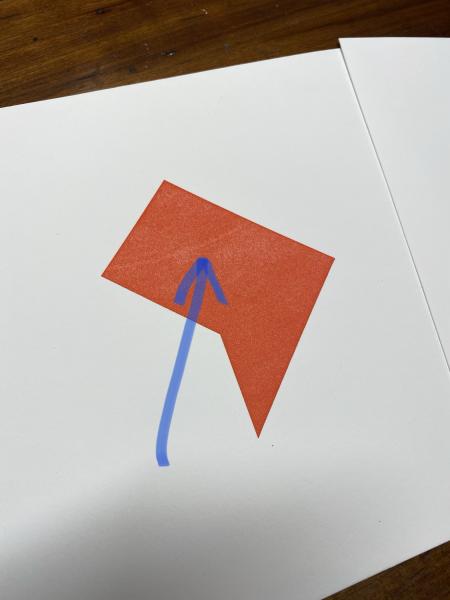
Ink disk groove showing up on printed image… help!
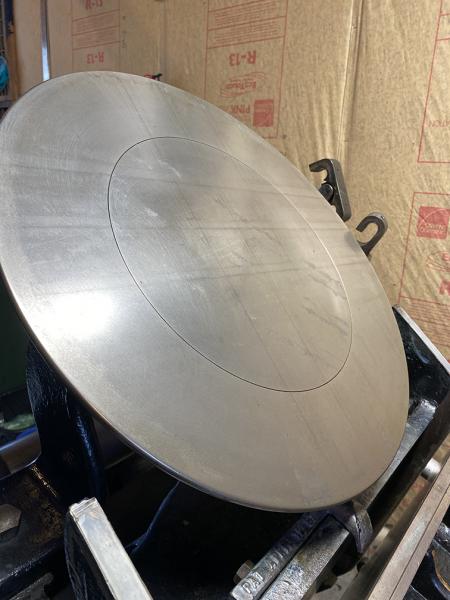
I have a C&P 10x15 oldstyle. The disk has an outer ring and inner circle… they do NOT rotate independently of each other, but spin all together.
I have noticed in my prints lately that the grove is being picked up on the rollers (or a lack of ink where the groove is) which is then in turn showing up on the printed image. This is especially noticeable with solid shapes. It did not seem to do this before.
I have tried to use three rollers vs two and the line still appears. I have also manually rotated the rollers just a bit when this happens which elevates the issue for a couple prints before the line returns.
I have been cleaning out the grove with a toothpick after each print do get the remaining ink out… perhaps the fact that it is clean and not filled with old ink/residue it is more prone to being picked up?
It is at least my theory that it is being caused by the groove as it shows up on different plates/designs and i have inspected the platen / packing / tympan for irregularities.
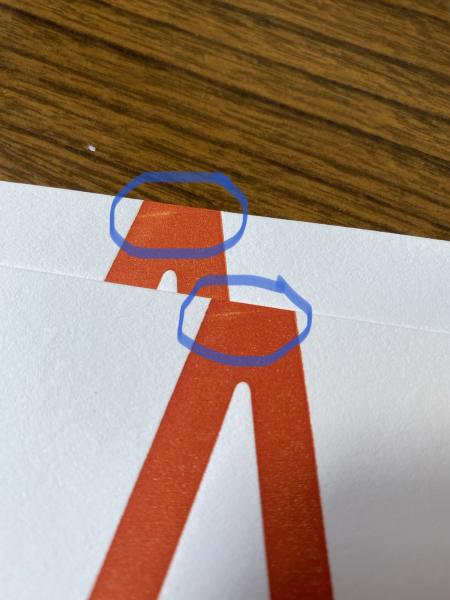
Not sure what to do here! Any thoughts? See images for the disk and resulting line in image.
IMG_1496.jpg
IMG_2361.jpg
IMG_2365.jpg
IMG_2367.jpg
IMG_2369.jpg
Fairly simple to fix.
C&P made the split disk model for a couple of years. It was more trouble to clean than it was worth.
Think of the groove as a deep circular scratch on the disc.
You need to fill it.
Go to the automotive store and look for an epoxy body and fender filling compound like Red Hand or Bondo. The container has more than you will need so you will have a lot remaining.
Alternately get two packages of epoxy glue from the hardware store. One may not be enough and the remaining extra will not be excessive.
Mix the two part epoxy and fill the groove. Use ink knife or popsicle stick, or similar. Be careful to not include bubbles.
A little above the groove or over the edges is OK. You will remove the excess.
Do not rush the job. Two days to dry is good. Sand down the extra material with fine grit emery paper on your planer block or similar. A very little bulge is OK
Get some ink on your shirt,
inky.
I have one of those split disks on my 8x12, with the gears so it counter rotates. Counter to other’s experience, I haven’t had any problem with the cleaning of it so far, and it does seem to distribute more quickly. For yours, I’d try taking it apart and wire brushing the mating parts, maybe the inner isn’t sitting as flush as it might. a lot of people seem to run them without the gears ( so they both turn together ) without trouble.
In my suggestion for filling the groove above I neglected one instruction.
Thoroughly clean the work area of the disk with alcohol before applying epoxy.
Thank you, for the thoughts.
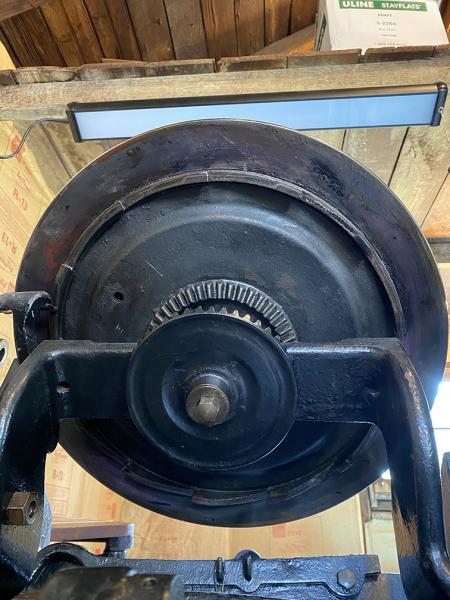
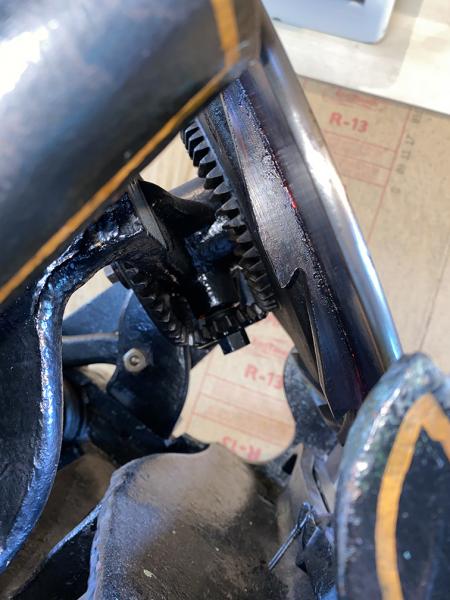
@scottbaldwin I had wondered if this was a counter-rotating disk.. i had taken it off and tried to see if I could remove the inner disk thinking that it has just been stuck shut after have been sitting for decades. I could not get the two apart. Here is what the bottom looks like.
I like the idea of just filling in the grove. Someone else said I could take it to a machine shop to have it filled and leveled.
IMG_2369.jpg
IMG_2367.jpg
Your press has the bottom gear and even the side one. These are the parts that would allow it function with the inner section spinning the opposite way. Often one or both of the lower gears are missing. I would be more inclined to try to clean it and get it working correctly than to try to fill it in. It is a pretty cool feature!
DGM
My $0.02 worth of advise is to restore the ink disk function. You seem to have the parts though some element has to have failed for the inner disk to have stopped its counter rotation. Disassembly, thorough cleaning, inspect the parts, analyze the fault and then make a decision. I bet many press operators would like to get their hands on that gear assembly.
Tom
www.tandtpressrestoration.com
I was able to separate the two pieces! Going to clean it up and put it back together and hope for the best.
IMG_2379.jpg
For what it’s worth, I had something like this showing up a few years ago and I started popping out the center section every few jobs and giving it a good cleaning and it helped keep the ghosting at bay.
I think what was happening in my case was the press wash was collecting in between the two sections and causing issues.
It’s great that you still have the gears- I’d definitely use it that way. One note- clean the inside and backside of the mating surfaces well, and just a very light bit of oil, or none between them- too much can wick out of the joint and cause that kind of ghosting. Just oil the shaft. When you clean up, don’t flood the disk with solvent. Note- the reason it may not have been rotating is, there should be a pin on the end of the inner shaft that engages with the gear- sometimes that was removed, not hard to fix, if so.
Hope you fixed your issue. I don’t have this press but I did have an issue like yours with rollers that were older and had started to crack. At one point I had a slender slit that made the same mark but it moved around since the roller was not hitting the printing plate the same way each rotation the mark moved. The slit caused a moving lack of ink mark mostly on a solid. A low spot on a roller caused by the repeated contact with the disk might do the same thing. I replaced the rollers and it went away. I would think a softer durometer roller would compensate for the change in disk height. I am sure the smart guys will rip me up, but best to cover all ideas rather than fix what was not broke to start with.
I got it running beautifully… but the grove is still showing up! This is quite frustrating. It is a bit less noticeable, but still there… now what??
2618.jpg
noplan,
Is it fully functioning now with both pieces rotating opposite directions? If it is, and it’s still causing an issue, you may need to just find a solid ink disk for it to replace your split disk.
yeah, exactly BComstock. Looking to get a solid replacement.
It’s hard to tell from the picture that you posted but if you take the printed sheet that you made and hold it up to the ink disk does the curve of the line match the curve of the split in the disks or does it match the outer rim of the outside disk? I tried to do this test with our C&P against the posted picture and it looked like the arc of the printed sheet was closer to the outside disk but I couldn’t be sure using the posted image. If the arc matches the outside rim of the outside ink disk then you don’t need a new one piece disk. You might need to lubricate the roller bearings or check if the ink disk is flat to the rails at the point where the roller rolls off the disk. These issues might disrupt the layer of ink on the roller as it leaves the ink disk and create the problem.
Just a thought
Bruce