Roll Alignment at OHT Windmill
Hello everyone!
Please tell me if anyone knows? Why are these adjustments on the OHT Windmill?
In the photo, the screw that lifts the rubber roller (and metal roller too) is circled in red. And in yellow is the screw that lifts only the top metal roller. If at all twist slightly, then they both stop rotating, since the grip with the lower rollers disappears.
So what are they responsible for?
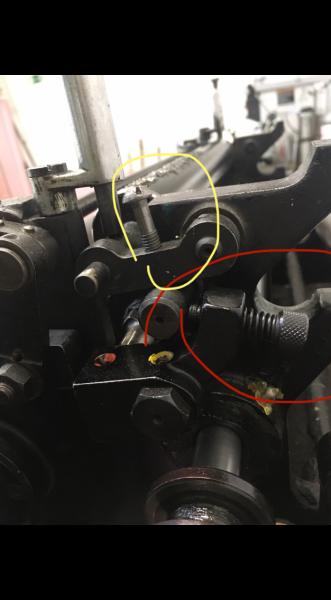
2020-12-14 13-36-43.JPG
The screws you have highlighted are for adjustment to get the rollers parallel, pressure is set with the spring screws above them.
Put ink on the press, run it for a bit, stop the press and lift the rollers, check your stripe at contact point for evenness across the rollers, use screws to adjust so stripe is even all the way across.
Having the rollers parallel with help with more consistent ink flow over your plate.
Jim
The screw in yellow is not the correct part, it should be a spring loaded screw setup like the one in red. I look at this as a push - pull setup to create both tension and a control setting for roller positions. The rollers provide ink to the drum, the drum to the impression rollers. Happy drum, happy impression rollers, happy job, happy client.
2 jfitz
There it is! I understand now … tomorrow I will check your words. Thank you!
2 western411
Yes it is. But the previous owners apparently worked this way …
In general, I have not yet encountered the problem of uneven adjustment of these rollers … but it may well be worth checking out!
these were for “composition rollers” not rubber. Hence no need to use it. If composition (gelatine) rolls were not set properly and had too much pressure, they would break down with friction. per earlier comment, the screw is not correct either.
2Nick Howard
Thank you!
but to be honest, for the first time I hear about gelatin rollers on OHT press
Do they somehow affect the print result? Maybe you know for what purpose they are used?
The way I use these adjustments and I may be wrong is: The inking rollers are a more rigid rubber durometer and used to transport ink. As time goes along rollers will shrink. I use the adjustment to keep good contact of the rollers to each other and manage the contact bead or nip to get predictable ink supply to the drum and thus the printing form rollers.
These pictures are from the Heidelberg instruction book.
When I set the rubber roller I very often use 2 strips of thin stock to pull out when I think the setting is right to guage if the pull is the same on both sides.
hberg rollers 2.jpg
hberg rollers 1.jpg
2frank hemmings
Yes, I saw this part of the instruction in the book, then I tried to twist it while working, and what? It only got worse))) Do not get me wrong - I did it as in the instructions, but the print result only got worse … So I thought - maybe I misunderstood what was written?
But in any case, I have no problems now! And this thread is just out of curiosity))
Thanks everyone!