Image “stretching” problem on Vandercook 3
Hi all, hope all are well. I’m writing with a strange issue that confounds me while printing reduction and multiblock linocuts on my Vandercook 3. I’ve been making a series of 4-color reduction prints that have printed perfectly on the first 3 layers, and then on the 4th, where there is generally much less surface being printed and smaller, dispersed areas being inked, I’m getting an effect of the impression stretching out, and thus printing out of register.
When I first got this press I had this problem but it was much more pronounced. The press initially was lacking (and please excuse my ignorance of the correct terminology) a metal sheet in the press bed to bring the base up to an appropriate height for contact with the cylinder, according to the man I bought it from and other print colleagues. I acquired that, and have had some success printing reduction and multiblock images since but the problem continues to rear its head in confusing ways and at confusing times, and makes me it difficult for me to know when a problem I’m having with registration is due to this phenomenon or something else. Perhaps there is some issue with having too much packing on the cylinder? Search me.
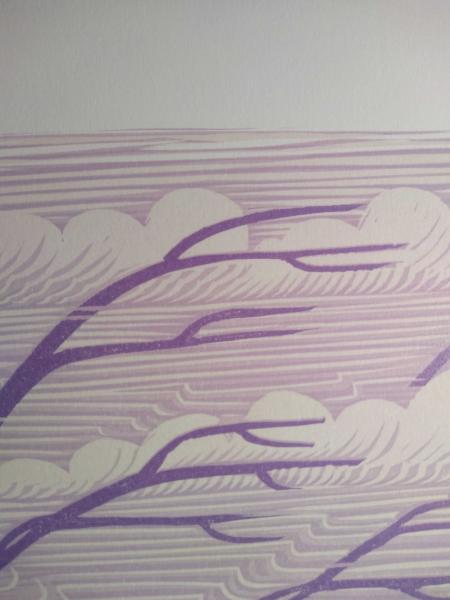
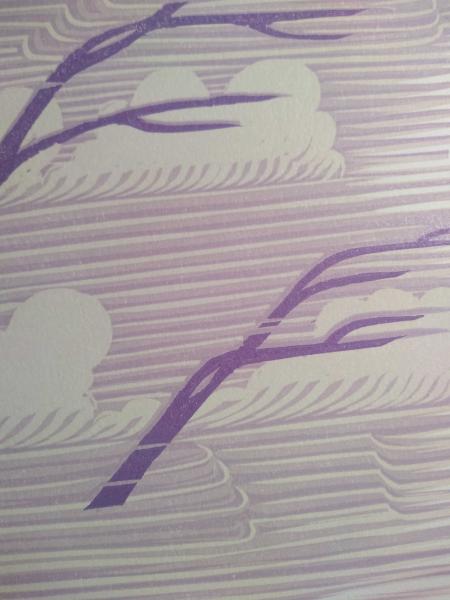
I’ve attached some images of prints- in “print1” you can see the top of the print (at left in the press bed) with the last dark purple layer aligned with the rest of the previous reduction layers. In “print2” you see that the last purple layer has migrated down 2-3 mm (to the right in the press bed). I’ve measured the shapes as they appear on the block as well as on the impression, and the distance from top to bottom of the impression on the last layer impression is 2 mm longer than same distance on the block. How can this be?
In “print3” you see the bottom of another 4-color print (the right edge of the it as seen in the press bed) and here the 4 colors align perfectly.
Anyone have any thoughts? Again please excuse my mangling of terminology and hope this doesn’t give anyone a headache. Any suggestions much appreciated.
print1.jpg
print2.jpg

print3.jpg
First thought was difference in humidity causing the paper to change size. If it only happens though, on plates with little inked surface, maybe some play in the gearing? I’d try using plate high bearers on either side, so the cylinder is for sure turning at the same rate all the time, and see if it makes a difference.
That looks like what happens than more Pressure is applied, as the stretch is in the lower part of the image.
I would do a little experiment: add packing to the cylinder (and at the same time reduce packing under the plate so you don’t over impress). That should change the length of the printed image. (To reduce packing under the plate you might have to take out the metal sheet and replace it with something thinner like pressboard, chipboard, etc). I think that will make the image longer but can’t remember for sure.
If you do the opposite: reduce packing on the cylinder and at the same time add packing under the metal plate on the bed so that the printing plate is high enough to print, that should change the length of the image in the opposite direction.
I would experiment with different thicknesses of packing and see how much the length of the image changes. Then if you have a problem with one color of a job, you will know how to adjust the packing to get it to register with the other colors.
It sounds like you already know that changing the packing thickness and plate height affect the print length, from when you tried to print without the metal plate under the printing plate. By the way, the thickness of the metal plate is usually .050 of an inch.
Geoffrey is right on, the relation of packing to form will control print length. There is another factor. Production cylinder presses have a cylinder brush that makes the sheet conform to the cylinder through the print stroke. Vandercooks only have those spring sheet supports; they don’t do much except reduce tail slur, and register between forms is really up to the operator’s left hand to control the sheet.
I have a large Vandercook, 24x24 form size, and in any long form with open areas, I put material in the gaps to support the sheet so it does not sag. Any sag in a form and it will print long. Scrap binder’s board works well to build up supports (that’s what many foundries use to protect their fonted type, save it). Improvise, and stay below roller height.
Now, I would not expect much sag in a reduction print, where the dead areas of the linoleum block act as support, but thin paper and a thorough clearing of dead areas could allow some sag area.
Fantastic, thanks for these suggestions. In my feverish examinations and comparisons of distance I had determined that what Parallel Imp calls “Sag” must be happening, but it seemed implausible. Glad to hear that this is a normal problem and not a distortion of the reality field!