Twisting narrow stock with gauges on windmill?
Hi there,
I originally started printing some business cards 4-up. However, I was struggling with inconsistent coverage. Since I was using a photopolymer plate, I decided to cut it in half (and the paper) and go to 2-up. I’m printing with gauges (this is a 2/1 job with the front needing tight register).
I’m under the impression that if using the gauges (brass), I need to have my stock on the extreme left of the feed table. This makes sense, given where it needs to be when dropped onto the gauges.
However, since my stock is now 2.75” wide (8.5” tall), I’m seeing it rotate when printed. I suspect that because of the narrow stock, when the gripper brings the paper down to the gauges, it is twisting, and can’t recover. Does this seem like a reasonable assumption?
If this is the case, how do I remedy the situation? So far, I think my options are to switch to gripper register so I can feed from the middle of the feed table (and catch more of the gripper) or use wider paper (even though I’d still only be printing about 2.25” of it; I don’t want to do this unless I have to as it would mean using/wasting more paper).
Specifics: 10x15 windmill, brass gauges set at about 50% and 90% (if 0% is extreme left of lay bar) , Boxcar base with photopolymer (mounted extreme lower right when facing press/chase), 110# Crane Lettra stock
Thanks for any quick responses!
Matthew
EDIT: Added pictures.
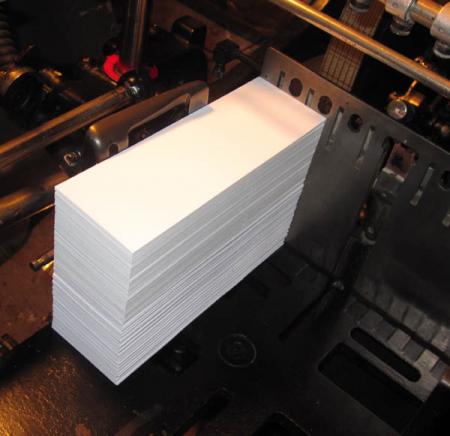
Feed table - things look good, yes?
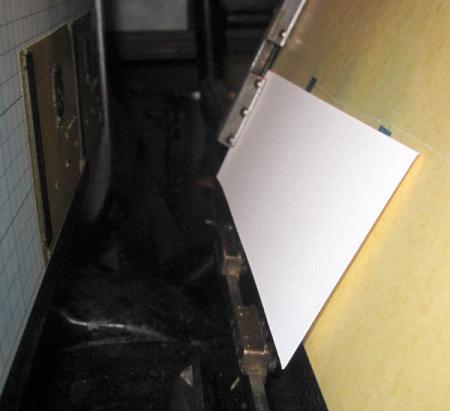
In grippers near lay gauges - eyeballing it, things appear OK at this point
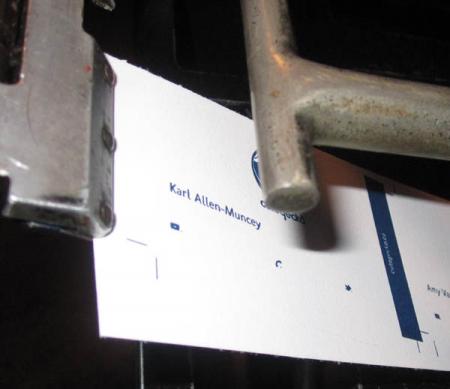
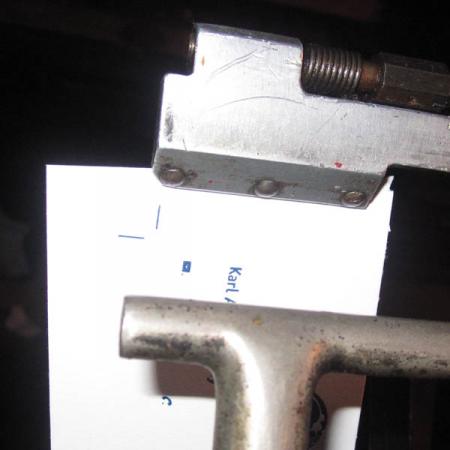
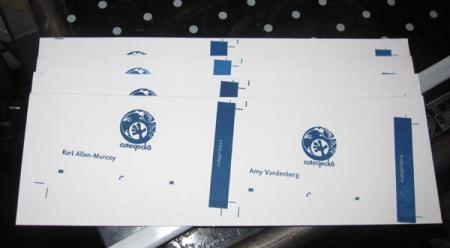
Just before release on delivery table - using crop marks, it looks like the cards are square to the gripper, but the paper has obviously twisted
Results - Not completely consistent, but certainly not random. It is a bit hard to see, but there is a little ‘notch’ in the top left corner of the paper (FIXED - side guide was coming up and clipping the edge, I backed it off as much as I could)
EDIT/ADDED: If I move the left standard in a bit on the feed table, twisting is removed. This isn’t a fix, but just another piece of evidence.
1_FeedTable.jpg
2_InGripperNearLayGauge.jpg
3_Delivery1.jpg
4_Delivery2.jpg
5_Result.jpg
Put a pin in your guide, it’s jumping over it. A paper clip will work.
Thanks for the suggestion. I’m using a Boxcar base…won’t a pin in the gauge just get crushed and/or damage the base?
I did manually ensure that the paper was on both gauges for one impression (stopped the press, ensured it was on both gauges, run) but either that wasn’t the problem or the problem re-occurred or occurred post-adjustment.
Thanks,
Matthew
without a pin your paper will keep falling off the pins, that kluge girl knows her windmills.
Put the pin on the far left guide. Make sure your base is locked away from the bottom of the chase to allow room for a pin. Use a short 1/4 inch pin, bend it away from the paper (towards the form), as needed to help keep the paper from jumping over or under. You could tape a piece of card stock to the pin to make it longer and not worry about smashing your base. Run the press at a slow speed. Looks like you should have room.
This is one example of why Dick and I like hot type or wood mounted cuts vs a box car base.
Hi all,
OK, I tried putting a small pin into my leftmost gauge and adjusted the position of my base in the chase slightly. Running at slow speed, I’ve confirmed that the paper is released and falls into the gauge tracks.
As I mentioned above, I had manually set the paper on the gauges previously (prior to using a gauge pin). In both cases, I’m still seeing twisting.
The only thing I can see come into play while watching the platen close is the side guide. As I’ve mentioned, I’ve moved this as far to the right as possible, but I’m still seeing it come up and jam into the corner of the paper — it causes a dent and (I thought) could be pushing the gripper edge of the paper to jump the right lay gauge.
So, I tried replacing the right lay gauge (which was T0265F, the regular right gauge) with the auxiliary lay gauge (T0276F) and a small pin to see if that might (assuming my theory was correct) prevent the paper from jumping the right gauge as a result of the side guide coming in and bumping it. It didn’t appear to make a difference.
Does anyone know a way to take the side guide out of the picture to test this theory?
Thanks all,
Matthew
OK, I removed the side guide to see if it made a difference. Twisting was reduced but there were obvious (other) problems. I know it wasn’t a reasonable solution, but I wanted to see what would happen. On the plus side, the corners of the sheets were no longer getting pinched/crushed.
I tried to slow the press down considerably. Unfortunately, when I did, the belt seemed to not like it and a nasty vibration and noise ensued. I was unable to reduce the speed past a certain point and didn’t want to risk damaging anything, so backed it off.
Sigh.
Matthew
Did you try moving the right lay gauge all the way to the right, past the adjustment holder? just a thought.
If you now have a pin in the gauge and you have having the same problems, the stock is now probably missing the pins.
The reason is that narrow stock runs wide along the gauge, and wind from the speed of the windmill rotation swooshes underneath the stock.
Stand 90 degrees to the machine, in front of the flywheel, and with your right hand, inch out (as in pull out in tiny bursts) the clutch.
When the flywheel is nearly closed, visually check to see that the narrow paper is straight along the gauge bar. The pin should be to the left of the cross section of the lettra.
If not, when the windmill is open again, and safety is on, you need to move your brass gauges, or make a taller pin.
If you are worried about the pin smashing into the Boxcar Base, within the chase, move the Boxcar base up with furniture. I can confirm your stock (in the photo) is tall enough for this to happen.
Next time, print business cards 2 up the other way: ie standing vertical. This will make your paper stock more square, and less reactive to wind/speed of press.
Good luck and persist with the bit by bit troubleshooting. You’re almost there.
You need the right guide to be all the way right, next to the gripper not in the middle. You don’t need a pin in that one. You can also side your paper over to the right about 1/16-1/8 inch.
Thanks for the help all. Dinner break and then will try a few more of these suggestions after.
Matthew
If problem persists after you have tried all the above get a couple of two point leads and put them down the front of the stack in the feeder stick them to the feed board with double sided tape dont protrude beyond the top of the feedboard but make sure the bottom of the leads go below the bottom of the stack this to reduce the amount of paper in the grip giving the sidelay a bit more time to raise before the sheet hits it , it might serve you to also get a small strip of double sided tape strip both peel offs away and stick it in the face of the right hand brass lay to give the surface good grip
The image you show does say you need to carry a lay pin too ,if you are scared of damage to the ali base use the fat nylon bristles out of a yard broom they just squash ,ok they wreck polymer though .
I have just noticed you too require that you fit the lay device that fits from the back of the platen and will have to also remove the standard side lay .The lay device is partnoT0278f extended side lay gauge it bolts to the rear of the platen (underside) and protrudes up at the bottom of the platen atthe point wher the gripper comes to rest during impression .
Hi all,
Things appear to be better after the latest round of adjustments. Ultimately, I think there were two things I was doing incorrectly:
1. I didn’t have a pin on my left lay gauge.
2. I didn’t have my right lay gauge far enough to the right. I now have three gauges in play.
With these two corrections made, I tried a few speeds (+/- 500iph) with no degradation in print alignment. That isn’t to say that it wasn’t a variable, merely that with the two aforementioned adjustments, such speed changes are ‘handled’.
I’m still seeing the side guide hitting the paper on the corner. I haven’t the energy to tackle it tonight (although I think Peter’s suggestions are on the money).
In any event, I’ve got some printing to finish!
Thank you all for helping a rookie (first job on the windmill). Even if your specific suggestion didn’t help with this problem, I’ve picked up five or six tricks to put in my head for the next time!
Good night,
Matthew
How about, just after the paper gets picked up, stop the press and turn it off. Then slowly turn the flywheel by hand (with clutch engaged of course) and watch the whole scenerio in s-l-o-w motion. Sometimes this might help. Also, is the screw in the ‘with guides’ position on the gripper head?
Just a thought. Good luck.
I think you will get the hang of it everyone has to start somewhere, you just picked the worst scenario to start from !! A small one up business card printed to register was one of my twelve test pieces and other than a huge solid i cant think of worse job to do .
I can see that the sidelay needs exchanging for that one that fits beneath as you are printing on a sheet that is too narrow for normal set up .
Hi Peter,
I’m going to dig around the garage tomorrow to see if I can find the extended side guide.
Thanks,
Matthew
you did read dennis bs post above did you i didnt think to ask if you have the cam on the gripper control in the right position (with gauges) ? I didnt think to ask that !
The only advice I can offer, which really isn’t much help this time around, would to be to print on more of a squarish sheet whenever possible. In this case print the card 3 1/2 x 4instead of 7 x 2. Long narrow sheets seem to give most every machine an issue.
Hi all,
Yes, I had everything set up for lay gauge usage.
I now know long and skinny isn’t ideal. :) Lesson definitely learned.
I couldn’t find an extended side guide…something that looks really, really close, but no luck. I’ll have to go over the parts box, parts book and manual again to see if I missed something.
Ran the second colour today. Not bad…bit dicey as I had a 2-4 point lateral shift in some cases due to the missing side guide. If I can’t find the extended side guide tonight, sounds like I’ll need to call Don Black soon.
Thanks,
Matthew
You have to run with some guide on the side ,if you have none you wont register properly . otherwise you will have to stand on the other edge and run ever so slow that will work but much more difficult to run having such a small edge to square up to . put up a post in the site and ask who has you can borrow ive only used it a dozen times in thirty plus years !
Put up a pic of the part you think looks like the special lay , it is a sort of right angled plate with a block on one end with a bolt through it that wont pull out?
Long and skinny, short and fat. These presses can register unbelievable even with the size of a business card. Takes time to figure it all out.
once he gets his head round the use of an extended lay he will be fine as you say it takes time to figure it out .
Patience is a virtue i was taught , good printers are full of that !!!
@Peter Luckhurst
I re-read page 80-81 of the manual (in bed, last night), then realized I’d tried to mount the part the wrong way (and was originally confused by the parts book picture of the item which seemed to imply the bolt hole was in a different spot than it actually is).
After running down to the garage (in pajamas, of course), it *was* the correct part and is not installed and ready to go.
Time to take it for a spin.
Thanks!
Matthew
6_ExtendedSideGuide.jpg
Not in your pyjamas one would hope although i have to admit to have adorned carpet slippers on the job , If you have trouble to get accuracy change the leads you are sticking to the feed board to 6point to decrease the grip yet more . there are actually proper spacers for this they are 1/4x 3/32 x10” or so long and look like shepherds crooks they hang on the front of the feed board and hold the stock back . I did wonder if you had actually got the part as you were bound to eye it up to the front of the platen !! it is a bit of a fiddle and remember to remove the normal lay altogethr . even though the extension fits from below ,…..
Just remember patience and little by little you will get there
its not impossible its a process that has been done for 80 years !!
A small note of warning reference the bolt that attaches these parts . The thread is extremely fine on these and never use a driver to start them off if you can do it by hand ,every effort must be made to protect the thread they are easily damaged with being forced if not located in the hole right .
Unfortunately you wiil have to make your adjustments to the form as there is no micro adjustments with this little gadget. Everything has a cost if it makes something extra available to you !!!
Reference confusing manual ,wait till you have parts that are not in it!
A funny point , there is a heidelberg manual cant remember which ,either cylinder or platen in which they explain why they are called by female terms and are moody sometimes . A reference to the packing says Tampon !!!! See heidelberg knew they had built female machines !
Matthew
was the image square-on before the paper was cut?
Alan.