New woodtype
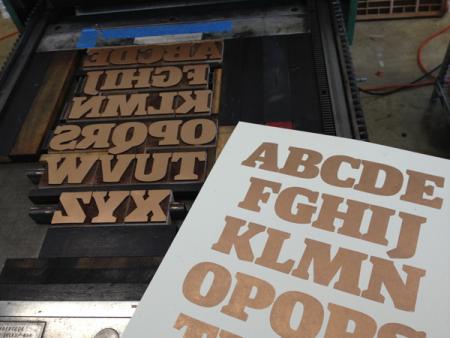
I just received some new type I had laser cut in hard maple. My friend Aaron designed the face in the Type@Cooper program last year and it was just begging me to make it into wood. So I did and thought I’d share. I found the effect the grain left on the non-face parts of the letter to be pretty interesting. It’s not high enough to print, so I’m not worrying about it.
http://www.flickr.com/photos/voteforletterpress/sets/72157629163467276/
proofed type.jpg
Very nice, Jonathan. We did some specimen prints with the completed faces here in the studio at Cooper Union, but the type was at much smaller scale and printed from photopolymer.
http://www.flickr.com/photos/thearm/6032397807/in/photostream
It does look really good in a larger size. I hope you made more than one of each character. As a guide, there are some decent wood type fonting schemes on the Virgin Wood Type page.
http://www.virginwoodtype.com/Font-Scheme.php
Daniel Morris
The Arm Letterpress (and Cooper Union)
Brooklyn, NY
We just made one of each to start. Neither of us knew what to expect so didn’t want to go cutting up lots of wood and then have to start again. My wood guy is in Pittsburgh, so we’ve been doing this through email and not side-by-side. I’m going to do some more printing with the blocks and make sure everything stands up, then will have a full fonting scheme done, maybe in a smaller size as well. This is 12-line right now, which is kinda big. I’ll probably drop down to 8 or 6.
The surface showed some weird artifacts after cleaning (mineral spirits), so I want to investigate the finishing process a little. He did a spray shellack this time. There’s no marring of the physical surface, just some discoloration and odd markings that appeared below the surface. I’ll post a pic next.
Here are a few closeups of the letters with odd discolorations. I can’t tell if ink or solvent penetrated the finish or what caused it. Maybe it just needs more coats of shellack. I’m not sure how many he did.
X.JPG
U.jpg
Q.jpg
The finish used on old wood type is a variant of what is called French Polishing. Basically, you use a cotton ball in a piece of cloth to apply many, many coats of shellac, a tiny bit of boiled linseed oil and most importantly, finely ground pumice to fill the pores of the wood, with a light sanding in between every few layers. There are many online tutorials for achieving this type of finish on various woodworking and antique restoration websites.
http://woodworking.about.com/od/finishing/p/FrenchPolishing.htm
-Kim
It’s a good-looking face btw… Type@Cooper looks like a good program.
We discussed doing french polishing the next time. It’s pretty time intensive, so we were looking for a shortcut. Should have probably known better!
I really like this face. Bravo to you for having it made and looking into this as a project. I’m a little jealous. I want some wood type…
Also…. VERY Handsome X, by the way.
I’ve been looking into doing this myself, either with a laser or a CNC mill, the worry with laser was clean edges? What type of machine and settings?
Lasering them would be much, much simpler than making CAM paths for the CNC.
What type of blade did you use to cut the blocks apart?
CNC you’d run into some problems with the edges as well- and you’d have to hand finish any inside corners with a chisel, as it won’t cut those.
It’s my understanding that a laser can be set up to cut vector pathways and then burn away the rest of the image. It’s more the amount of time it takes to actually burn away the non-imagre areas that is the problem with a laser I think.
On the CNC, by using a finishing pass with a V shaped bit you can cut the small areas in the counters to a sharp point. Basically, the areas where your first clearing pass with a 1/8” bit can’t cut, you do a new pass with a small V shaped bit and the code lifts it out gradually in the extreme points.
The very tip of that point won’t be cut very deep, but with proper inking it shouldn’t be an issue.
People engrave sharp letterforms on CNC machines all the time, but it is a bit of work setting up the toolpath compared to basically clicking “ctrl+p” on a laser cutter. Yes it does take a while to etch away the non-printing area, but while you sit back with a cup of coffee and wait for your new type you will be enjoying the lovely smell of charred wood.
Traditionally wood type has always been finished by hand, and it takes some skill to trim according to how the grain presents at the top of the letter. The slight angle created by the hand finishing also helped to keep the letters from skimming ink off of the rollers. The finished rounds were sealed before the shellac finish was put on, then a 1/2 & 1/2 denatured alcohol & shellac coating was put on and repeated. Not all wood finishes well, sometimes the wood is more porous and the shellac will suck down into the pores (if you are working with end grain). In this case I have used a stronger shellac mix to create a fuller surface. Type washes will soften and remove the shellacked surface, and can be replaced to make grey printing type print fully again.
Paul
Paul, I take it the sealing you mention is a variation of french polishing, i.e. sealing the grain with pumice?
Rob Roy Kelly’s American Wood Type describes the finishing process like this:
-A mechanical device brought the cured slabs down to type high and gave them a first finish. A mixture of linseed oil and pumice applied by hand gave them a high finish, and coats of laquer and varnish, alternated with light sandings furnished the final finish.
Mixing 50/50 denatured alcohol and shellac simply dilutes it, right, as shellac is an organic resin suspended in Ethanol? I guess diluting it allows you to put down thinner, more uniform layers?
-Kim
With the fine sandpapers available today I wouldn’t bother with pumice. Use a sanding sealer liberally to seal the wood on all sides. It would be nice to have a drum sander that can be adjusted to get the final surface level. The folks I knew at Hamilton told me about the shellac. Shellac is rather thick out of the can, and needs thinning. The alcohol helps the finish wick into the wood, but take care about re-coating to quickly, it will re-activate the shellac if it hasn’t dried enough. Back in the day they didn’t have access to all of the polymer-based finishes available today, and I imagine some experimentation might come up with a better surface, but if you want to re-coat old type I would only use the shellac mix. I have a radial arm router that I’ve used to remake missing characters, and used this process since the early 1980s while I was at Hatch Show Print.
Paul
Kimaboe,
I see what you mean about the V bit; we have a C&C shop next door- we share a bathroom, and I am familiar with the process. The one part about it is that I question the fidelity the V bit presents with regard to the graphical styling of the type itself, and the softly sloped shoulder that it would present. Do you have any practical experience with printing from forms cut in this manner? I’m really interested to hear about it….
Typically I have found that printing wood type has involved a bit of heavier ink and a lower roller setting than, say, 8 pt lead foundry type or fine dot patterns on polymer.
The tests I’ve seen of CNC cuts on various surfaces have indeed allowed the inking to overcome corners of this nature in a distinguishable way. I’ve had to go in with a chisel and clean up, especially at the ends of points that were very sharp.
Honestly, I’m not nitpicking- it’s probably a “damned if do, damned if don’t” kind of situation, because the tooling path takes a bit to program in; but with a good path program I understand you can actually build it in, tell the program “Where [, execute X. Where ), execute Y.”; some of the automation being built into these machines and into the software that drives them is getting to be really advanced- but as many of the folks here can agree, there’s not really much that beats a practiced hand!
-Mark
Mark, I haven’t printed from it, no.
Theoretically, you import a vector of the typeform(s) into the CAM software and tell it the dimensions of the wood workpiece. You select the path or paths you want to cut and tell the software that you want to cut 1/8” deep around the vector path using a 1/8” bit. It will generate code to cut as close as it can get without crossing it and show you a preview. Then you can add a finishing toolpath, this time a slower cut using a 1/16”, sharp-sloped V shaped bit, to cut the counters that the 1/8” couldn’t reach and slope out on the very endpoints. It will then give you a 3d preview of the finished cuts to see it they are good enough. The software can then export both pieces of GCode and should allow for an optimal cut with a fairly steep slope for the extreme points of the counters.
It probably won’t be as deep as if hand-finished, and I agree that nothing beats a trained craftsman. However, it would be possible to do for an untrained hand (such as mine) and easily repeatable once the paths have been designed. With the larger sizes I was planning, there really wouldnt be that fine detailing that I could see bring problems.
Obviously though, it would be much, much simpler to laser cut if the edges are sharp enough. My concern was that since the laser is burning away material, that there would be some “bleed” and roughly burnt edges. I guess it all comes down to turning down the power, turning the speed up and doing more passes for each cut so the edges remain sharp.
Jonsel: Would you be interested in sharing what type of machine did you cut this on, settings and file-prep?
-Kim
I’d have to find out that info. I don’t really know how he did it.
He has one photo on his blog that gives you some indication of the process, but I intend to get more details from him next week. It looks to me like he cut the blocks apart before hitting them with the laser, but I’m just not sure. I do know he set the laser to cut 1/8” deep.
http://mcnabbstudio.wordpress.com/#wpcom-carousel-536
If you explore his site some more, you’ll see some very intricate work he’s done with the laser.
Has anyone else had the similar raised grain effect after laser cutting?
Jonsel, the laser burns the wood, the dark areas of the rings are denser and will therefore burn slower.
Hello All,
I am new to the Briar Press community, and very excited to contribute!
I am the “wood guy” that made these wood blocks for Jon and I had a wonderful experience learning about wood type and letterpress. Just to clarify, I will add a few notes to this forum about the details of these wood blocks:
1. The machine I use is an Epilog Helix Laser Engraver that has an 18x24 bed and 40 watt laser head. Epilog makes a range of sizes and strengths. Very nice, easy to use machine.
2. The variations you are seeing in the recessed areas of the blocks are the result of the laser engraving process. The annual rings of the wood are accentuated due to the density of the wood. In the winter months, the trees case harden to protect from the weather, often called winter growth. In the warmer months (growing season) the trees become less dense to allow nutrients to travel the length of the trunk (often called summer growth). The result is the typical annual ring pattern you see when you look at a tree stump. The laser maintains a consistent speed/power setting throughout the entire job, resulting in the texture you see. I recently experimented with my wife, a graphic designer to make a few wood block prints that incorporate this effect. You can see images of our experiments on our studio blog.
www.mcnabbstudio.wordpress.com
3. I used a spray shellac for the first set to see if I could simplify the finishing process. The result I got from spraying was a nice, even coat that dried much quicker than french polishing would. After seeing the slight discoloration that Jon experienced, I will probably french polish all future blocks. I have some experience with french polishing from my furniture background, and am confident I can get a very nice, clean finish.
4. The blocks were made from 8/4 hard maple, milled, dimensioned, cut, sanded, and shellacked prior to laser engraving. after engraving, the blocks were sanded, shellacked again, and finish sanded to 1000 grit.
5. This was my first attempt making wood type. My process will definitely be modified according to the feedback I received from Jon. Overall, with no knowledge of letterpress technique or wood type, I think the finished product is high precision, very functional, and quite beautiful, if I do say so myself :)
James,
I’m currently looking into this process for a project at work, and I’m really glad you have shared the process and pictures.
I’m wondering about the blocks you used- so you had cut them to the precise size of each letter before actually engraving the letter, correct?
Otherwise its probably a pain to cut it down after the engraving, right?
I’m just wondering how to do this process for a fully usable typeface.
I would love to get my hands on a pantograph to try that direction out. I’m considering building one, but does anyone have clues for anyone on the West coast producing wood type?
I need some help recreating a few letters from letterpress wooden type alphabet. Can you help?
[email protected]