SP-15 Inking problem
I had some strange inking problems over the weekend on an SP-15. When I first inked up the press, it distributed fine across the rollers, nice tack and all. I ran my first sheet through. Then I noticed a little blobby piece of ink on the roller, so I rubbed it off and let the rollers go back to their business. Problem was, the ink wouldn’t distribute across the metal oscillating roller. I hadn’t touched anything else. I tried cleaning off a bigger portion of the roller but nothing. See below picture. Ink looked like it was ok on the rubber rollers, but it also didn’t seem to be making it to the drive roller. I washed up completely and re-inked and ended up with the exact same problem. Ink would distribute on one side but not the other.
Upon closer inspection it seemed like the rollers were not making good contact with each other. I tried some adjustments with the end knobs on the rollers. If I raised the rear rubber roller enough to make better contact, it lost contact with the drive roller so the whole assembly would stop spinning. Then I tried to check roller heights with a lollipop. I could get the right height on the left side (as seen from the end of the bed), but got NO ink on the right side.
The second image is of the gear on the right side of the roller. Is this supposed to be engaged and rolling when the carriage moves down the bed? It was not engaging. It almost seemed like it was in trip mode, but we couldn’t get it back to print mode.
The third image shows one of the rear trucks (right term?) on the carriage. This and the one on the other side would not make consistent contact with the bearers and rotate.
I’m pretty new with these machines, so forgive if some of what I think is wrong isn’t.
I was using standard VanSon rubber pantone inks. I cleaned the press with kerosene.
Help, please!
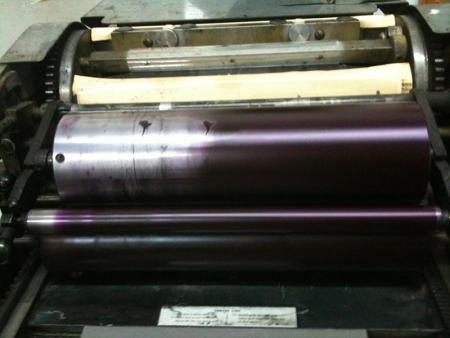
noink.jpg
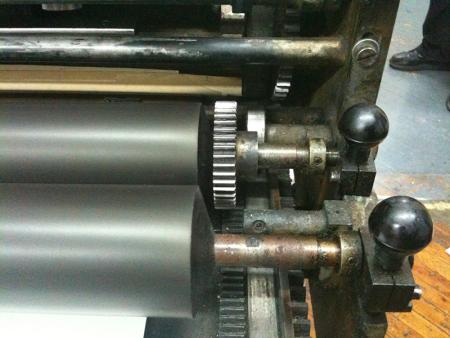
rollergear.jpg
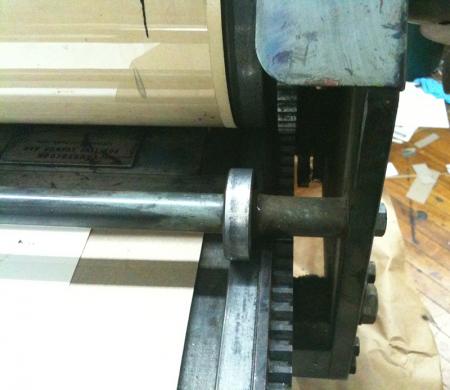
reartruck.jpg
“The second image is of the gear on the right side of the roller. Is this supposed to be engaged and rolling when the carriage moves down the bed? It was not engaging. It almost seemed like it was in trip mode, but we couldn’t get it back to print mode.”
It should engage in trip or print mode.
How are your trip springs - when a trip spring breaks it may leave one side of the carriage in trip mode and the other in print mode - does the whole cylinder carriage move freely?
The whole carriage seemed to move fine, no hitches except where you’d expect them. I’m not sure where the trip springs are. I did alternate between trip and print while the carriage was down the bed and the small metal rods (?) would engage or dissengage depending on the trip position.
If the gear isn’t engaging at all, could the carriage be off the rails? It looked and traveled ok, but my eye is untrained. What is odd is that I ran a first sheet with no problems, then all went to hell.
Is the mechanism that raises and lowers the rollers working? Both ends lift together and lower together?
If the rollers are the lowest position, and the gear is not engaged, I think you have just misadjusted the roller, which also explains the lack of contact with the drum.
Set them to a roller setting gage so you are not guessing, or slide a piece of type under to feel contact. Next check that there is firm contact with the drum: with rollers inked, drop them and lift them after a few seconds; advance the cylinder and look for the contact-stripe at the top of the drum. It should be, say, about 3/16”.
I am not sure about the original problem unless the distributor roller wasn’t seated somehow.
The rear bearers might only contact the bearers when in trip mode.
It also looks like the rear form roller is missing a retainer, outside the block. It might be a clip if there is a groove, or a screw with a large flat head if the end has a threaded hole in it. With a retainer at the end you then shift that collar over to eliminate side-play, and also reduce wear to the block. Then you center the roller gear over the bed gear rack.
In your second photo it looks to me that you have turned the roller height adjustments (the black knobs) to the highest position. If you turn them counter-clockwise to lower the rollers I think your problems will go away.
Paul
We adjusted the rollers to both extremes with no change. I tried to see if I could get them back to type-high using the trusty lollipop stick and was unable to get any ink on the right side. Clearly that was where the problem was. The good news is that I heard from the owner today that, for some reason, that side of the roller assembly had, indeed, gotten stuck in a higher position. It ‘unstuck’ itself and is working fine again. I’m printing again on Wednesday, so let’s hope for the best. This job is challenging enough without the press getting cranky on me.
It sounds like the trip mechanism on the right side is sticking. There is a small pin that sticks out on both sides that trips the print mechanism. If that pin doesn’t move freely that side of the press can stay in the trip position. It sticks out of the frame just in front of the large ink roller. Make sure it moves freely and that the spring attached to it has enough tension.
Paul
You know, I did check the trip pin on the handle side of the carriage, but never looked on the opposite side to see if it was stuck.
Where exactly can I find the spring? I was trying to look underneath the bed to see the mechanics, but it all seemed to be contained within the body of the press. Is there a panel to remove?
I will have to defer to someone with an SP-15. I had an SP-20, but having seen enough Vandercooks I know they used very similar mechanics. On the Sp-20 there was a thin panel that had to be removed to access it, and that is about all that was under the panel. I’m just not sure on a 15. You should be able to depress and release the pin and have it snap back out easily, when you oil them use the lightest machine oil you can find or they get gummy and stick.
Paul
The trip pins are accessible if you take off the sheet metal panel covering the motor. Two pivoting arms holding the trip pins are connected by a long wire and spring. It may be as simple as the apertures through which the trip pins slide are filled with gunk and need cleaning and re-oiling - as Paul says they do have a tendency to stick with anything other than a light oil.
A broken trip spring or a sticky trip pin does not affect roller settings, or the contact between form and distributor rollers. Unless the impression bearings are set incorrectly, the rollers are at the same level at trip and at print.
It is important to keep all these moving parts clean and lubricated, so looking under the sheet metal plate behind the head bar is a good suggestion (on an SP-15 you’ll find the motor and gearbox lubrication points down there too), as is looking between the cylinder and the side-frames of the cylinder carriage; that’s where the trip springs are. There are two possible mechanisms, one with leaf springs, the other with coil springs. The leaf springs are prone to failure but are replaceable without disassembly. You may need brushes and/or compressed air to clear out that area.
I’ll try and take a look at these on Wednesday. From a posting on Vanderblog, I saw that the springs (and motor) are accessed by moving the carriage down the bed, then pulling up the sheet metal plate in front of the drum.
Parallel_imp, thanks for confirming what I thought about the rollers and trip setting. I assumed the rollers were always in contact and at type high regardless of trip setting (hence inking the form on return). That’s why this was so puzzling, because even if it had been stuck in trip, the rollers should still be inking.
Here’s what happened: when I disengaged the distributor roller, it apparently unseated the entire bottom roller assembly. When I re-engaged, the rest of the roller assembly didn’t drop back down where it should have. That helps explain why using the fine adjustment knobs had no affect on the roller height. Everything inked fine today. Whew.