pin registration system
Update: A few folks have written to me lately about registration on a proof press that doesn’t have a tympan/frisket or grippers…. or on a home-made press. So I thought I’d bring this old post out of the dust-bin of antiquity….
Here’s the original post:
In a few other posts, folks have asked about pin-registration systems used for simple flatbed presses like Pocos and Galley proof presses, and quite a few folks have asked me about it via e-mails. For you experienced printers and printmakers, this is going to seem overly simple.
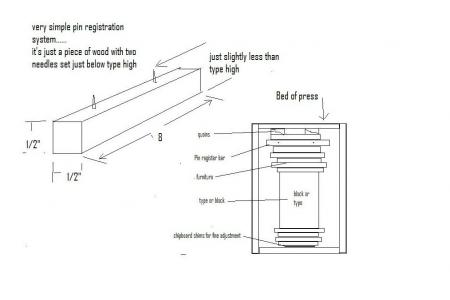
Attached is a sketch of the pin-registration system that I use on my Galley Proof Press. (Please excuse the rough nature of the drawing…. I did it in about 5 minutes)
Essentially, it consists of a 1/2” x 1/2” x 8” stick of hardwood with two needles set just below type high. To use it, you simply lock it up into the bed of the press like a piece of furniture at one end….. then when you print the first color, you get two little needle holes that you can use to align your next colors.
For the first color you may want to put guide marks in pencil on your furniture. Then place each piece very carefully the first time. Remember: you are hand-inking anyway, so it’s going to be slower than a platen press. Then for each successive color, you simply line up the pin-holes. When you are done printing, you cut off the edge with the holes.
To adjust the registration between colors, add or remove cardstock shims between your furniture for up and down movements. For side to side, just loosen your quions and shift the pin-bar. OR you can use screw adjustable quions.
About the only problem you’ll encounter is accidently enlarging the holes while printing…. so be careful about that.
While the above method seems crude, it is especially effective for multi-color work on flatbed presses without guides or grippers. It is the same method advocated by the Tamarind school….. and is also used by printmakers. It is slower than some other methods, but it’s simple, cheap, and gives good registration.
pins.jpg
If printing a form with only one color element (say an initial letter, or dingbat), the form can be locked up with a little bit of clearance built in (1 point or so) around the element to be in the second color. The main form can be inked as normal and the individual element can be inked “off press” and dropped into place before the impression.
I have done this on both iron hand presses and Vandercooks to good advantage. It gives perfect registration even when there is a deckle all around the sheet, and reduces the job to a single press run (albeit a bit more demanding one). On the Vandercook, ink the form on “trip” and then raise the rollers before placing the color element and making the actual impression.
I’ve found it useful to set up wide type-high rules on a table to make it easier to ink a small element properly.
WinkingCat, no quoins or furniture perpendicular to the ones shown? Sloppy lock up! What prevents the pin bar and form from moving when you go to the next form? Also this kind of lock up is prone to bow up.james
Oh give me a break, James! The sketch is merely an illustration to show how a pin bar works. If you think you need to use quoins on the sides, then by all means use them.
The pin-bar does move between form changes. With each set-up you simply reset the bar, using the first color’s makeready as a guide. It easy, and only takes a few minutes. Typically, it takes less than 10 makeready impressions to get things lined up.
Right now, my shop does four or five multi-color, hand pulled art prints (typically 5 to 8 colors) per week using that system on a flatbed press….. and have been for several years now. To date we’ve never had a “bowing up”, or any other lock-up problem. So James, while you are right in theory, in practice it’s not that big a deal. Remember, we are talking about simple flatbed presses here, so lock-up is not nearly as critical as it would be on a platen press where the form is vertical.
Dave,
Could you expound upon this: “For the first color you may want to put guide marks in pencil on your furniture. ” Is this to set the needles in the first place? And how are the needles set? and what kind of needles? All the rest seems pretty plain. Thank you for taking the time to help. :) I can’t wait to get all this- and the bearers set up for my etching press.
(for all other see, http://www.briarpress.org/21245)
Chris
Orlando….. the pencil marks are to serve as a guide for placing the edge and head of the sheets for the first color. After that, the pinholes keep everything in alignment for subsequent colors since they stay in a constant position in relation to the image.
The pins can be any type of needle set into the wood furniture. I use sewing machine needles that I broke off to the right length with a pair of pliars. They are set into holes drilled with a dremel, and then epoxied. BUT it really doesn’t matter what type of pins you use, or how you set them as long as they are just slightly less than type high. I’ve seen small brads used the same way.
For some reason, everyone always tries to make printing far more complicated than it needs to be….. or say “that’s not right” to anyone who differs from their way of thinking. It’s actually VERY simple, and there are hundreds of ways to go about it. Pin register using a home-made pin bar is the same way. Some fuddy-duds who’ve never tried it will tell you it doesn’t work…… but then when you try it for yourself, you’ll see it works pretty good. One of the most prestigious printmaking schools in the world, Tamarind, uses this method. If it’s good enough for them, it’s good enough for me.
The easiest way to learn about pin-register is to make yourself a pin-register bar, and print a test job with it. It will cost you virtually nothing. After one afternoon, you should have it down to a science.
WinkingCat, I laud you for your sharing of knowledge
and your vast experience. So there is your break. It only
takes a few minutes to lock up correctly. Pin bar in place
where it wont move and plate/form in register to the one following. It only takes a few minutes to learn a bad habit
and a lifetime to unlearn them. james
LOL… James. point well taken. a good lock-up is never a bad thing.
Dave… thanks. :) Would still love to have a high-res of your drawing. :D
…and yes, I still use such a system
For centuries pin registration was used on hand-presses, and 100+ years ago it was considered the best registration method that printing could offer. The advantage that a tympan and frisket system offered was that the points were placed near the center of the paper, which when dampened would expand from the center. The tympans could be packed to make up for irregularities in the printing surface, and the frisket kept the printed sheet from picking up dirt or marks from the form outside of the printing area.
Paul
Re Pin Registration system, I have recently constructed what I believe to be a good pin registration system, as a challenge from one of the regular contributors to this forum.The construction was 100% mine, but the principle was “borrowed ” from the Holroyd perforation system, (but I dont think the 3rd or 4th generation relatives will come looking for me) My construction is as follows , the outer barrel turned from hexagon brass to 1/8 of an inch less than type high, bored out to take a secondary barrel, made in two parts to depress on impression which prints as an 18pt (approx) letter O which then perfs the paper from the point, at exactly .918, the deppresion point protects the rollers on inking and will presumably be in the margins or the gutters etc. This is precisely the “holroyd ” principle when way back invoices (for example) were Printed, Perforated and Numbered in one go. Anybody remember? My prototype and my perfected pattern are in existance, and I will ask the afore mentioned contributor to post pictures on my behalf. I havent gotten my head around this system.
I was just up at the Hamilton Wood Type & Printing Museum for their annual Wayzgoose and I was showing most of the attendees a fairly simple registration system for proof presses with small diameter cylinders or proof presses without a gripper on them. I’ll try to briefly describe it here.
It does require oversized paper because you will use a two or (more commonly) three-hole paper punch. It is very important that the punch creates a 1/4” hole (there are some that create a slightly larger hole). Punch a piece of paper and then place the edge with the holes on a piece of wood furniture (maybe 5 picas wide) and CAREFULLY mark where those holes are. Then use a 1/4” drill bit in a drill press (a hand held drill won’t give you a good straight-down hole) and drill about half-way down. Cut some lengths of 1/4” wood dowels and glue them into the holes. When dry, saw them off maybe 1/8” above the surface of the furniture. Use some fine sandpaper on the cut edge of the dowel to create a soft edge that won’t tear paper. The whole thing should be less than type-high.
You should end up with a piece of furniture that a pre-punched piece of paper will fit snuggly onto. You can then lock this furniture into your press and position your form accordingly.
You are now set up to place your paper on the pins and roll your impression cylinder over the form. Not only do the dowels act as a gripper, they become your registration system. Your printed image should always be in the same place in relationship to your punched holes. You can then set-up your second and other passes to register as you go along with additional passes.
You will need to trim off a little over 1/2” of the edge with the holes in it when you are done.
A little time consuming and a little paper waste, but you will get great registration.
Rick
Rick, what a great, practical solution that is!