Long Style Ink Fountain
Can someone explain how to use a long style ink fountain for an Old Style C&P? We have a large run to do in a few weeks and we never learned how to use the fountain. Thanks so much!
Ours looks like the one on the photo attached.
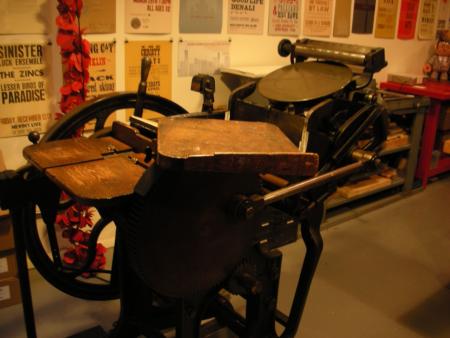
2342501285_0ebf7a2d20_o.jpg
Ideally, your ink duct should be serviced first. The demonstration picture suggests that to be done. Its usually a once-in-a-lifetime thing. Remove any scores or scratches from the heavy metal roller by taking it out and getting it to a fitter and turner. The wiper blade underneath that roller is adjusted by winged screws. The blade edge should be machined to remove any unevenness. But if too much is machined off, better get a new spring metal blade made. The winged adjusting screws will need to be removed, brushed clean and oiled before refitting. They must be firm in fit but very easily turned. When in good condition they are very effective. All this is critical to the control of the ink flow from the duct to the ink disk and to the rollers.
There should be a rod or stiff wire connection from a hole or bolt in the rubber Roller arm/carriers almost directly under the cog of the metal roller. On the metal roller there should be a swinging ratcheted hook device. The Rubber roller arm/carrier and that hooked swinging device are connected by a connecting rod. In operation the hooked swinging arm is hooked over the ratcheted cog of the metal roller. The machine in motion will move the hook forward on the metal roller ratchet and drag the metal roller “backwards” causing the ink in the ink duct to be thinly drawn between the blade and the metal roller. The blade is usually adjusted sweetly up to the metal roller and that provides the control of the amount of ink thus transferred to the top rubber roller, which, as part of the cycle puts ink on to the disc. The rest from that point you’ll know. It is important to know that apart from the ability to load a lot of ink on to the disk by opening up the distance between the metal roller and the under metal wiper blade by wing screw adjustment, you can also get a “U” bold attachment on to the rubber roller arm. This U bolt can be released and tilted forward or backward giving much more movement to the ratchet hook on the metal duct roller.
Another important thing to do is to back off the whole ink duct in your very first initial setup. Lock it there with the bolts underneath. Bring the platen to the impression part of the cycle/closed, by hand-turning the flywheel. Impression ON! At that stage loosen the locking bolts under the ink duct and move the duct towards the top rubber inking roller just kissing the rubber roller, [you should have a very thin amount of ink on the metal roller] so when they touch about 1/8th of an inch ink mark is made on the rubber roller. Judicious use of the wing nuts will allow you to control the amount of ink flow anywhere along the metal roller. Some machinist help themselves by making a little lead wedge to keep bulk ink away from that part of the roller. That thin line of ink must be the same width all along the rubber roller. And finally, don’t try and increase the width of that ink line as it will be possible over many impressions to loosen the rubber on the roller spindle and ruin it. You will note that if you are running a quite heavy form, requiring a lot of impression, that the rubber transfer roller could even not make contact with the metal duct roller, due to the enforced speading of various worn pivots and guards. The option is to advance the ink duct for that specific job or better still put it on a cylinder press.
William Amer, Rockley NSW
If there are no deep scored scratches in the fountain roller, you should be able to get the surface rust off the parts with some rubbing compound. No need to machine down the roller or blade if they are not deeply scored.
Take a look at how it turns and is linked, and make certain you oil the moving parts before using, then adjust to the top roller when on impression as William has described, and you will be in business.
Since the disk turns, you can’t control ink being carried to individual parts of the form as you can with a cylinder press, but adding a tiny stripe of ink at each impression helps to keep the inking more uniform throughout a run, and helps a lot with longer press runs or when printing multiple forms which must match from beginning to end (like a bound book).
Thank so much!!! I will get back to you with any questions or a success story when we try what you both suggested. I will upload an actual picture of our fountain too. The above picture was loaded as an example in a pinch. You guys are awesome!
The roller on my fountain has been caked with ink for a long time. Can I just sand this down with a fine grit sand paper, should I really take it somewhere to be turned, or is there a good way of getting all that caked ink off? It doesn’t seem to have any gouges in it but it’s more black than silver.
If you’re trying to get dried ink off, try Easy Off Oven Cleaner, the original (stinky) stuff. It’s effectively spray on lye. I had hard dry ink dried on a Plexiglas mixing board and while laqauer thinner would hardly touch it, the Easy Off took it right down and it rinsed off clean. Do NOT use on aluminum (none on the fountain but just the same).
I use the Easy-off in restoring old rollers, and have used it for stripping ink as Montana Mike suggests. Just remember to dry and oil up any surfaces after the process or rust will come.
Thanks. I picked up the heavy-duty as the only other option they had was the “fume-free” kind and will be giving that a try this weekend.
The Easy-off was fantastic. Cleaned it right up. Under all the ink there was/are some scratches that seem to be, at most, half a millimeter deep. Since it’s just the fountain roller do the surface scratches really matter or should I look at having it turned?
Haven’t used it yet so I guess it wouldn’t hurt just giving it a try.
The scratches will make the added ink from the fountain a bit uneven, but you can compensate for that with adjustment of the fountain keys. Make sure the gap between the roller and the blade is completely free of dirt and grit — it was their presence that caused the scratches. No point in adding more!
Bob