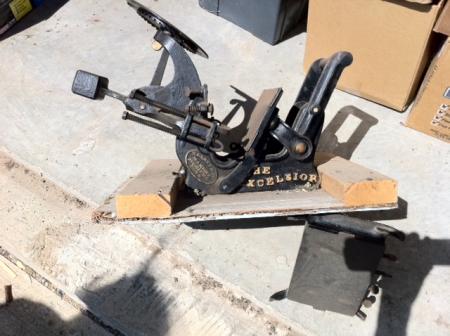
Kelsey Model ??
My friends and I have been trying to find out what model this is. Obviously its a Kelsey excelsior press but I don’t know if its the older or newer model. Can’t find anything like it in my research on the internet.
Help is appreciated! Thanks!
IMG_3609.jpg
Definitely an oldie. Model #?? No clue.
It looks like the one on this Briar Press page; the seventh image down:
http://briarpress.org/museum/browse?page=1
It is called the “Excelsior 2 1/2 Self Inking” according to the caption.
Thanks for the help!
The press is very rare. I only know of one other one that is complete with chase.
Something else of interest I stumbled on while looking further into their museum pages is an Excelsior 2 1/2 which is obviously not a self inking model.
Tenth image down:
http://briarpress.org/museum/browse?page=11
I’m not sure of the dates on these but they look pre-1900 or turn of the century. Not sure if they made the self inking model after or concurrently with the non self inking model…
The one you have looks in complete original condition..including the chase.
Could you give the measurements between the rails of the chase? It might be possible to fit this with new rollers.
Wow, what a find!
[edit] The only thing I can see missing is the grippers, and that’s not a big deal.
I have a No.4 1/2, chase size 7.25”x13.25”…
I’ve got new rollers, pretty much finished cleaning off the rusty old paint and dirt and will be pulling my first prints with it this weekend if all goes according to plan. I also intend to have a new chase machined, as the one I have has a brazed crack across its bed. The chase for these presses has the chase-bed and chase in one unit with the adjustment screws below the chase, not the platen.
The patent is 1873, I believe the round-bottom Kelseys were sold between 1873 and sometime in the 1890s… I found a scan of the original ad for these presses, they were all available both with and without rollers and the original price for the self-inking No. 2 1/2 was a staggering $14, the self-inking No. 4 1/2 cost $44.
-Kim
Thanks so much for the info everyone.
Kim - thanks in particular for the info in the chaise. I couldn’t tell what was going on with it from the pics.
Hopefully I can get my hands on this press. It belonged to a man’s wife who passed away and it has been sitting in storage. He was going to donate it to a church.
This one looks to have the rails as part of the chase as well?
For my larger model, the rails are bolted to the press itself, while the chase moves freely, if the rails were also part of the chase, it would have been way too heavy. I attached a pic of my press during the process of getting the old paint off.
-Kim
kelseyold.jpg
Kim, that chase doesn’t look quite right, looks like the left side is sticking out further than the right. Dick G.
Kim - do you know what the chaise size is for the 2 1/2?
Dickg: it doesn’t, but I see what you mean in this picture. The chase has two small “wings” that slide into two spring-tensioned bolts going through the bed, the bed and the rails are separate parts. The bed that the chase (that also has a bed) is resting against is part of the press, like you can see in the first post. On my press, the rails are part of a curved piece of cast-iron that is bolted to the back of the press. The rails are quite far out from the press and curve back to where they are mounted, and from this angle, it creates that illusion. Or it might just be the distortion from my lens.
Leysleyrin: the chase size of the No. 2 1/2 is listed as 4.5x7.5”…
This all has been a huge help. Thank you so much!
I said ok for now on cleaning the press last week… today I finally had a couple of hours to start figuring out how to print properly with it, figured I’d update this thread instead of starting a new one.
The form I’m going to print is a diamond shaped illustration with fine details and lines, as well as a couple of heavy areas. A challenging form for my first print on this press for sure.
The problem with this press is that since the platen is stationary and you move the chase/chasebed in one unit, using 6 normal bolts that push against the back of the bed, I figured that once I dialed in my rollers to ink at the correct pressure, I have no way of controlling impression on the bed without messing up the inking.
Now I’m thinking I’ll get the chase/bed inking evenly (using a roller gauge), then let the screws be. For different images and papers I’ll have to experiment with packing and bring out any areas with weak impression using makeready. I’ve played around with makeready before, but on a sylinder press printing wood type, bringing out worn areas with tissue paper. This is obviously a much higher level of precision.
I did a few trials to see how the level of the bed was printing as it stands now. Currently, I can close the press completely with little effort and I’m getting a visible, slight impression in dry 220 Lettra, using a packing of red pressboard, oiled tympan and a sheet of copy paper in that order. I’m thinking that when I print on dampened paper, they will swell a bit and the impression will be a tiny bit deeper? I have no experience dampening paper so it will be a new challenge for me to figure out.
I’m thinking that tomorrow I’ll try to get the inking even, make any adjustments on the impression as necessary after tampering with the bed and then do the actual printing next weekend when I have a bit of spare time. I’ll get back to you with my results for anyone who cares to read my ramblings.
This is fun stuff, if I can print this form well enough, I’m thinking that smaller forms like business cards and smaller invitations, that are designed for printing on letterpress unlike the one I’m doing now, will be a breeze. =)
-Kim
Kim, i enjoy reading your ramblings. I too think this is fun stuff. When i pack my presses i try to use a sheet of pressboard and 3 or 4 sheets of copy paper, for tympan i try to use the oiled sheet but a sheet of coated stock will work just fine cause you can easily wipe ink off the coated stock. You are right when you say if you can print a larger form then the smaller stuff will be easier. When you say smaller forms designed for printing letterpress, whats wrong with larger forms, i print file folders letterpress, some of my forms are the full size of the chase (12x18”), and i don’t use polymer, i set everything in lead. Most presses will give you a hard time if you try to print a large form, the larger the form the more impression that is needed to make it print. You are right to set the impression screws then try a makeready to make it print. By using a few sheets of copy paper in your packing when you just print a line or two you can remove some packing, if the form is heavy you can add. The pressboard can be removed and you can use more copy paper to make your packing softer, or a piece of index in its place, sometimes you need a softer or a harder packing, you will have to experiment with this to get a deeper impression. Dampening is pretty easy (haven’t done it in 50 years) when i was a kid part of my first job was pulling stone proofs of chases locked up for a magazine, there were 8 pages locked up in each chase, we would hand ink it then with a spounge slightly dampen the paper, then lay a sheet of paper on the form and use a planner with some felt nailed to it and plane the form to make the proof, if worked well. The spounge will allow you to use more or less water, i’m sure you will figure it out. Now look who’s rambling. Good Luck Dick G.
Thanks for the advice and well-wishes.
No “problems” with a larger form, but I foresee some tough tasks to print the one I’m working with for my first pull, namely some approx. 0.3pt dotted, white lines in large fields of color, so I’m thinking that getting the inking *just* right in terms of roller-pressure and consistency is of essence to avoid those bleeding shut (they were visible on the proof from boxcar). It might just be the lower resolution I’m used to from my screenprinting making me worry, and after all I love a good challenge… I might as well figure it out right off the bat, when there isn’t some crazy deadline to meet.
-Kim
Kelsey presses bounced around a lot in the 1800s. The first workable press was the trunnion model which Kelsey produced for about a year and then in 1874 or 5 they came out with the boat body. Early catalogs show the Boat as a hand inker and a different square model as the self inker. Then catalogs in the 1880s showed the boat as the self inker and a model like yours a hand inker. They then followed with the square base like yours as the self inker with that neat square counterweight. If I had to guess, I would date your press around 1890.
Now Kim, Could you send me a diagram for the chase for your 4 1/2 with measurements? I could probably figure it out myself but I am a procrastinater. I would also be guessing at the thickness for the chase bed and the hieght of the chase sides. My 4 1/2 has been lying around for years waiting for a chase and rollers and trucks. If you have dimensions for rollers and trucks I would really appreciate those as well. Thanks. Bill
I actually haven’t gotten around to doing a diagram of it yet, but once I do, I’ll be sure to post it on here.
I’ve been busy with finals for a month or so, and hadn’t had too much time for the press, however, last night I inked it up for the first time. I managed to get the chase bed somewhat level, then adjusted the impression with makeready.
Despite the fact that I’m obviously stretching the limits of coverage in one area of the form, I managed to get an even impression, although fairly salty (this might just be me holding off on the ink). I tried adding a couple of sheets to get a bit more bite into the paper, but no luck, seems its not happening with undampened stock at this size. I have a couple of sheets of 220 lettra in a plastic bag dampening right now, so we’ll see how that works out.
I was pleasantly surprised as to the results, took me about three hours of experimenting from I pulled out the roller-gauge to these were printed…
-Kim
230794_10150181709962312_600907311_7497900_7321530_n.jpg
Here’s one of the ones I pulled while I was doing the makeready, that shows the design a bit better…
231074_10150181594847312_600907311_7496180_4534399_n.jpg
That print is badass. Send me one!
For real.
The artwork was done by a friend of mine, I’ll be sure to pass on the compliment… give me your details and I’ll send you one.
-Kim
So, yesterday I took a sheet of Lettra, hosed it down, covered it in some paper towels and placed it in a plastic bag until this afternoon. It helped out a lot, ink saturation was better and it got just a tiny bit of impression into the paper, couldn’t ask for more. The attached photo shows the dampened test, a slight bit of overinking on my part, need to work on that balance.
Really happy with the results of my first time ever printing on a tabletop press and with the performance of the old thing. Now to get a bit of spare time inbetween my finals to do the full run of 80 =)
231169_10150182622772312_600907311_7509422_784341_n.jpg
Pretty good for a new kid, you can try double rolling it before you print, or a double hit, print it twice in the same position on the sheet. You are going to do well in no time, i’m impressed. Dick G.
Thanks for the encouragement.
I double rolled, which I am guessing is why the right hand side shows a bit of ink-bleed closing the hairlines on the bands there. I didn’t print a double hit, because I hadn’t set up pins and just held the sheet in place while printing these tests. I’ll keep that in mind when I do the actual run.
The size of this image is 3 1/8” x 7 1/4”…
-Kim