Adjusting platen on C&P 8x12
So I have the general idea of the how-to from search the forums and googling, but I can’t seem to do it.
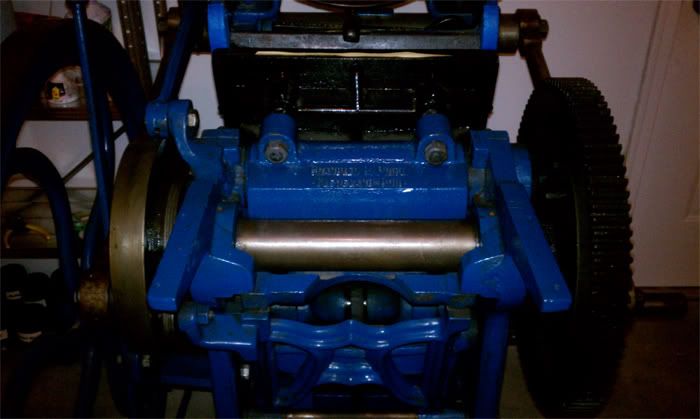
My first issue is exactly what bolts I’m adjusting with the wrench. I’ve attached a picture of the front of the press. (Yes it’s blue :/) From what I have read you have 4 bolts that you are adjusting. Well I only see 2? I see 2 more under the press, but I don’t even know how one would reach those bolts.
http://img.photobucket.com/albums/v456/thisstuff/frontofcp.jpg
My second issue is I tried adjusting the 2 bolts that I can see with the wrench and they won’t budge! I’m kind of lost. I know the steps to actually adjust the platen but I can’t seem to actually do them. Any help please?

frontofc&p.jpg
I think the “&” in the filename is messing up your post, because the image isn’t showing. Try renaming and reuploading your photo.
-Kim
Thanks Kim, let’s see if this works
frontofcp.jpg
Hi Jane,
There are lock nuts on the four bolts that have to be backed off before you can adjust the platen depth. The lower bolts are adjusted from below when the press is open, you kind of have to go in from the side. If the bolts are frozen you might use some penetrating oil to loosen them. Once the platen is properly set, use the lock nuts to make sure it doesn’t move.
Generally, once set, you don’t need to move them again, instead you use packing on the platen under the tympan to change the depth of impression. The rare case where you might adjust them is to put the top in a few microns on a particularly heavy form. Polk covers this in his “Elementary Platen Presswork” which someone has been kind enough to reprint. Copies available on amazon.com here http://www.amazon.com/Elementary-Platen-Presswork-Ralph-Polk/dp/16033700... and highly recommended for C&P owners.
Do you know how to level the platen?
Cheers,
Alan
Hi Alan thanks for the response, so just to clarify what I’ve circled below are indeed the bolts I should be adjusting?
And then in the 2nd image what I’ve circled are the locknuts?
Those are what seem to refuse to budge.
I put some 3-in-one on it earlier do I need something stronger?
And now another problem arises… I noticed when I add any kind of packing to the press the flywheel won’t turn once the platen hits the chase. If no packing it will turn all the way. I guess I’ll work on that after I can get the dang platen leveled.
locknuts.jpg
bolts.jpg
Hi Jane,
Yes, those are the lock nuts and bolts. Look closely at the threads, make sure you’re not tightening vs loosening. Not all bolts on a press run “right tight, left loose”. Stop by an auto parts store and get some actual penetrating oil. 3 in 1 is not penetrating oil. Penetrating oil is much thinner. Douse the bolts liberally and wait 24 hours, douse again, and then try loosening. I am going to recommend that you not use an adjustable wrench but buy a wrench the correct size for the bolts. When dealing with stuck nuts, an adjustable wrench is more likely to slip and damage the nuts and your hands.
Once you’ve put penetrating oil on and have the right size wrench and know your direction, if you can’t move the nuts with your own power, get a rubber mallet and while holding the wrench carefully but firmly in position in one hand, tap the wrench with rubber mallet to try to jar it loose. Don’t pound too hard, but the jarring motion might help with the initial loosening. Also, try tapping the wrench at 3, 9, or 12 o’clock positions, not 10, 11, 1 or 2, as you are more likely to slip in those positions. Don’t use a metal hammer as you don’t want to break something else on the press with your hammering. You may have to tap a dozen times or so to jar it loose, but once it starts you should be able to finish by hand. If you’re uncomfortable with this, find a mechanic friend who is. Any time you hammer you face the risk of fracturing the press elsewhere since the it is made of cast iron and is old. Just be aware that this is a risk you are taking.
If the press is binding with no packing in it, then you definitely need to back the platen off. Looks like the press was recently restored/repainted so the bolts are probably overly tightened and not frozen in place with rust, which decreases the likelihood that you’ll damage anything.
According to Polk, the proper packing is 1 sheet oiled manilla tympan, 1 piece redboard, and 3 pieces 60# paper. This nets out to about 35-40/1000’s of an inch of packing if you don’t have 60# paper. Redboard is about 20 thousands, and the tympan 6-8 thousands and the rest of the packing at 5 thousands a sheet. Have the tympan properly packed, then adjust your platen so that it prints even on a sheet of 20# copy paper. You can back out your packing as needed once adjusted even up to 220# lettra. Polk gives advice on the leveling of the platen. You can do it with a platen gauge or lock up 4 pieces of 72pt type in the four corners of the chase and adjust until all four print evenly but lightly on the paper, changing out the copy paper as needed.
Keep us posted,
Alan
If I’m looking at your photos right you have the labels on them switched. The bottom photo shows locknuts and the top one is the adjusting bolts. Loosen the locknuts first.
It won’t work the other way around.
One side of the adjusting bolts has a left-hand thread and the other a right-hand thread. That’s why when you turn them the gap between the platen and the rocker changes. Very small adjustments on the adjusting bolts at one time is advised. A quarter turn is a lot.
I have a different perspective on what I think I am seeing, but, it is difficult because photos do not show it clearly enough to be sure. I think this press has threaded studs and two sets of lock nuts on each stud. (No bolts to adjust) I had a large tabletop that worked this way. It was a real pain to adjust the platen. You have to work with both nuts on each stud to move the platen in or out. The threaded stud were threaded into the platen not pushing against it as a traditional bolt/nut mechanism. The studs went through a hole in the rocker only. All adjustment was made buy tightening or loosening the two nuts on it. As an example, if you want to move the platen away from the bed, you would loosen the outer nut first, and then move the inner nut in the same counter clockwise rotation which actually tightens it against the platen and outer nut you previously moved. Am I making any sense? Anyway, that is what I think I am seeing in the photos. I am a Golding enthusiast, but, this looks like an old style C & P to me. Is it possible early old style’s had the kind of setup I described. Design changed over the years with Golding. I thought maybe this also occurred with C & P.
JF
Now he’s a c&p mechanic, the pictures above the first one says lock nuts they are the adjusting bolts, the second picture are the lock nuts which must be loostened to adjust the bolts.John could be right, although i’ve never seen any that adjusted like he said, but what do i know, i just print with the presses. Dick G.
This appears to be an Old Series C&P 8x12; just like the one in my basement. The lock nuts are normal threads. The adjusting bolts all work the same.
I seriously doubt that C&P would have bothered to make two variations of this mechanism. All of the C&P presses I have worked on behaved exactly the same. Loosen the lock nuts at the end of the bolts and turn the adjusting bolt slightly to lower or raise that corner of the platen.
I do defer to the C & P owners/experts. I am sure you know what you are talking about. I just thought I was seeing nuts on both sides, not a bolt on one, and nut on the other. I have seen C & P make different adjusting setups on their Pilot, so I thought it might be possible on the floor presses as well. For those that have never seen the arrangement I described, here is the American No. 8 which is a Degener and Weiler press from the 1870’s I restored awhile back. Note in addition to the odd corner adjustments there is no center bolt. The nuts are so far up the stud, its easy to see what I was describing.
JF
JF
AmericanNO8.jpg
John, look again after nap time and things will be clearer. good nite Dick G.
Wow! Such helpful information to come back to!
Alan - I have ordered a platen gauge so hopefully I get it this week and I will work the bolts with the penetrating oil.
As far as not using an adjustable wrench, I’m trying to figure out the correct size. With the adjustable wrench It says that the bolts are right between 1 1/16 & 1 2/16 so my googling says I need a 27mm wrench? And is that a normal wrench or socket wrench?
Arie - So are you saying my pictures are mixed up? Thus I should be loosening what I have labeled as “bolts” instead of what I have labeled as “Locknuts”?
What’s your take on the wrench sizing since you have the same press. Also when you are adjusting does the “righty tighty, lefty loosey” method still ring true?
Thanks so much for the replies!
Hi Jane,
Standard wrench, not a socket. These presses weren’t made with metric measures, try a 3/4” wrench.
Best,
Alan
Yes, that’s what I’m saying: you have the wrong labels on the photos. And the lock nuts should loosen up leftward—-or counter clockwise if you’re looking at the bottom of the bolt.
I use an adjustable wrench; the biggest one in the house. I make sure it is absolutely as tight to the nut as it will go. A large open end wrench of the correct size is better, but I don’t have any of those. A rubber mallet carefully applied to the end of the wrench is sometimes helpful.
The bottom two locknuts and bolts are hard to get to, but obviously it can be done more easily when the press is open; the top two are easily accessed when the press is closed.
The wrench size is 1.125” and an open end wrench cost a lot. Adjustable or crescent wrenches are cheaper but make sure it can open to at least 1.125”. If you are lucky you may have gotten C&P wrenches with your press but they are very hard to come by. Follow Arie’s directions and you can’t go wrong.
longday that’s exactly what it calculates out to and the adjustable that I currently have does go to the size.
Maybe I’ll just get the rubber mallet and penetrating oil first and see if it works with that and get the open ended one if I come across it in that size. I was googling and a guy said he couldn’t find one in any store? I see them online, there’s one of Amazon for 10 bucks.
Wish me luck!
So the penetrating oil really worked, the bolts are loose now. I tried playing around w/ leveling but I don’t even notice any difference from moving it so I’ll wait til the gauge comes in.