impression issues
I am working on adjusting my C&P Pilot to get an even impression.
What I’ve done so far:
- raised my rollers using tape on the trucks. I’ve checked with a roller gauge and they are at the correct height.
- for packing I use 1 pressboard, 4 sheets of copy paper and tympan sheet.
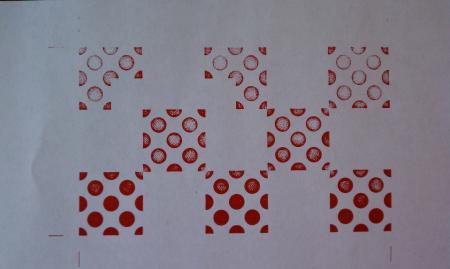
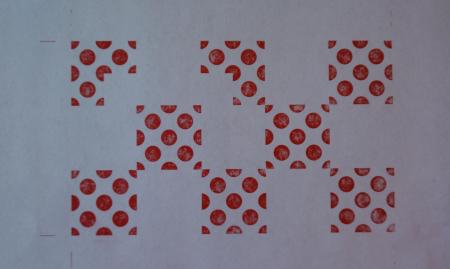
Now I am adjusting the bolts on the platen to get an even impression. I don’t have type or enough furniture to lock 4 letters in the corners. I’ve been using a polymer plate on my boxcar. I am finding that I either get a good impression on the bottom or top of the print (see image 1) or I get an even impression but it’s too light.
Any suggestions on how I can correct this?
Thank you.
circles1.jpg
circles2.jpg
you want an even impression, if it is too light then you have to do some makeready. the lsrger area you try to print the more impression you will need, you can add a sheet or two of packing to make it print better. your platen has to be adjusted evenly, then it should be left alone.
Thank you for the quick response.
I tried adding packing, but this actually made the impression disappear which didn’t really make sense to me. Any thoughts on why that would happen?
If you have grippers and are they coming in contact with the boxcar base they can prevent or impair contact between paper and plate. More packing will make the problem worse.
I read that the grippers can damage the boxcar, so I made sure to move them away to either side before I started printing anything.
It’s a Platen Press, the Platen is always larger than the Press Bed, than you add makeready, make sure it fits there your polymerplate is. it doesn’t extend to the rails L+R, at that would defeat it’s purpose.
As dickg stated, you have even impression -you are there!
You just have to apply the correct way and manner of makeready.
I will try adding makeready only to the area with the polymer plate.
Thanks for the tips. I’ll post once an update once I’ve tried this.
Update to this post:
I have been able to get the press adjusted so the ink is even, but am still having trouble with getting a good impression. I’ve added make-ready and tried many different combinations of packing and make-ready. The best I’ve gotten is one tympan sheet and 2 make-ready pieces of tympan taped behind where the image is. I get a slight impression - but nothing close to what I see in photos. Anytime I add more packing or make-ready, the image gets lighter. If I have less, then the image just “kisses” the paper.
Any thoughts? I feel like I must be missing something big, but I can’t figure out what it is.
Thanks!
You must be a little smarter than your press. Not a lot, but some. That means you have to understand how the press works rather than twisting bolts and trying something different. On occasion it may come down to that, but should not. Trouble shooting must be one thing at a time.
Go back to basics. Proper inking is a must and is step one.
Ink the plate/form and remove the chase to inspect carefully. If the inking is good, you can move on.
We armchair long distance self proclaimed wizards do not have the benefit of touching and seeing your press. We are going on intuition and experience.
Your statement that when you add more packing, the print becomes lighter should tell you something. The opposite is what is expected. Think how the press works. Something is
interfering with the form getting to the platen. The grippers if placed to the sides away from the base should not be a problem unless they are contacted by the chase. As a start, take the grippers off completely. The packing should not be a problem in keeping the form from contacting the platen. Do check to see that it is not being contacted by the chase. Close the press and look in with a flashlight. Feel all around the chase with a paper feeler strip. Be just a bit smarter than the press and you will solve the problem.
There are three kinds of people who mess with the platen screws (bolts actually). Those who understand what they are doing. Those who are well intentioned, but misguided. I will not use the term for the third catagory.
Once you have messed with the platen screws and obtained an even but light print, STOP. Tighten the locking nuts. The rest of the work is done by adding and adjusting the packing.
Remember: Just a little smarter than the press.
were talking about a pilot press, i thought they are smarter than most printers???
I never got a heavy impression with dense coverage of a form like that on my pilot. I’d usually have to hit it twice. Maybe you’re expecting too much from the Pilot.
If you get a smaller plate made, perhaps of just a line of type, can you get a nice impression with that?
I found that when I printed just a line of type I could get a good impression, but the larger the image, the less impression I got. Tends to be the case with smaller/table-top presses.
Thank you for the feedback.
Widmark - I thought about the same thing. I’ve been working with a smaller image this week and I’m having the same issue with it so I don’t think that’s the problem.
Inky - Thank you for taking the time to respond. I guess I should have been clearer in my post, but I have already troubleshooted for something interfering (nothing there), checked the inking (normal), checked the roller heights (correct). And I agree - totally doesn’t make sense that the image is getting lighter, but it is. When I add a little bit of packing or make-ready, I can get a deeper impression on the bottom of the image, but the top of the image gets lighter. In general - it’s as if the print is ok, but just not making an impression into the paper.
way back in your first post you said you can’t lock something in each corner of the chase, you can’t adjust the press unless you do that, once the platen is adjusted you might be all right.most any press can only print an area about 1/3 the size of the chase, if you try to print especially with a deep impression you need to start with a small image and work your way up to larger ones. it takes a lot of practice to learn what your press can do.
In discussing windmill packing, they always have this diagram, where if the impression is heavier on the bottom, you add packing and if heavier on the top, you remove packing. Maybe that’s relevant here as well. Because of the angle these platen presses close, they don’t really approach closing totally square.
If you have an even impression, light or dark, then you assume the platen is even, but maybe it’s too far away. You should buy one of John Falstrom’s platen leveling tools so you can not just make sure it’s even, but make sure the distance is an appropriate amount.
OK, you have the email wizards working with you. You report that the inking and roller settings are correct. You have also inspected for anything interfering with the form meeting the platen. Good productive trouble shooting so far. That is narrowing it down to pretty much the platen and the packing.
Back away for a moment. All of these old presses were intended to print on the paper. Not into the paper. They (and especially the hand operated presses) can only deliver so much pressure. The rule of thumb that a platen press can only print a total of one half to two thirds of the chase size was the rule for fine kiss printing. Not for smash printing. If you want to punch the paper, you will have to settle for less area. We respect the artist and will try to help you get what you want, but cannot change the capabilities of the press.
If your platen is not true, and especially if it is too far in at the bottom, all the pressure will be used there and there is none left for the top, or very little. More packing just makes it worse.
If you do not have the four pieces of type to set in your chase, do please get John Falstrom’s simple setting device. It is very good and quite cheap. You will bless him and the day you decided to get it.
If you wish to tinker at bit more before you get it, put your form in the press without ink on the press. Over one sheet of press board, build a very soft tympan with a couple of sheets of newsprint and a sheet of plain copy paper in place of the hard surface tympan paper. Pull an impression. If nothing is seen, put one or more additional sheets of newspaper in the packing. My guess is that you will see impression at the bottom and not at the top. This says you have work to do to true up the platen. Hope that John is in town and gets your gauge to you right away.
I don’t think you are far away from good printing.
In addition, tell where you are. You might find a wizard close by who will help.
Added thought. When adjusting the platen with the gauge, the gauge is placed against a bare platen. It is based upon a tympan and packing thickness of .050” +/-. Adjust the bottom platen screws (really bolts) and then the top. Then go back and adjust the bottom screws again. My guess is that John includes very good and clear instructions. That is the kind of guy he is.
sounds like someone is on John’s payroll. some advice, when you call John do it before 2 in the afternoon or after 4, you don’t want to disturb that nap.
I was searching other threads earlier to see if anyone had similar issues and came across John Falstrom’s gauge and ordered one. I will see when I’m getting the gauge. If it will be a while then I’ll tinker around with the packing as inky suggests.
Thank you all again for the advice. I will post an update.