A few beginner questions, roller height etc.
I’m getting close to running my first job through the press. I have a few questions any help is greatly appreciated.
The press is a Challenge Gordon, the ink plate is currently with a gear fabrication shop. I noticed a missing bevel gear after I brought the press home, a new one is being manufactured.
I’m working on adjusting the roller-height. It looks like I have quite a bit of distance to go with the tape. The rollers are currently rolling over the boxcar base. I should have the rollers just above the base right? Is adding more layers of tape the correct way to go?
I’ve tried to figure out the lever to on the side of the press, not sure on it’s function. It doesn’t appear to be doing anything?
The other question I have is on the second image. The smaller wheel spins but doesn’t appear to do much. There is a section missing from the wheel it is spinning on which makes a large “pop” every rotation when it loses contact. I’m not sure what the function is supposed to be?
Thanks,
Rob

photo 1.jpg
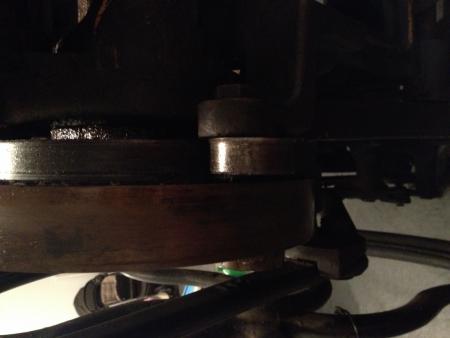
photo 2.jpg
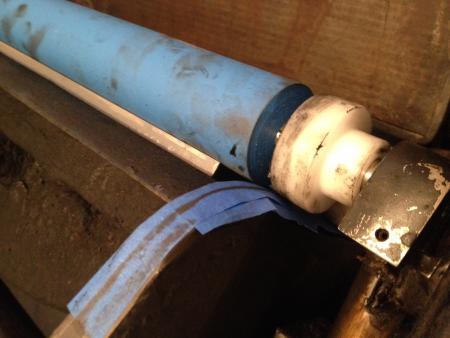
photo 3.jpg

photo 4.jpg
On a C&P, I think this would be called the small head and rocker cam. There it controls the in and out movement of the rocker lock; a hinged affair that locks the rocker into place during impression; stiffening the press just when it needs it.
Does your press have the rocker lock mechanism. I’m not too familiar with the Challenge Gordons.
The gate in the front shuts down every rotation when at the moment of impression. I’m not sure if there is a lock mechanism.
Never tape the tracks…only the trucks. The trucks should be the same diameter as the rollers although in the US climate considerations may mean it is better to buy Morgan Expansion trucks. I work a Challenge Gordon (1908) in NZ.
The boxcar base and anything in your chase should never cause the rollers to rise off the tracks i.e. the chase contents would appear to be higher than type high. Build up the TRUCKS if this can’t be improved.
Tony,
What do you mean never tape the rails/tracks?? It is the preferred method to raise the roller height. (especially if your trucks are already the same size as the rollers)
John
rtbyrd21,
To try to answer one of your questions, tape is the way to go, but, there are limits and the kind of tape you use can effect your success in correcting the situation. If you have to add a lot of tape to achieve proper roller height, the height will not stay consistent over time using some ordinary tapes. The saddles are under a lot of spring pressure pulling them tight to the rails and if there is too much tape required the trucks will compress it anywhere they are left for any length of time. This is usually not a problem if only a couple of layers are required to correct the height but gets more and more of an issue if you are trying to correct for a lot of wear. I believe there are special tapes available from NAGraphics that are not compressible that help when there is a lot of wear, but, even those have practical limits. At some point, when there is just too much wear, the rails of the press need to be rebuilt to factory specs.
I do not know of any press manufacturer that ever recommended having trucks larger than the roller diameter. Only varying smaller sizes to compensate for the changing diameter of composition rollers. Today, we mostly use rubber and make them the same size. This is partly due to the durometer differences between rubber and composition, but, also helps compensate for the wear that most of our presses have.
Hope this helps,
John
That does help, thanks John and Tony. Boxcar recommended nylon strapping tape, I’ll give that a try. My chase also has a crack in it. I’m starting to think that may be a bigger issue than I realized. Although the rails are worn, it looks like the lock-up may have moved when putting it into place causing the base to move forward.
If this is anything like a C&P, the lever is for controlling when the press makes impressions. When it is in the forward position, it should make an impression. If you move the lever back, it should put it in a position where it does not make an impression. If it is making impressions in both positions, I would say a part may be missing or broken.
rtbyrd21,
The “gate” is the rocker lock. There are a couple of machined projections on the rocker that slip in between the frame and the rocker lock. At impression the rocker is held against the rocker lock and frame; stiffening everything at the right time.
An alternative to taping either rails or trucks is the use of roller bearers. There should be descriptions in the archives here.
The lever must be broken. I’m getting the same impression in both positions. From the research I’ve done it is pretty similar to a C&P.
My treadle was removed. I’m resorting to turning the wheel by hand, which is fine until I get the hang of the press. I’ve seen a few posts for creating wooden treadles.
I adjusted the packing to the point where a clean impression is made. The wheel now comes to a halt at the moment of impression and some extra force is needed to get past the impression. Is this normal? or is this a sign of too much packing.
Thanks for the help.
Hi
My Challenge Gordon 8x12 has some of the same issues. I don’t think we quite have it all solved, but the bottom connection for the Throw off Lever looks like this at the bottom. Does yours? I am still not sure we put it back together correctly after the move.
Nancy
Ducks In A Row Press
Throw off lever connection 2.jpg
My first press was an 8x12 Challenge-Gordon, described as “wobbly” by the previous owner. After years of tortured use, I discovered the rocker lock had been retimed; in the revised position, the rocker came up sluggish, and in the original position, it slammed into place.
Worn presses can’t be expected to performn as when new. Any Challenge-Gordon must be assumed to be well-worn.
I agree with John Falstrom, taping tracks is now a normal practice, because all tracks are worn by more years of use (by far!) than age of current owners; my press saw over 60 hears of use befpre I touched it. There must be a balance between taping worn trucks to fit more accurate roller diameter, and taping worn tracks to adjust to more accurate form height. There is no exact formula, and it varies with roller softness and nature of form (metal and photopolymer have different needs, with phoopolymer needing much lighter contact). To start, examine roller travel over form and look for slurring or ghosting, and compare ink below edges of form.
I’ve learned a few things about my press over the past month of printing. It has been a balancing act of roller height and packing. The left roller rail is considerably more worn than the right. I’ve built it up with tape and vary the height in spots here and there depending on what I’m printing.
The rocker lock is interesting. I assumed that it was hitting at the moment of impression, it hits just before impression and slightly brings the angle of the platen downward so the two surfaces are flush when they meet. It seems to be functioning correctly. I’m not sure it is an entirely necessary component or maybe more of a “bells and whistles” turn of the century add on to the press.
Overall I think it is printing great. The constant adjusting of tape on the one rail has been an annoyance but it’s nothing I can’t work around. Eventually it would be nice to bring the roller rail height slightly closer to what it should be somehow so not so much tape needs to be used on the one side to even things out.
photo 5.JPG
The throwoff is sometimes a bell-n-whistle, but sometimes not. In many production printshops the presses (and all the other machinery in the building) were powered by ceiling-mounted shafts that ran constantly called line-shafts. These shafts would have pulleys mounted where the machinery was to be run. From the line-shaft pulley to the machine pulley would run a leather belt. Because the line-shaft ran all the time, so did the belt and the pulley it was connected to. Sometimes an idler pulley was used so that you could pull the belt off the drive pulley. Sometimes a clutch mechanism was used. In presses, the throwoff is basically a clutch to allow the drive wheel to continue to run even if not printing. If you’re treadling or hand-throwing the press, the throwoff isn’t really necessary. If you’re running on an electric motor (or an actual line-shaft) the throwoff can be quite handy.
—
Michael Hurley
Titivilus Press
Memphis, TN
Platen Press Operation, by George J. Mills, p. 11:
“The throw-off lever is the long vertical rod at the left of the delivery board. It enables the operator to prevent making an impression when there is no sheet in the press or when the sheet is crooked.”
I’m sure Wikipedia has yet another daffynition.
It appears that the small steel wheel is off center, I think the bolt should be in the center of the wheel. It appears to be excessively worn. Dave