Stuck pin, any TIPS?
Hey all,
Upon discovering my Improved Pearl No.11 had too many fractures and repairs to be reliable, I was able to find another one built several years (decades?) earlier. It was missing parts that I plan on supplying from my (now) parts press.
The part in question today is the treadle. In retrofitting it from the other press, the hole on the crank is a bit too small for my donated treadle’s screw, and I’ve decided it’ll be easier to use the original crank from the other press… than hunt down a reverse-threaded screw that will fit.
So I cannot get the pin holding the crank on to budge. I’ve tugged with vice grips, tapped the crank back down the piston with a hammer, and sprayed with “B’Laster” (my locally available version of Liquid Wrench).
Any other tips? Should I drill it out and have a new pin made from scratch?
pearl.stuck_.jpg
I have use “oil of wintergreen” as a replacement for Liquid Wrench, wash off all other solvents and dry the area. Use a heat gun and warm the area and apply the oil of wintergreen. It may take several applications.
Nothing will happen fast, but oil of wintergreen has great penetrating powers, it was used in the aircraft industry for removing seized bolts, plus you and your shop will smell like you just had a rub down with “Heat”. You can buy oil of winter green in most health food stores or at some drugstores.
If the part has a shoulder, why not use a gear puller and just pull it off?
If you do have to drill it out, check your local hardware store for stock size key stock, you can always buy and oversize and file it to fit. Not a tough task.
Thanks Chuck. I’ve been told this may be a “woodruff key”, which I’m somewhat familiar with from disassembling my Vespa scooter. I don’t recall those keys sticking out the end of the shaft, however, and this one is most definitely square on the end, not half moon shaped.
I may have to scrap the oils and just drill the damn thing out - I don’t have lots of time to let things penetrate, and it’s in there awfully tight.
It’s not a Woodruff key — they’re crescent-shaped as is the slot for them. One trick you might try is drill as large a hole in the end as will leave some metal all around, and tap the hole for as large a short hex-head bolt as you can fit, being sure the tapped threads don’t go outside the key. Stack some oversize washers, big enough for the key to fit into, around the bolt, with a couple of hefty flat washers under the bolt head bearing on the stack. Then screw the bolt in and if you’re lucky when it comes down on the stack of washers it will pull the key out. You can keep adding washers to the stack until you have it out far enough to pull the rest of the way with pliers or a claw hammer under the bolt head with a block for the claw hammer to bear on for leverage. If you try the claw hammer be sure you don’t stress the crank by bearing on the outboard end of it.
Are you sure you can’t get a bolt at a specialty store with the right threads so you can use this crank?
Bob
“It’s not a Woodruff key…”
K, that’s what I thought. Thanks for clearing that up.
“One trick you might try is…”
Great idea, I’ll tuck that one away for now as Plan B. Chuck’s gear puller idea is a good one as well, though I don’t own one (yet) and I was sort of afraid if this key was more of a wedge than a rectangle that I may actually pull the assembly even tighter!
Are you sure you can’t get a bolt at a specialty store with the right threads so you can use this crank?”
It’s entirely possible, though I think it’d be a long shot. Not only would it have to be the right size (diameter, thread distance) but there’s a smooth section before the head so that the nut can spin freely inside the treadle rod.
I’ve got to think this is the easier way, though it sure doesn’t feel like it at the moment.
Most diameters of machine bolts are available with about 1 inch of threads and a plain shank between the threads and the head on the longer bolts, which might serve the need. But if it’s left-hand threads that makes it harder.
Bob
Yes, it’s that left-hand threading that I’m suspicious I’d be able to easily find.
Then again, I suppose it’d be a piece of cake for a machine shop to re-tap the hole in this crank a bit, to accommodate my larger bolt. Maybe I’ll call around Chicago a bit in the morning.
But the problem remains that it’d have to come off the 300+ lb. carcass to be worked on. My next thought was to possibly just slide out and swap the entire shaft with the one from the press which has the correct crank. Except that just moves my problem 6 inches or so down the shaft to a large gear inside the body, held in place with a similarly tight woodruff key.
Also notable is that I haven’t yet checked to make sure the shafts are identical in size, which would prevent both my ideas thus far — swapping shafts OR just the cranks. I may still be at square one… and just haven’t realized it yet.
Before you go removing metal, have you tried heat? Heat applied uniformly to the surrounding piece will make it expand. It may loosen any chemical bonds as well.
Some keys are wedge-shaped (like the gib-head key common to C&P flywheels and pinion gears), others are straight, and each are handled differently. Gib head keys stick out enough for the L-shaped head, and by themselves lock the assembly in place, but straight keys may need a setscrew or cross pin for alignment. It seems to me that earlier discussion of Goldings indicated a straight key, but you can check the archives for that.
that is a straight key. heat up the casting and begin to pry it off. with 2 pry bars, one on each side, opposite of each other, it should begin to slide off. a chisel through the gap between part and frame would prob work too. be CAREFUL… old cast iron and impact shock don’t always go together.
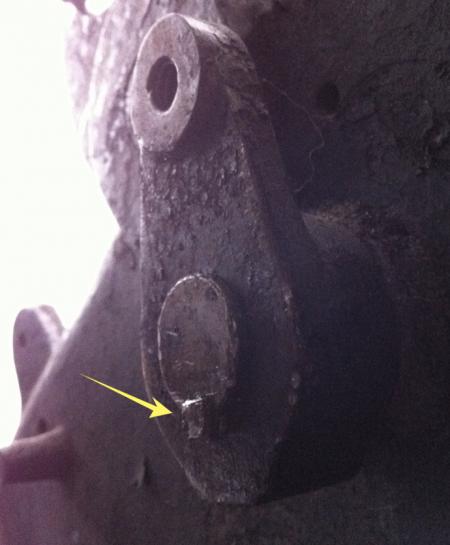
Check also to be sure there isn’t a set screw or tapered pin through the crank onto the key — it looks in the photo like there might be a flat side opposite the crank arm, where a set screw could go to hold the key in place.
Bob
“Before you go removing metal, have you tried heat? Heat applied uniformly to the surrounding piece will make it expand….”
“that is a straight key. heat up the casting and begin to pry it off…”
I apologize for the ignorance, but I’m assuming you guys a referring to one of those little gas torches, correct? I just can’t imagine a heat gun (for stripping paint) could possibly put out enough heat.
I may try that next, as I would get to keep everything intact. Thanks also for the reminder to check for additional set screws or pins, everything’s so filthy that it’d be easy to miss something like that.
set screw is possible… though period correct would most likely have a square head screw sticking out.
Ericm, you’re correct - at least as far as the square key and square-head set screw on the flywheels (at the other end of the same shaft.
If there’s supposed to be one for this crank, it’s been removed and the hole filled with gunk, because I haven’t noticed it.
Well folks, I’m out of ideas. I got the key out successfully, and now have the problem of the shaft being mushroomed (I don’t believe by me) to the degree that the crank won’t come off.
I’ve tried a gear puller, tried sanding it down with a rasp, and finally held a propane torch on it for over an hour straight. I was able to get it 1/3 of the way off, and now it’s completely stuck.
I suppose I could burn through another bottle of propane with questionable results… or I can attempt to remove a small inner gear (great, another key!) and pull the entire shaft out in order to take it someplace with an arbor press.
This is quickly becoming a nightmare.
torch.jpg
Carefully drive the crank back onto the shaft until as much as 1/4 inch of the shaft is exposed. Then file it down with a mill file, not a rasp — turning the shaft a little each stroke so you take the mushroom off uniformly. Take it down to a very slight bevel. The crank should slide off if the mushrooming hasn’t penetrated too deeply on the shaft. If it’s still stubborn, drive it on a little further and file some more. Don’t remove too much metal if you plan to reuse that shaft.
Bob
It’s already about 1/4 - 1/3 off the end of the shaft… I can’t imagine how I’m going to get it back on.
Thanks for the input - I’ll sure try it. Wish I’d just gone out and bought the correct tool for filing the shaft in the first place, instead.
heat should be applied from the outside of the casting, not the inside as shown in your pic. are you using a hammer with the puller? the puller is made to be cranked up very tight then hit with a heavy hammer where the arrow shows. it will move the casting , then the process starts over. tighten then strike. if you got the casting this far it will come off.second pic shows the type of hammer you need. they are cheap enough. do i see a gas can in your pic???
DSCN1953.JPG
gear_puller.jpg
Wow Eric, thanks so much for taking the time to include photos! I certainly didn’t spurge on a good gear puller, and that $8 special from Ace is worthless. Yours looks like the nice $50+ version, and I’m sure it’d have been more successful. We get what we pay for!
I went with (part) of Bob’s advice this morning, gently hammering the crank back onto the shaft where it was able to spin freely once more. I then was able to get the inside gear backed off it’s key. I’ve now removed the entire shaft.
The caked grease has essentially become clay, so I felt this would give me the added advantage of cleaning these pieces thoroughly. Between the treadle, gear and flywheel all running on at shaft, I think it’ll be worth the trouble to have that section at portion not binding up. I’ll ponder Bob’s advice to file the mushroom a bit now, but for now I may just wait and reassemble it as I need to print a job in the next few days, ideally.
As for the heating technique, I’d just moved the burner as I took that photo, but for about 45 minutes prior to that I’d only been heating the outside, slowly and evenly all around. Sure didn’t do much.
No gas (or fumes) in that can, BTW. I knew that’d raise an eyebrow or two. : )
gearshaft.jpg
check around… some places rent good tools or even loan them out for free.
Well, getting this shaft quickly and cleanly out of the other press happened in very short order (much less gunk on the other press - unfortunately it’s the parts press for having suffered through too many poor repairs).
I’m in the home stretch it appears, and wanted to thank everybody who’s responded to me on this. This is a great resource and I’m humbly grateful for all the willingness to share your considerable experience in the “black arts” of letterpress.
Take care,
Brad
This is obviously too late for your job, but in case anyone else reads this, the trick in heating parts while trying to pull or pry them off, while tension is on, is to apply heat as fast as possible from around the outside. Two torches are much better than one.
Consider joining the PearlRestor group on Yahoo.
Tell us more about PearlRestor — I searched for it in Yahoo Groups to no avail.
Bob
http://groups.yahoo.com/group/PearlRestor/