ink coverage
I’m having trouble with ink coverage and am looking for some guidance!
Here’s my set-up:
• Craftsmen 9x12 Monarch platen
• Boxcar base
• form is 0.5 in x 3.5 in, centered in platen
• platen is level
• rollers are type-high (tested with gauge)
• using Van Son rubber inks
• printing on Lettra 90C
• use California Wash for cleaning
Here’s what I have tried:
• when I first mix the ink, I used transparent white and after reading through these comments (http://www.briarpress.org/39743), I remixed using opaque white, but yield same results
• I’ve rotated the form 90° to print parallel and perpendicular to the rollers, but no change
• I’ve played with packing, increasing it and decreasing the amount, with no difference.
• On a recent job, I used Lifestyle Crafts Letterpress Inks with no issues at all (the form was larger and a lot more detailed)
So what gives?? To me, it’s either the rollers or the ink.
Since the job prior to this printed just fine, it tells me that the rollers are fine and are not in need of replacement. Could it be the ink is not adhering to the rollers? If not, why?? However, I have printed with these ink (on my Kelsey) and have had no trouble what-so-ever (even with the transparent white). This is the first time that I am using these inks on the Craftsmen. What else could be causing this?
** the print-outs are laid in order that they were printed, so you can see the variation and it’s inconsistency in coverage. (I trimmed the sheets so that I can have the printed area closer to each other for the photo).
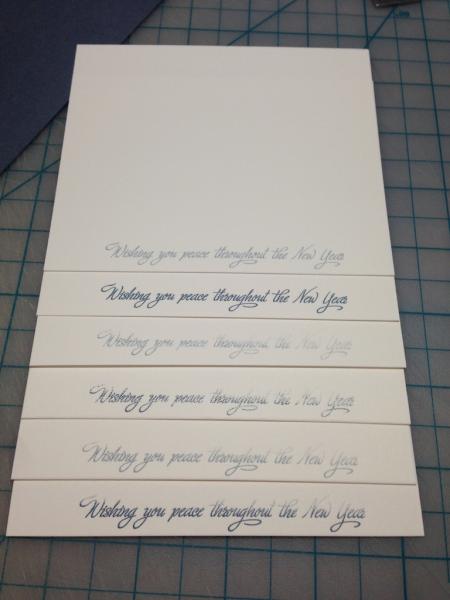
InkCoverage.jpg
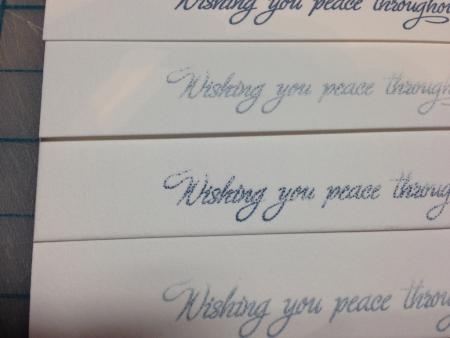
InkCoverageDetail.jpg
Hows the heat in your shop, if it gets too cold then your ink won’t spread out and your rollers could shrink.
Check you roller trucks, they might be broken or not rolling and are pushing the ink across the image.
I’d also bet that your rollers trucks aren’t true, thats why there’s a pattern. If there’s a slight wobble it will raise and lower enough to affect ink transfer.
Set a couple pieces of line rule vertically in the chase and you can test this theory.
(sorry double post so here’s more ideas)
You’re going to need to need to isolate each variable. Has this press ever printed well? What kind of imagery was it? What changed? Lots of experimenting, and even note taking and you may find the answer. Don’t count out any piece of the machine, often its something that seems like it couldn’t possibly be the cause.
Thanks for the feedback.
The heat is consistently right around 70° as I work inside my home.
The trucks are not broken, cracked; and they roll and do not drag on the rails. (and they are locking trucks)
What do you mean, if the “trucks aren’t true”?
I did notice that when the platen is open, the left side (when facing the press) drops down about 1 - 1.5 inches lower than the right side. (see pictures) I am able to manually lift up this side so that the rollers are once again parallel with the floor, but I have to do this each time. I pulled a few prints and it did seem to help, but yet not eliminate the problem. Could the saddle springs need to be replaced?
It is a new press to me, that I’ve had running for just over month or so, so I can’t answer if the press has ever printed well or not.
The only thing that comes to mind that has changed from the prior printing, is the ink. I printed (on this press) about 50-80 pieces of 10 different images/set-ups without any issues.
BedRollers_2.jpg
BedRollers_1.jpg
Tony,
It seems you are so close to diagnosing your problem on your own. You’ve used the scientific method to test and examine every variable except the elephant in the room, the rollers jumping over the type. Either the springs don’t have enough tension or the roller arms are loose and not moving in unison. The fact that the roller droops on each impression is a clear sign something is amiss. The sequential nature of the result would indicate that something is skipping or skidding on its rotational path. Based on your methodical analysis you should be able to fix this. Keep us posted.
Steve
could be solvent getting in the mix. You wipe the plate or rollers w/ california wash and don’t wait till it’s dry and it’s havoc.
I think that I’ve made some headway.
I put 2 sheets of copy paper behind the Boxcar base and that helped a lot. But I have to wonder, isn’t this counter productive to taping the rails??
While printing, I did have to manually lift up that left side. As I was printing, I noticed that the roller core of the bottom roller was hitting the compression arm on the right side of the press (opposite side) causing it to jump, which probably contributed to the irregular printing. (see pictures)
I got about 100 or so prints in and then this happened! (see pictures). The left side of the bottom roller started to get caught in the platen as it was closing.
Is this still a saddle spring issue? Or could something else could be causing this?
RollerHittingPlatenBed_CloseUp.jpg
RollerHittingPlatenBed.jpg
RollerCoreHittingArm_Detail.jpg
RollerCoreHittingArm.jpg
Nice clean press.
You may have more than one issue to cure. It looks like you have a sprained roller arm. One side sags. Remove rollers. With an assistant to hold the handle in place while you test, move roller arms to about mid position on the bed/rails. With assistant holding handle rigidly in place, grasp roller arm and firmly wiggle up and down. Do same with other roller arm. They should feel the same and move very little. I think the left arm will wiggle quite a bit and that you have a dislocation at the shoulder. Explore there.
With rollers off, run the arms up to the highest point and pull the saddles out against the spring tension. Both sides should feel the same and pull smoothly.
After you solve any roller arm problem, install rollers and ink the press and install chase with form. If you do not have a roller height gauge, you can do as the old printer did. Use a piece of 20# paper in a strip. Place it over the form and roll the roller onto it. Tug the strip. There needs to be a little pressure on the form, but not much. Test both sides.
You have to have good inking before you go any further. No amount of cursing or arm waving will do any good. Get the inking right.
As other folks have mentioned, I think that you have identified the source of your inking problem.
I have a C&P pilot that I recently reassembled. I had the same problem as you.
My roller arms did not move in synchrony. The net effect was that the rollers canted during the printing cycle and slid over the form to some extent while inking. The effect was a mottled uneven impression similar to what you are seeing.
I resolved the problem once I installed the two roller frame pins. This largely prevented independent movement of the roller frames.
I believe that your press uses the same style tapered roller frame pins. Check to see if these are installed. If not you will need to install or improvise a set.
Good Luck
Don
OK, after some (well, a little more than some) time away from this issue, I’m back at trying to resolve it. I’ve replaced both saddle springs and reinked the press only to get the exact same results: coverage that is blotty and inconsistent from print to print.
Ugh - I just don’t get it!
Now what should I try??
Hi Tony,
It does sound like the arms are loose. As Inky notes, if they wiggle, check the fasteners.
are your rollers shiny, glazed? Did not see this thought in previous comments.If you have an old pair try very slightly roughening them with pumice powder/glaze remover to try before treating your best set.
I check the arms - they were not loose. In fact, very little wiggle to them at all.
My rollers were not shiny. But I did clean them well with mineral spirit and “Super Soap” as well as the ink disk. That did it! Yeah! I printed a small (125 qty) 2-color job and pretty well for both colors.
A few follow-up questions based on this:
How often should the rollers be cleaned like this?
I’ve always used California Wash to clean up, would that be the culprit? In my option California Wash cleaned better than the mineral spirits (only) and would rather use it, if it won’t cause future problems.
I did see that Boxcar Press carries a Van Son roller deglazer called Easy Street. Is this something that I should consider purchasing? How does it differ from the “Super Soap” (from NA Graphics)?
thanks for all the input!
Help! (again)
Since this discussion, I have replaced both saddle springs. I haven’t used this press much since. And now, it’s happening again. The same side, the same issue, as shown in the photos above (RollerHittingPlatenBed_CloseUp.jpg and RollerHittingPlatenBed.jpg). I’m just over 200 compressions into a job before it started to happen again.
What gives???
I noticed you have NO packing in these photos.
The top sheets is for holding the register pins, under the top sheet you have to have packing.
It looks like the bottom roller core is longer than the top. It also looks like there is a gap between the truck and the rubber. If the roller can move from side to side, it can clear the arm during the early part of the printing process and gradually move over and strike the arm later in the run. You can eliminate side play with washers on the roller core to fill the gap.
Have you measured the diameter of your trucks? It is possible that different diameters will travel at different rates. You can also try switching trucks from side to side and see if that has any effect.