Photopolymer inking issues
This seems to be a common issue posted on Briar Press so I apologise for going on about it again. Though I cannot work it out. I have read and re-read the posts and tested and tried the many options as to why this happens, still with no luck.
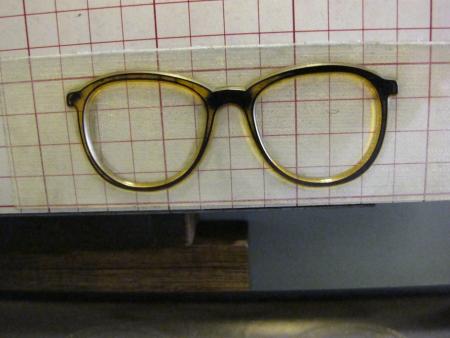
My photopolymer plates aren’t inking evenly. See image below. The ink takes to the outer edges and is heavier in certain spots, resulting in what should be a solid print but printing only an outlined image.
- My rollers are locked to my trucks. Trucks are rolling smoothly over the rails and rollers smoothly over the polymer. Even so, have tried rosin on the trucks in case they needed more grip.
- I am using rubber based ink.
- I have used a roller height gauge and corrected the roller height with masking tape on trucks.
- I have tried placing a piece (sometimes 2) of bond paper behind my boxcar base to get more ink on plates which has helped slightly.
- I have tried with less ink and had even worse results.
- I have tried the plates both horizontally and vertically in all corners of the bed.
Fine lines and smaller pt text print perfectly.
Perhaps someone out there who has experienced this inking issue has found a solution??
I am at a loss. Is it my ink? Is it my rollers? Trucks? Plates?
Probably doesn’t help that I can’t identify my press. No one seems to be able to tell me. I have posted an image of it so you can see what I am working with. A John Haddon & Co maybe… It is the closest I have got yet.
Any help would be great.
Erin
IMG_9165 2.JPG
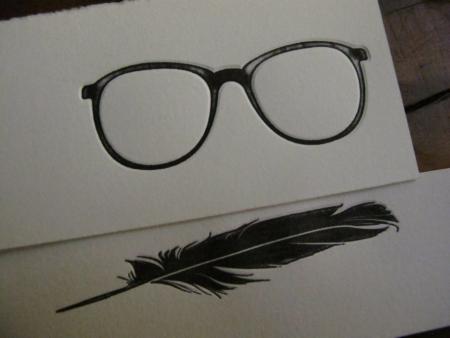
IMG_9353.JPG
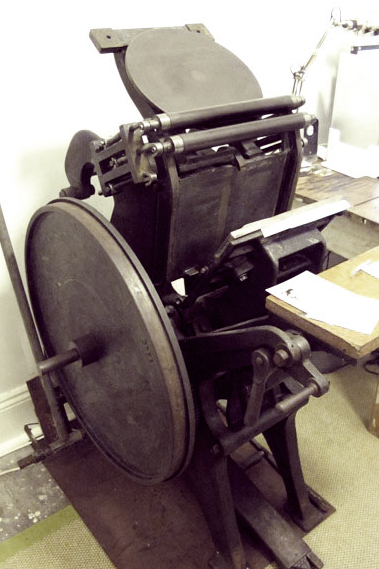
Unknown press.jpg
Could be a roller problem, how old are the rollers, if the rollers are rubber you could try using a glaze remover on them, rubber rollers will get shinney after many washups and will not distribute ink very well, offset printers use glaze remover often, any ink supplier should be able to tell you where to get it. New rollers make a huge difference, this might be where to start. Dick G.
Thanks dickg. Always so helpful on briar press.
I don’t know how old my rollers are. Sad to know so little about my press but the previous owner had no info so it has been a slow learn for me.
My rollers are about 1/16 - 2/16” larger than my trucks. Currently I have my trucks built up with tape to make them type high.
They are rubber so I am going to buy glaze remover tomorrow. Goodness I hope I don’t need new rollers!
If your rollers are swollen larger than your trucks, I’d say you need new rollers cast and ground to the diameter of your trucks. You want those things to be very very close to one another in diameter.
Thanks helimited.
So even if the rollers are the slighest bit larger, say 2/16” then my prints will be off???
Can I just buy new rollers and trucks or is it better to get new rollers cast and ground to the diameter of my trucks, as you say above? Is there much of a difference in price?
I only ask as I am in Australia and letterpress is such a small industry here, its often easier and quicker to order new from The States rather then try find someone to remake in Australia.
It might be the type of ink. If the ink is thin or has no body, it might be breaking down as it rollers over the image.
Does the ink work okay on type with good coverage?
Check your plate. Are the edges of the solids higher than the centers? I have experienced plates that are concave and print like yours.
I had my rollers ground down today, now they are the same siza as my trucks and completely round all over. It has made the world of difference to my inking!
My ink disc is slightly raised in the centre so I should also get that flattened out. But for now my prints are great so that can wait.
Thanks for everyones tips
This is a four year old post, but I just came across it, and the remark by Sharecropper Press:
“Are the edges of the solids higher than the centers?”
YES
I make my own plates, and they are consistently like that. The plates don’t cause any printing/inking issues like erin andType experienced, but when I take a close look with the magnifying glass at the plates, I do see the raised shoulders. Printing type is fine, the solids are also fine with well defined edges, since there the impression depth is ever slightly deeper than on the inner area.
I am wondering, which part of my plate processing can cause the raised edges? I am using LSL-145 HSB plates. I did ask my Plate Sales Rep about it, but did not got a usable answer.
Louie, I can only tell you from my experience with soft photopolymer flexo plates. Usually height variations like this are because the plate is not adequately dried before it is post exposed. During processing, the plates can swell unevenly. The edges of the images are in more contact with the processing solution since both the sides and top of the image are in contact with the solution, as opposed, for instance, to the middle of a solid where only the top is in contact with it. So, the edges can absorb more solution and swell more. If the plate is completely dried, all of the printing surfaces should go back to being the same height. Then the plate can be post exposed to do the final cure and make the polymer more durable.
When you post expose, you lock in whatever heights are in the plate at the time. So, if the plate was not adequately dried and the surfaces were uneven, when you post expose you lock that unevenness in. After post exposure, no amount of additional drying will change the heights in the plate.
So, my advice would be to increase drying time and/or temp, but be careful not to exceed the recommended temp for your plates.
http://www.toyobo-global.com/seihin/xk/pdf/print.pdf
Hope this helps……Geoff
Hello Geoff, thank you for the advice.
Increasing the drying time does work!
I tried it yesterday, and there were no raised shoulders. I did not check how much extra time I need, but at least I know which direction to go in the future. Probably I have to introduce a coffee break in to the plate making process, maybe add an extra drying drawer or a separate dryer unit.
Glad we could solve your problem, Louie!
A coffee break sounds like a good solution, in addition to your other ideas :)
Regards, Geoff