Help with imprint on C & P Old Style
I’m having problems with the imprint on my 8x12 C & P Old Style and was hoping someone could give me some advice. I’ve printed on this style of press before in other studios, but this particular one is new to me.
My first problem is getting a solid imprint. The print area is about 5x6”, so I know there is a lot to cover, and it is ending up a little sparse in the middle. If I add any more packing (currently using tympan and 1-2 pieces of red board), the press jams during contact and gets stuck together, like it can’t follow through the cycle, and I have to rotate it backwards to get it unstuck. I’ve seen a few comments about adjusting the platen, but that sounds scary and I don’t know even where to begin.
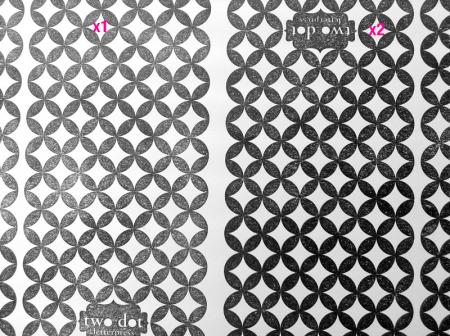
Second problem is inking. I just printed business cards and had to do a double print to get them to look correct. I’ve tried the same thing with this project but even after 3 passes it is still speckled. (photo attached). Regardless of ink, I’m not getting a correct blind imprint. So I think one, it is a pressure issue.
My rollers are brand new and the height seems perfect, no inking on the base. I have no blotches on the image edges. I’m using a deep relief base with the corresponding plates, Von Son ink, and Lettra 110# cover. I’ve seen a lot of people on here not liking Lettra, but I printed an entire wedding invitation suite with it on a Vandercook and didn’t have any problems. Also, I have already purchase a couple of reams and it is what I am stuck with for the time being.
I love the quote on Letterpress Commons: “Letterpress printing can feel like 99% troubleshooting, and only 1% actual printing.” Haha, that has been my life so far with this press. One step forward, ten steps back.
#LetterpressNewbie
Tianna
Great Falls, MT
bookmarks.jpg
5x6 inches of an image like that with close to 50% coverage is a stretch for an 8x12 — more than 1/2 the chase size, when the guideline is typically about or less than 1/4 the total chase area. To add to it you want the press to punch that much area into the Lettra. I think you are going to break your press trying. That is a job for the Vandercook cylinder. You would have trouble printing that image solidly inked with kiss impression on the 8x12, I believe — though double-inking and carrying a bit extra ink might do that. Not with the deep impression, though.
Bob
You’ve created a hard design to print, for one thing……fairly heavy solid areas requiring a good amount of ink, combined with very fine reverse type (the word “letterpress”), which, if you over ink it, will fill in. Also, the choice of typeface with thin strokes which are quite thin, makes things harder. If you are hitting the stock so hard that the press gets stuck, then I agree with Bob that your image size is too large, and you will damage the press if you keep that up. Assuming the press is adjusted correctly, another recommendation I would give is to use slightly more ink. Remember that ink will not transfer from the plate to the stock unless the ink physically touches the stock. In the low areas of rough stock, you may need a little more ink to squeeze out beyond the high areas of the stock and fill in the low areas. If you use more ink, this will probably mean revising your design to get rid of the fine reverses.
Machinery has limits as to what it can accomplish, just like your body has limits when you try to lift something heavy, etc. You need to develop a feel for what your machine is capable of, just like you have developed the ability to know what your body is capable of, and when you become physically overstressed. You have said that this is a new machine to you, and I hope you will be able to better know your press over time, and develop the ability to know when you are pushing it beyond its limits. Until you gain that knowledge, it is safer to err on the side of understressing it rather than overstressing it.
Eeek. Ok I don’t want to be breaking anything. I’ve already watched it fall off a fork lift. I’m going to cut the plate in half so it is less work area and keep messing with ink levels. Or I’ll just move on to the next project…
Thanks fellas!
Tianna,
I’ve had a 8 x 12 C&P NS for over 30 years. Everything that has been suggested is right on the money. However I would like to add a few thoughts. Because the Lettra has such a deep texture it will be difficult to get that image to print solid on this press. The fact that the press binds up is an indication that you’ve got too much packing. Two red boards would indicate fairly heavy packing. To test your press, (and yourself) try printing this form with a smoother stock. This way you will eliminate the texture factor of the stock and be able to tell whether your platen is adjusted well, your rollers are good, and your ink is heavy enough. If you can’t get the image to print cleanly on smoother stock then you know you have to start looking at other things, but it sounds like you have them under control.
good luck,
Steve
Tianna, you said you’ve printed Lettra on a Vandercook with no problems. There’s something to keep in mind about the difference between cylinder presses like the Vandercook and platen presses like the C&P. Cylinder presses can produce much greater printing pressure because the contact area is very small at any given time (just a thin stripe of the cylinder as it contacts the forme). Platen presses must generate all their pressure across the entire forme simultaneously. Larger formes will not print as well as smaller ones. It looks like the plate your printing is something multiple-up. You might try cutting it down to a single and trying it again.
—
Michael Hurley
Titivilus Press
Memphis, TN
What has not been mentioned is that dreaded letterpress word, “makeready.” More ink implies that a thicker layer of ink will encourage it to jump off the plate onto the paper, and more impression means that the edges of the plate bite deeper into the paper still leaving a weak center, and on a light weight press like the 8x12, that stresses the mechanics of the press.
Makeready can be self taught but with the aid of a book, like General Printing or Practice of Printing. It can be considered an art, but is a general requirement for most successful printing. The left area of this plate, or maybe middle of the plate, which appears to be possibly a 4 up card, needs some makeready, under the top sheet, to bring up the impression—don’t fiddle with the platen adjusting bolts but look to makeready to solve the problem, within the ability of the press. It is too involved to discuss here in detail but the technique has to be learned to get good or better than good results.
And then, why 2-up or 4-up? Especially for one’s own business cards. Is it to cut down on number of impressions but in reality causes much wasted time and paper stock, or perhaps to put to use the oversized base that is likely locked up or to get the most plate for the dollar. How many cards can you hand out in a year? A 4 up plate would imply an order in the magnitude of several thousand cards, but if only 250 or 500 are needed, this set up is very much in error. For hand feeding, I have settled on a one-up card that prints on a 4 1/4 x 3 1/2 card—print one end, then when half way through the run, reverse the card and print the other end. If the design includes a bleed, then use a larger piece. This cuts makeready to the bone, solves the inking problem, and you’ll be off the press doing something else while a 4 up card will be causing you to keep wasting time and paper.
Another aid in getting proper inking is to go only so far with a roller setting gauge. These are not to be the final determination for setting the height of the rollers, but the base and plate (or metal type) determine that. The gauge will help get the rollers parallel to the bed from side to side, but there is rarely a plate/base combination that is dead on .918”. I suggest setting the rollers to barely ink a plate, say a good sized plate, then adjust the height of the base to increase/decrease inking by adding appropriate thickness of packing paper between the base and the bed of the press. This saves a lot of rail tape and easily adjusts the inking needs as plates and amount of image coverage changes. And I strongly suggest that a press designed for 3 or 4 form rollers should use all the rollers to provide for consistent and adequate inking.
I have really learned a great deal from reading all of the notes here. Thank you all for taking the time to write. But I have two questions.
First, Tianna, my heart stopped when you said the press fell off a forklift!! Is there more to this story?????
And how did your final image turn out?
Thanks!
Nancy
Ducks In A Row Press
All great suggestions ahead of me, I cringed when you said the press jams and you had to reverse it. Have you done an initial Platen adjustment? Once that is done you can start fiddling around with makeready and ink. My first suggestion would be to cut the plate in half and rotate it 90 degrees. That might help with ink starvation when running a heavy solid like you have. My main workhorse is a C & P 8x12 OS and it takes a lot of tweaking to get some images to print. I usually print business cards 2-up (as Fritz said, run them through once, flip them and run them through again then one cut on the knife)
Good luck!
Steve
Paper Stone Printing
.