Impression Screw Crack on C&P Tabletop Press
Hi!
I am looking to purchase a 6.5 x 10 C&P Tabletop Press from a seller. She mentioned that the press is in good condition barring a small crack where the impression screw screws in. I have attached a photo of the crack and press from the seller. She mentioned that the depth and the evenness of the impression is effected - is there a way to repair or replace this part? I was looking to purchase this tabletop press as a beginner press and am a little out of my depth here, just looking for some insight!
Thank you!
Melanie

C&P 6.5 x 10.jpg
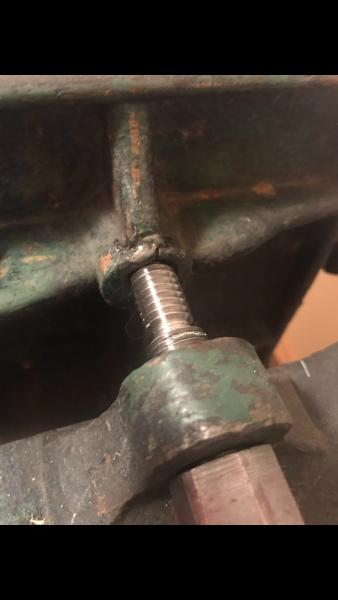
Impression Screw Crack.jpg
Melanie, Just a guess and that`s all it can be, sorry, but the *crack* appears to be only a very short way into a substantial section of the >bed<.
Generally to affect that operation, it would need to be a very very substantial Break (not a tiny crack) - perhaps do a little more in investigative work to publish and help other B.P. contributors.
Take an in depth look at THE bolt where it enters the base and the alleged crack, is there a corresponding nodule underneath, implying that there may have been (prior) a botched weld repair.? or crude attempt at Re-Threading. Dentist mirror may help.! or the one in Your compact/Make Up case, non intended, ?? Limey humour.
With extreme and gentle care, can THE bolt screw IN any further, implying METRIC (or wrong font) bolt into an IMPERIAL threaded hole. Finger tip control ONLY.
Perhaps do a comparison inspection on the other 3 bolts, do they appear the same thread, a thread *pitch gauge* would help, but even a simple brass rubbing on a piece of stock will give a good guide, especially if You can publish all 4 on B.P. in THAT resolution.
Apologies if the above be rubbish, but may prompt proper info.
My best shot. Good Luck Mick.
Fixed URL for first image:
http://www.briarpress.org/?q=system/files/C%26P%206.5%20x%2010.jpg
10 years and this bug still hasn’t been fixed.
Melanie,
I can’t tell from the image, but is the screw itself cracked, or is the platen casting cracked? The platen casting seems to have been welded at some point, is that the case?
that platen needs to be removed and all the adjuster bolts removed to inspect the thread quality. use a drill bit or something of correct size to “pre-measure” the gap there so it can be reset…. counting threads just isn’t accurate enough.
Melanie: From the posted picture, I cannot see how the overall impression quality could affect the impression quality, if the screw can be screwed in and out and hold it”s position.But without your trying this yourself I cannot see buying the press.. Gerald
The seller lives about three hours away from me - I was willing to make the drive to check it out if the crack was something that could be fixed. I unfortunately can’t really tinker with the press. Like I mentioned in my original post, I was looking to purchase this press as a beginners press so I’m definitely out of my depth here! Thanks for all of your input!
Howdy Melanie. If you decide that all is well with the press and buy it but the press needs some adjustment to align the platen, may I recommend this tool (link below)? I am NOT an expert on presses at all and for that reason alone, I researched and bought this from a gentleman (Rick) on Ebay to help me get the platen on a table-top press that I bought adjusted perfectly. I was shocked at how fast and easy it was once I understood how the bolts interact to adjust the platen to the press body. The experts here on Briar Press may have other/better remedies. FYI, I made him an offer and did not pay the asking price. Hang in there, you got this.
https://www.ebay.com/itm/LETTERPRESS-MAGNETIC-PLATEN-ROLLER-ADJUSTMENT-GAUGES-2-IN-1-NEW-PRINTING-TOOL/123585319525?hash=item1cc6425265:g:IEQAAOxyLm9S~o0y:rk:13:pf:0
Tony
We have seen this from time to time. The most likely cause is platen misalignment when running the adjustment bolts all the way into the rocker, resulting it the platen being free of the bolts. That is to say perhaps an adjustment bolt was broken and during the removal to replace the bolt the platen gets tipped a bit. Well, at the end of the process all four bolts are to be screwed in all the way with no binding before the platen is lifted off of the bolt ends. This may sound confusing if you don’t know that the end of the platen adjusting bolts has threads are left handed. When the bolts are screwed into the rocker, the platen climbs off of the bolts. If the bolts are not dead even in the travel, the single bolt with a 1/2 to 3/4 thread remaining engaged… will brake away the last thread resulting in what you see in the photo. It is also helpful to know that the left hand thread is 1/2 12 tpi. This of course is not standard by any means.
The installation of the Pilot platen demands that all four bolts are started at the same time and backed out one flat at a time using a crisscross pattern to maintain even movement. It takes a while to move the platen to its correct location parallel to the case base and about type high plus 0.050”
We use John Falstrom’s platen adjusting tool with outstanding results. We highly recommend this tool.
Tom
www.tandtpressrestoration.com