Registration on SP15
Hello Briar Press! I’m hoping to get input on some registration issues I’m having with polymer plates on an SP15, using a deep relief Boxcar base.
I’ve noodled to the end of my current patience and I can’t get the second color (grey) to meet up with the first color (teal). See images below. The grey is on the inside of the leading crops and on the inside of back crops, which makes me think the polymer wasn’t placed squarely with this run or the last… Is there another possibility I’m missing?
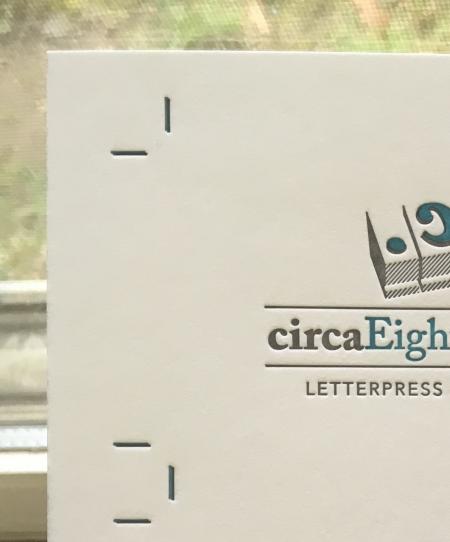
BackCrop.jpg
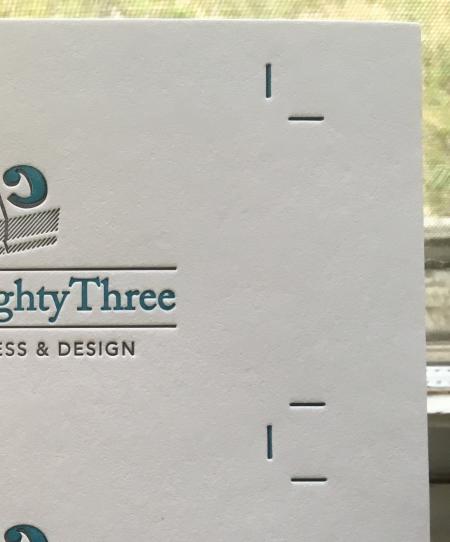
LeadingCrop.jpg
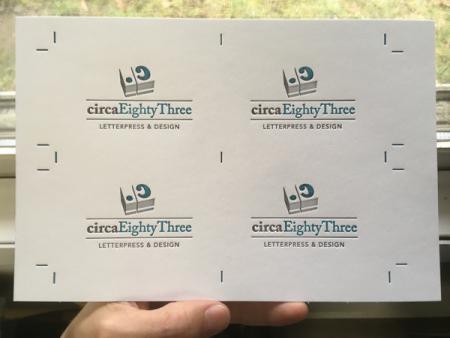
FullSheetSmall.jpg
Any press that is hand fed…wirh paper that can change dimensions due to humidity etc….will need adjustment.. Paper has a grain too so can move more in one axis.
If you believe that your plate hasn’t been been put down exactly square, you can and should adjust your gauges slightly to get your second colour in register. And, important factor, feeding you paper perfectly with multi-colour work is extremely important.
I sometimes find on a hand fed press that by experimenting with moving the gauges slightly to move the paper sideways, or up and down, or especially to tilt (rotate) it slightly, a job that you didn’t think you could get in register, actually can be gotten in register.
And also, in the end, the goal is to get the job in register, not the register marks, so you can sometimes do this and get the traps right and get the job looking ok, even though the marks are a little off.
Thank you everyone!
I dont know anything about the SP15. Something to try is to add or remove packing. If you gripped the short short side in this case it might explain why some of the marks are on and some off. This may help change the diameter of the cylinder and may let you compensate for the change to the paper caused by the first pass.
Tend to concur with Western 411 re His Change the diameter of the cylinder etc., reasonably well documented in the case of the V.M. (Vertical Meihle) that that the overall Forme area compared to the circumference of the Cylinder can and has resulted in the above Scenario, could well be so with the
S.P. 15 especially running what is probably Cotton Waste stock coupled with Deep impression ? Not tantamount to good results in the early stages. ! !
Perhaps, as a simple proving experiment (or otherwise) take 2 consecutive Pulls/Proofs on both Blocks & Colours on (semi) transparent paper or even acetate sheet(s) at worst hold up to strong light OR at best shine up *Light Box* / *Light Table* with the pulls viewed - superimposed, ??? will prove or otherwise IF the circumference and packing on the S.P. is the problem.
Perhaps as well ascertain if the author producer of The image has any Typographic Training/Expertise especially in Copy Fitting, Spacing etc., see the Serif of the *T* in Three sitting on top of the l/c, *y* and more.
6 pt. more length on the cross rules would have made all the difference.
**Non intended** ? but feel so sad for the new Devotees trying to assimilate all the Vagaries and Idiosyncrasies of This amazing medium, also grateful (during apprenticeship days) to have spent 6 months in the Proof Readers box as a Copy holder, before laying hands on a setting stick in the Composing Room.
After Thought. Depending on how you made the plates that may also be the part of the issue. If from an inkjet film could be an issue or even a film neg stretch can occur along with exposure contact issue. You should be able to print the blue back through onto itself. Print, then wait like you did now and run through again. It should register perfect. If it does not then the prior discussions will help point to an answer. We use a plate made by Crown Flexo. We just finished a tight register 2 color card that looked as good as anything I have ever printed on my Ryobi or my GTOV in 40 years.
This just sounds to me like you are unfamiliar with the guides/adjusting them, and that you’ve gotten your answer already. The other aspects of setting it up and technical details people have raised are ‘good to know’, but in my opinion taking a measurement from the gripper edge of the sheet against your first couple sheets should give you an idea of how far to move the guides, adjust the sheet into register, and then put you square with the edge for cutting as well.
Often with beginners and these presses, the knobs and dials that can be adjusted are overlooked or under-represented as an important part of the press to understand- because all of it is so new to you! And that is OK. Your first few multiple color items are kind of going to be imperfect, and that is also OK- as you move through experience you can refine your craft and before you know it, you’ll not only understand the guides- but will be comfortable with them.
Don’t be afraid to get a teeny ruler and measure distance from head of sheet (gripper edge) to first crops, and then do so every once in a while again on sheets you’ve printed down the line.
You can even standardize your press and become familiar with where the crops should land on the paper, get into a routine of checking this on the first few sheets of a job, and adjust accordingly before you ever get to your second color too.
Good luck!
This just sounds to me like you are unfamiliar with the guides/adjusting them, and that you’ve gotten your answer already. The other aspects of setting it up and technical details people have raised are ‘good to know’, but in my opinion taking a measurement from the gripper edge of the sheet against your first couple sheets should give you an idea of how far to move the guides, adjust the sheet into register, and then put you square with the edge for cutting as well.
Often with beginners and these presses, the knobs and dials that can be adjusted are overlooked or under-represented as an important part of the press to understand- not because an instructor might wish to keep the information from you, but because all of it is so new to you! TMI is overwhelming at first. And that is OK.
If you’re self taught, it’s also something that people tend to be ‘shy’ about- adjusting guides. Just remember to put them back to original position (approx) when you finish your run. On vandercook presses, there is usually a scored line across the gripper bar in the cylinder- I will usually put the sheet against the guides and square it with this to straighten the guides before running the first impressions, and move away from this ‘base line’ from there.
Your first few multiple color items are kind of going to be imperfect, and that is also OK- as you move through experience you can refine your craft and before you know it, you’ll not only understand the guides- but will be comfortable with them.
Don’t be afraid to get a teeny ruler and measure distance from head of sheet (gripper edge) to first crops, and then do so every once in a while again on sheets you’ve printed down the line.
You can even standardize your press and become familiar with where the crops should land on the paper, get into a routine of checking this on the first few sheets of a job, and adjust accordingly before you ever get to your second color too.
Good luck!
Circa Eighty Three —- Did you resolve your registration problem? I remember trying to do a 4 colour process proof on a proofing press as an apprentice and the most important thing to remember is to balance the sheet on the front lays, ideally about a 1/4 of the way in from each side and work the sidelay to suit. If the sheet is balanced on the lays it makes it easier to print in register. another tip is to have finer registration marks and reduce the amount of impression to start with until you are in register? worth a try good luck.