Crafting my own
Hello everyone, first post here.
I’m looking into making my own proof press for some nice posters and whatever I feel like pressing at home, let me know what you think about this diagram of my design. I’ll try to post a full tutorial once I build it. Any advice on how to improve will be much appreciated!
-Connor
proof-press.jpg
You might consider getting a cylinder from an AB Dick or Multilith press. 11x17 or 17x22, are two common sizes. You’ll save a lot of labor and enginering with this. There is a rubber blanket on these, and is half the labor in building. I’ve seen the bed and rails on one of these made from a hardwood. Good luck!
Great! I was wondering where I could get a good proof press roller. Thanks a lot!
-Connor
Good Morning Connor! It’s good to learn of your press building project. Over the last few years there have been quite a few presses built by clever folks….. and many of them produce quite outstanding work.
Here is a link to my own Wooden Proof Press, which I posted here a few years ago.
http://www.briarpress.org/12848
That particular press prints a very nice 12 x 18 print, and sees almost dailly use in the “artistic” side of my shop.
As you can read, the cylinder is an old scuba tank that I cut the ends off of…… and it works like a charm. Since htat one was built, my friends have sent me details of similar presses using all sorts of cylinders. Old fire extinguishers seem to work particularly well, as does heavy steel tubing.
I would not attempt to make a cylinder out of an old AB Dick part. I attempted it, and it doesn’t work so well. The ring gear, and cut outs tend to mess things up. Stick with a simple cylinder of some sort for your first press.
Now…. about your design: It looks like it will work great, but I’d like to offer a few comments based on experience.
1. Supporting the bed only from the ends doesn’t work too swift with a wooden or aluminum bed. It’ll sag over time no matter how good a wood you use unless you make it very thick. You’ll need to add a support under the bed, running lengthwise.
2. That WILL of course render your tension cross rods under the bed impossible. Vandercook offers us a solution to this: Use cross braces OVER the cylinder, and/or behind, loaded in compression, to keep the sides in alignment. Look a a picture of an old Vandy, and you’ll see what I mean.
3. You don’t have enough material on your side plates. Make sure that you have plenty of “meat” there, since this is the most highly loaded part of the press.
4. with that design, you’ll need some sort of way to adjust / levelize the pressure. Use eccentric axle-bolts on your little truck wheels, or eccentric stud mounted bearings. You can order them from McMaster Carr for relatively low prices….. and they’ll make all the difference in the world.
OR you can use a free cylinder design, which is cheaper and easier to build. They produce less pressure, but still more than enough for printing relief work.
Good luck, and keep us posted.
Dave
aka Winking Cat Press
Wow thanks for the advice!! I made my cylinder out of a 4” diameter pvc pipe, then I put end caps on and drilled 1” diameter holes for the steel tube I ordered (correlating with the 1” diameter holes in bench press weights.) And since the caps were about 1/4th inch higher than the tube itself, I bought some thing pvc rubber, and wrapped the tube to level it out with the caps. This also has some good weight to it. I’m thinking about using some turnbuckles to attach the wheels to the roller so I can keep it in good tension.
I have been thinking very hard about how to give the bed more support. I agree that the tension rods won’t work super, due to sagging, so i’m still mulling around with that. I’ll look at the Vandercook.
I actually gained some inspiration from your design, seeing as there aren’t many hand made proof presses on the web.
Thanks!
-Connor
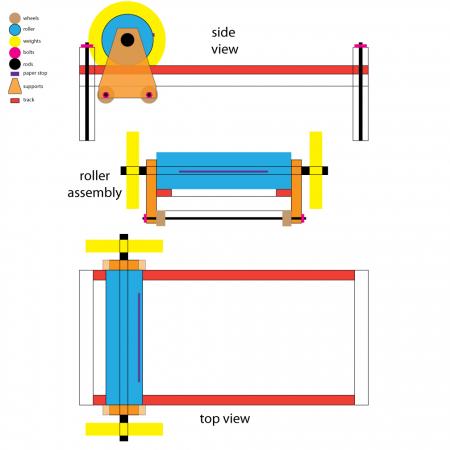
Alright, I thought about it and I think I have a solution, Check out this graphic. I might put some cross support too between the lengthwise beams, but we’ll see. If you can’t understand anything from the picture let me know. I’m more than happy to explain
proof-press.jpg
Have you thought about a counter-roller that applies pressure to the underside of the bed?
counter-roller.jpg
I can just about hear the wheels turning in your head. You also do very nice graphics.
In my humble design training and experience, I was always focused on objective. Another adage was that form was to follow function. The third was KISS.
The original proof press was to get a proof impression to read and correct. The type could be tied up and on the stone. It was inked and a piece of paper plopped gently on the form. The kitchen rolling pin could have been used to roll over the paper and create the print. The proof press grew from there to the large motor driven Vandercooks which the current artists like for poster work.
Your evolving design will work. Will it serve your objective well? You can plop your paper down and roll over it with your 4” turnbuckle tensioned roller and get a print. If you are going to do a second color in good register, you will need a frisket and register system, OR a set of grippers or an arrangement to accurately hold your paper to the cylinder. Your 4” roller will limit the length of the paper that might be attached to the roller.
Your tensioned roller can be horsed down very tight. With it too tight, it could cause slur at the top end of the print as the roller mounts the paper.
In the evolution between the kitchen rolling pin and the motorized Vandercooks, there was a humble and effective proof press that was essentially a large weighted rolling pin that ran on machined rails on a cast iron bed. The cylinder could be filled with sand or lead shot as appropriate. It was covered with a felt piece when it was used to make a simple black proof. One such press made in many numbers was called a Doctor Miles press.
You are on the road. Your design work is good. If you have the skill and machinery to fabricate, you are on the road to some fun. You are doing something very similar to what was done early in the history of press evolution. In this case reinventing the wheel is not bad at all. It is that great minds think similarly.
Get some ink on your shirt.
Great advice everyone, this is a great community. Glad to be a part.
This roller for the underside, how would it improve the printing? By applying more even pressure? It sounds like a fun challenge if I can see it improving the overall performance!
As for the roller size vs. paper size, and registration, you can see on the roller in my first illustration, a small dot, that is where I’m planning on making some sort of a stop for the paper to rest on while it begins to roll, then to release the paper once the print begins. In my mind, I don’t see the roller effecting the paper size because it can keep rolling, the paper wont be attached though. In theory, you could roll over a 20’ long piece of paper, with even a small diameter roller. I’m not sure how this will effect the print outcome, although, i’m sure I can find a way to make it operate well.
Thanks!
-Connor
Inky… you are right about the Mile Nervine presses, they actually print pretty well….. but you don’t need a tympan/frisket to achieve good registration on them. I routinely use a pin-register system tha works like charm on proof presses. It’s the same way the litho-stone folks keep their multi-colored work in register. (It also works GREAT on Poco’s …. I’ve used pin register for many years )
Could you link me to a place that shows a good example of the pin register system? I work in screen printing so I know a bit about registering. Also my brother just got a job at our local letterpress studio, Spark Letterpress, It’s a pretty good place. You can check it out at Letterpresslove.com
-Connor
The bottom roller maintains even pressure to the form and prevents the press bed from distorting during the printing process. The idea is borrowed from etching presses that I have used.
Very cool idea! I’m definitley going to toy around with that one. Especially since the bed is wood, distortion is best avoided. I could even attach 2 rollers underneath on the cross bars that the wheels are attached to, make the rollers the same size as the wheels, then wrap them with rubber to make a very slight size difference to make contact and grip. Thanks for the inspiration! I have a feeling this press is going to be a monster! (in a good way) as for price, I have most everything bought, and I think it’s costed me about $60, so this is pretty cost effective. If I do the rollers i’d say it would cost about $20 more. So not bad. I’m excited to see the outcome.
-Connor
If you do 2 rollers you could cause distortion and binding if you apply too much pressure. Two rollers vertically aligned puts the squeeze just where you need it.
Where are you located?
Sounds Good, My newest design uses 3 turnbuckles per side, the middle used to tension the upper roller, and the lower roller. The two side turnbuckles used to keep the wheels tight to the track, so the upper rolled stays in line and tight to the track. The lower roller is pvc pipe, end caps with holes drilled to run a threaded rod through. Let me know what you guys think.
Thanks!
-Connor
edit: I forgot to mention, where the rod for the lower roller goes, it has some room to move up and down so it can be tightened without effecting the wheels.
press.jpg
Here’s an update, It’s getting towards completion. I just need to make a metal bracket to put the rods holding the wheels, and lower roller through to keep them in place, this will give the press a much smoother roll. Anyways! Here’s a pic!! I’ll see if I have a picture to show the top of it.
press.jpg
Here’s the top, before I put the steel tube in the roller.
press top.jpg
Alright I have some issues with the press that I want some insight on. I made metal plates to hold the 3 rods in the same position on both sides of the press, and I have been messing around with it and the main roller is able to twist, everything stays straight but the roller can turn causing it to move off center. I’m very frustrated and considering a complete redesign of the lower part of the press. I think I may just do something simple this time like Winking Cat Press did. they always say simplicity is the best route
Im not sure if people are still commenting on this post, but thought it was worth giving it a shot (fingers crossed!)
theres a group of us who have just started making a proofing press, we have the roller and general design, which is very similar to yours connor.. I am worried we will have the same problems, did you find any solutions to these?
ive attached a pic below… (at the moment there are no wheels underneath)
it sounds like there has to be a lot of weight on the side plates?
Also we do not have a counter roller or turnbuckles, will this make a big difference?
Thanks!
Andie
tumblr_m6abboXvjQ1ryww31o4_1280.jpg
tumblr_m6abboXvjQ1ryww31o3_1280.jpg
and I would like to say using a litho roller seems to be very ingenuous
there is probably no need to, but could drill a hole in 1 end and fill with lead shot or sand etc-also at my work there are large viscocity inking rollers for intaglio, 9 inches diam x 18, and people who do large litho printing eg for stone have larger inking rollers than that too-with a larger diam roller could affix a paper holding mechanism screwed through the rubber into the ali stock, presuming the roller has a large enough diam for length of work being printed.
You could get a kit from Germany
http://www.drucken-und-lernen.de/Detailview.92.0.html?&tx_ttproducts_pi1[backPID]=125&tx_ttproducts_pi1[product]=10&cHash=c6d57fd989
Thanks for the comments!
Thanks for the link for the kit from Germany, but we have to make the letterpress ourselves as part of the project - we have access to a very good workshop, which is lucky!
Yes as it is a litho roller it was originally just meant to ink a surface so we are worried about the weight of it and if it will generate enough pressure
im not sure we can drill into it and fill it though as we believe it is solid? A paper holding mechanism would be great - but unfortunately we need to keep the design as simple as possible as we have a time limit of september…
the major issue we are worrying about is the tension between the litho roller and the bed/ how best to attch it and how to manufacture the sideplates to be as effective as possible?
we have now decided to make the sides out of Ash and the bed out of WBP - as this should be very strong and not wane or warp
what do you think?
Thanks again!
Andie
I built something on a different design. It’s a gravity type press, not a pinch type like this one.
It can be seen here:
http://www.youtube.com/watch?v=ZjuasRbQil0