Special scoring — notebook spine
Hi everyone. I am trying to make some notebooks, but I’m wondering how would I go about creating this type of spine profile. I already did score all the sheets and the cover, but they look pointy (a very acute angle) and not nicely round.
Any suggestions? Please I could really use some help on how to do this.
I am attaching a photo of what I need.
Thanks everyone!
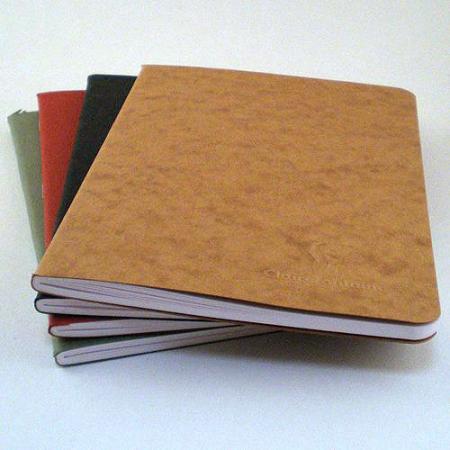
notebooks.jpg
If you can find 6 point score rule, that’d be a start. Alternately, put three 2 point rules together (possibly a ,910 bracketed by .900 or .890) and use three or four layers of duct tape as a counter. There may be come channel creasing matrix products that can also work as a counter—depending on what level of production you intend.
Sounds like a project that lends itself to experimentation.
I only need to make 100. But with 50 sheets inside each. So I also scored the pages with an autoscorer. And that makes the whole notebook very pointy. I will check with the client if they mind or not. I really have very little experience with rules, but that makes sense. A wider rule so the roundness is more pronounced, also I think this calls for a reverse side scoring. Right? Instead of scoring the outside and folding in-wards.
You are going at this a bit ass backward .
If you want the spine to look box like then utilise one of your shown books and try this .
cut the spine off , pad glue your spine like you would a scratch pad .
Tip the book up onto its foredge and with a fine toothe saw put six evenly spaced cuts 1/8 deep into the spine at 90Degrees to the spine direction , wrap some cotton around a ruler thirty or so times , run a sharp knife down the rule to produce the lenghts become strips of cotton a couple of inches long, put a bit of glue in the slot s take five or so strands of the cotton and twist together ,lay them and forcce them into the slots leaving an even length of tail protruding to the front and back ,Make your covers with a double crease that will wrap around the sections/ pages ,
Put a guard sheet under the top sheet of section put your cover in place lined up as you wish , place flat on table and paste the top sheet , fan out the ends of the protruding cottons so they lay small as possible and let them stick to the pasted outer of the book section , then carefully close the front taking care to get everything straight and no bubbles , flip over and repeat at the back,put a guard sheet in , glue out ,fan chords close back cover as with the front and place under heavy weight or book press to dry .
You can saw the slot in ten books at a time and the rest is quite quick once you get going at it .
Its the cheapest form of binding with as close to the strength of perfect binding as you will get .
Some finishes lend to an extra crease down the front of the spine and rear of book same to make breaking the book in easier without breaking its back as its called here .
I don’t think these were scored at all. I think they were stapled while the sheets and cover stock were still flat, then machine pressed as a whole block, and last they were cut/corner rounded. The spine achieved is a result of a simplified mechanical process, not something they aspired to produce, though it does do the job quite nicely.
You might want to try something similar if you have the means to fold and press them after stapling.
Book clamps for the back guide of the cutter might be helpful to keep the spine down so you can evenly trim the fore-edge of the book.
http://bit.ly/YyrLMN
You’d likely need a wire stitcher to get staples through this many sheets.
DGM
Bostich wire stitcher
Challenge book clamp
You could try working the pointy spines to a nicer round with a bone or teflon folder (search Talas bookbinding supply website). I do agree with Dan that a wire stitcher was probably used on your sample picture then books were pressed flat, trimmed and rounded.
Are you using a wire stitcher? Aka heavy duty booklet stapler? Sometimes the thinner notebooks are sewn with thread on an industrial sewing machine. It does take a very sturdy stitch to hold together one thick section with cover.
Then they will have the middle sheets extending out from the middle of the section while the outer pages are shorter from wrapping around the bulk. So also definitely need to be trimmed carefully since a stack won’t sit flat in a cutter, hence it is useful to have the book clamps as was suggested to keep them stacked against the back gauge of the cutter.
Best of luck,
Carrie
I think he is trying to achieve a squared back and stapling a folded section is not really going to achieve that …
Book clamps oh how many times i have wished i had half a dozen of those !!!
Having read enriqus note again i am wrong ,he wants a round back so he should not crease in that case .
Some automated collater/stitcher/trimmers fold the book after stitching, yielding a softer fold (and rounder back) than a book built with conventionally fold signatures/cover and then saddle stitched.
There is also a tremendous difference to be had from stitching together a 48 page book (12 sheets) vs a 96 page book.
Thin stitching wire can also help in keeping the spine from getting to “pointy”. Ideally loosely folded signatures in combination with a broadly score cover, combined with clamping/squeezing the spine before trimming will tend to create the most “round backed” books.
Ah, the fun of bindery. Wish I had a signature sewing machine…..and a proper folder, and the space for both…
Hi guys. The thing is that they will be sawn, by a shoemaker, since I asked around town and nobody has an industrial sewing machine that can stitch the pages to the cover, and everyone recommended a shoemaker. So the recommendation by a book binder was to bring the notepads scored so they will align easier for the shoemaker. But a regular scoring gives a very pointy spine. I will try and see if I can soften the score if not, we’ll end up adding elastic band to make the notebook close better. The problem with the pointy spine is precisely that: it doesn’t help keeping the notebook shut.
Wow, this brings back memories. “Back in the day” when designing a fairly thick saddle-stitched book, we would have to calculate the paper thickness (usually by making a dummy) because, as Carrie points out, the pages nearest the center of the trimmed book where definitely not as wide as the pages at the beginning and the end.
The calculations were used to determine the layout of groups of pages (we were not crazy enough to do every page!). The pages were layed-out/shifted incrementaly to try to ensure that things like page numbers all appeared an equal distance from the trimmed face edge of each page.
If this was not done, there could sometimes be a 1/8” difference. Just a typographic nicety.
Many designers were not even aware of this and some of the higher quality printers would simply take the individual page layout and simply do the compensating themselves when they were stripping the film for each form.
Rick
I’ve been wanting to create similar looking books. Im not concerned about round vs pointy spine. I am curious about workflow. I like the idea of stitching/stapling flat stacks of covers and guts and then folding and face trimming, but can anyone tell me what the powered device that can fold un-scored book stacks is? Or have recommendations?
Is there some way to do this other than hand folding – this would be challenging and tiresome on a bunch of 50 pg booklets. Any thoughts or info would be most welcome.
Alternately does it make more sense to run all the guts through some automatic folder and hand collate the covers. If so what kind of folder will handle the page count/collation of books as opposed to outputting just single folded sheets?
Thanks,
Josh