Kelsey Restoration… where to start
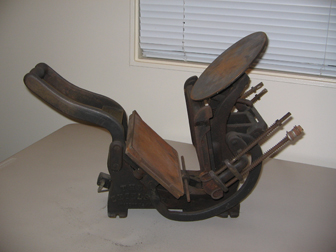
I purchased an older model Kelsey Excelsior 5x8, patented 1893, that needs some work. I would like to restore it to its original appearance. I want it to be both pretty and functional.
1. I think think it’s a Model-O, but I’m not 100% sure. Does anyone know what the original color(s) would have been? I uncovered some gold paint remnants on the text.
2. There is a layer of rust that covers most everything on the press. What is the best way to remove it? So far I’ve been instructed to use a dry wire brush and then paint a product called Por 15 onto the press that converts rust into a black primer. Is this wise?
3. How much of the press do I need to dismantle to effectively treat the rust, paint, etc? My fear is that I would either damage something or not be able to get it back together.
I’d appreciate any guidance you can provide. Thanks! : )
The best product I have found for rust removal is called Evaporust. The stuff is slow working, will not affect paint, is non toxic, is not an acid or base and can be flushed down the sink without violating EPA regs. I have used it on several different projects and it is the best thing I have found to date. It can be reused until it stops working. The stuff isn’t cheap but you can get a pretty good deal on ebay.
I just purchased a press as well and it was in a similar state. All I used was some 3in1 oil and a rubber sanding block with a super fine grit, which you can find at any hardware store. I put a small amount of oil on the press and then lightly sanded away the rust. It did two things. It got rid of the rust and oiled all the moving parts. For the tougher bits of rust I just either soaked or rubbed on some white vinegar and let it sit for a while then did the same thing with the oil and sander. Now my press looks like new and I did not have to use any nasty chemicals! Just be careful not to use too much pressure when sanding.
Dismantling the press to affect cleaning is not advised. Cast iron is very brittle and even the smallest of misplaced tappings to remove a recalcitrant pin could easily result in disaster. Besides, once the ink table, bed, roller hook arms and the platen are removed you are right down to the main frame. It’s the platen removal that might present problem; the center bolt/spring is usually stuck tight and you must remember to count the number of turns required to remove it. Here is a suggested method for cleaning up your press:
Take it to a car wash. Spend the dollar and hose it completely free of accumulated grease and grime (be careful - the hose has lots of pressure). Then take it to a source of compressed air (a tire shop as example) and blow every nook and cranny completely dry paying particular attention to the bearing surfaces. Now, on your way home, stop at the store and purchase 1 gallon of vinegar, 1 quart of lemon juice, one quart of oil, 1 can of laquer thinner, and a pump-type oil can, and, if you don’t already have a large, square container, buy some heavy plastic garbage bags as well.
Once home proceed as follows: Take every piece of sandpaper, emery cloth, steel wool, wire brush or any other abrasive and lock them away. Never - repeat - NEVER - use any abrasive on any press. If you do, you will drive grit into the bearing surfaces, upset the trueness of ink table and roller truck rails, and could easily gouge the bed surface. The press is easily cleaned with the supplies brought from the store as follows:
Take the oil can and force oil into the bearing joints. Continue forcing oil through the joint until it runs clear. Wipe up the excess. If there is dried ink on the press, use the lacquer thinner and a piece of brass rule - do not use a screwdriver or any other steel object. The ink will lift easily.Now, mix the vinegar and lemon juice in a plastic container; one large enough to hold the platen, bed, screws, roller arms. Or, if you don’t have a container of suitable size, simply construct a cardboord frame then use the plastic garbage bag as liner. One that is completed, immerse the rusty object in the solution. Then wait. Wait until the rust is easily wiped away with your finger (c’mon - it’s vinegar for pete’s sake!). Do not - do not give in to the urge to use steel wool to hasten removal. (If you want to do things quickly, use a computer, not a cast iron press). Once clean, oil everything immediately. If you don’t, your now bright, rust-free surface will begin to rust. Now, assemble the press. Or, if you want to paint it at this stage, well, William Kelsey and Henry Ford shared similar philosophy in that area: both provided their product in any colour - as long as that colour was black. (An apocryphal tale on Henry’s part, but true for Bill.) Anway the black finish is somewhere between flat and shiny - satin? Do not use any primer else it will show when the press wears. Assembly is straight-forward. There is information available to adust the bed/platen relationship on this site and others. Have fun.
Laurence
Updated. Cleaning
I was cleaning a 5x8 earlier this evening myself. My choice of weapons was some mineral spirits, WD-40 and a scotch brite pad. It won’t harm the paint or leave sand or grit behind if you keep it wet. When I got to the embossed area on top of the handle, I hit it first with some Mineral spirits and a rough brush, then got rid of the dried ink stains using acetone (it’s strong, but effective), then switched to some Fantasic spray cleaner and a 3” fingernail brush to make it sparkle and wiped it all down with my clean shop rag when I was done.
http://excelsiorpress.org/photos/kelseypressnametag.5x8.jpg
I like the idea of the vinegar and lemon juice for surface rust - and in fact just bought some - but have not tried it yet.
Do anything you want with the ink table and the bed - just remove them first. That vinegar/lemon juice concoction might work well for the rust on the platen.. otherwise, just wiping the whole thing down with WD-40 and a wet scotch brite pad should do the trick.
Roller Hooks & Springs
I took off the roller hooks and polished them up on my wire wheel. It is important that they are fresh and clean and unpainted, since they do have to travel back and forth in their slots and if they are rusty - or painted - that could cause a problem. You may also want to see if you can pick up some replacement springs at the local hardware. The orginals get pretty beat up over the years.
http://excelsiorpress.org/photos/kelseypressparts.5x8.jpg
Paint
The older Kelseys came in black with gold pinstriping. Newer models were painted battleship gray.
I stand corrected on the paint colour statement. In fact, sitting next to me is a GRAY 6x10, and next to that a BLACK 3x5. The former bears serial number C54C; the latter A83D sans pinstriping. Perhaps colouration of the various sized presses throughout the years was not that ridgidly observed by Kelsey; goodness knows their standards of fit and finish weren’t.
And, yes, acetone will remove paint, ink, et al, but in my experiences, lacquer thinner is the better choice. Acetone is a remarkable liquid for removing glue though, although it does have a very disagreeable odour. Flash points on both materials are quite low and must be used in well-ventilated areas.
Good point about the roller hooks on the smaller presses. The rods are easily bent, the springs do lose tension, and they must slide easily if they are to perform well. I maintain however, that using a wire brush, while expedient, can do damage to both fit and surface.
The vinegar/lemon solution works very effectively. Just give it time to work. In my opinion.
Laurence
I received an inquiry on the serial numbers posted above by forme and have answered the question in a new topic at http://www.briarpress.org/5829.
I recently come in to possession of two press a 5x8 Model P and a 3x5 Model C. I want to clean them up but don’t don’t want to paint them will the vinegar lemon stuff change/hurt the paint?
The vinegar/lemon solution will not affect any substance other than iron oxide (rust). However, if rust has penetrated under the paint then, yes, the paint, having no tooth, will lift from the surface. That is a good thing. It will reveal rusted areas which might well remain hidden until failure occurs. Should you simply want a good overall cleansing away of grease, oil, ink, et al, refer to my earlier suggestions about refurbishing the press appearance. And please keep the abrasive cleaners locked away. As with cooking oil to clean rollers - they might do the job, but will present problems later. In my opinion.
Laurence
Updated. I soaked the springs, roller arms and the platen, of the 5x9, in the lemon and vinegar solution and it worked great. For the rest of it I wiped it down with WD-40 and the whole thing looks pretty good.
Thanks for all the help.
I have a 3 x 5 Kelsey. I am wondering what type of oil to use to clean/lubricate it. Will general household use oil from the hardware store work?
Hi. I am currently restoring my Kelsey 5X8 press following forme’s instructions, however, i am not sure how to remove the platen or if its necessary for cleaning. It looks good and doesnt appear to have any rust. Any thoughts?
My thoughts on restoration are not to take it apart if not necessary, if it ain’t broke, don’t fix it. Some people take everything off and clean and paint, sure it looks great, but i would rather just print with it . As long as there is no rust it should be ok. Dick G.
I quite agree with DickG.
Do you want a museum quality display piece, or do you want to do nice printing?
In the old letterpress shops the presses were often filthy except those surfaces that had ink and those surfaces where the paper touched. The filthy press was also well and regularly oiled. The old saying was that if there was not a bit of oil on the floor, you were not oiling it enough.
Wipe the press down, but don’t take it apart to polish the threads on each bolt.
Get some ink on your shirt and spend your time in doing nice printing.
inky
There’s no reason to force yourself into a false choice between opposing extremes. While preparing a machine or tool for the Smithsonian isn’t necessary, leaving it caked with grease, dirt, rust, and in this case ink can and will lead to problems that a more balanced approach will avoid.
A few examples:
1. At some point, probably sooner than later, you will want or need to adjust your platen; you certainly should not assume the last user left it in the correct position. You could get completely set up to do that first print run only to find it set improperly. You go to adjust it and find the bolts are rusted in place. You finally remove them and find two are cracked or broken. So much for that first print run.
2. You’re printing away and find that no matter how much you adjust the platen, do makeready, spend on new rollers and type, etc. you get an uneven impression. Exhausting all other possibilities and as a last resort you take the press apart just in case there may be some worn parts on that fifty or hundred-year-old press. After cleaning the built up grease, oil, dirt and ink off the press so you can get the shaft that connects the bed to the press body out, you find the shaft is work in the bearings and the bed therefore moves at every impression. I’ve seen this myself on several presses and those presses were all well lubricated, at at least outwardly so. Just clearing the oil hole does not mean oil will flow into the bearing itself.
My point is that there are many advantages to disassembling the press, doing a general cleaning of rust and crud, and then reassembling and lubricating it. Here are some of the benefits:
1. You get to know the press inside and out. You will understand better how it works; what to adjust and how; what worn or broken parts need attention.
2. The press will operate more smoothly, the parts interact more freely and therefore more efficiently. The probability of the press operating as it should are increased accordingly.
3. Adjustments will be easier and more accurate.
4. The bearing surfaces will receive and hold oil better allowing the press to run with less resistance and last longer.
5. You won’t get dirty just by touching a place besides those few you may have cleaned.
6. Don’t discount the feel-good psychological benefits of operating clean, well-maintained equipment in producing a quality product.
I’m a cabinetmaker by trade and rather old-fashioned to boot. I wouldn’t feel comfortable working in a laboratory-clean shop and my house is not kept that way either. Shops of any traditional trade, cabinetmaking or printing for example, will not by their nature look like a barracks. Machinery will not be dusted daily, sawdust and ink are allowed to accumulate up to a point. But in any shop where I’ve worked we swept the floor, cleaned the machine surfaces and waxed them, wiped off the oily sawdust, etc. at least once a week, or more often if needed. It can look cluttered and nothing is spotless but there is an underlying order nothing looks like it has been sitting outside through a New England winter or has been used for a grease trap.
It really takes little time in the end. I spent probably 30 hours disassembling, cleaning, reassembling, and adjusting my 10x15 last Fall. You can read about it and see photos on my blog. Since then I’ve had to spend no time on maintenance other than oiling. I replaced or repaired the necessary parts and adjusted everything to work smoothly as it should. I know where the weak spots are (there are always weak spots; my press was built in 1892) and compensate for them. As a result I get faster setup times and better printing.
I’m proud of my equipment and my work and it was well worth the time invested to clean and adjust everything the first time. I’ve found that a hit and miss approach will only lead to frustration in the end. However much you clean the press down the road, I would invest the relatively small amount of time to start off with a good foundation and you will waste less time and get better results faster. I love the past and am very traditional but there’s nothing romantic to me about rust and gummy surfaces on a machine.
Rich
Front Room Press
Milford, NJ
http://frontroompress.com
http://frontroompress.blogspot.com
Rich, your presses that you restored are a thing of beauty, i don’t think they looked that good when they were brand new, but the average guy or girl usually will get in trouble taking these old machines apart, myself I would rather wipe off the grime and print with it. My shop has 2 windmills, about twice a month i wipe them down with a rag with a little oil on it, these presses are used daily to support me, i do a lot of trade work for other printers in my area, so many printers come to my shop. One printer always gives me heck for spending too much time shinning my presses, another one comes in and tells me he couldn’t work in a shop where the equipment is so dirty. No matter what you do you must make yourself happy, if you want a museum piece, or just want to print you should do what makes you happy. Dick G.
@forme what kind of oil would you suggest using in your instructions above? it did not specify.
I have a section on my website that I dedicated to restoring my Kelsey 5” x 8” Model U, here is a link:
http://brannonsolomon.com/kelsey-restoration-guide/
Hopefully you can find some good info on it, if not the people here on Briarpress are really awesome and knowledgable!
-B
Brannon, you did a very nice job of documenting your journey. I would not hesitate to direct a new press owner to your process for rapid DIY instruction.
Tom
T and T Press Restoration
www.tandtpressrestoration.com
Thanks Tom!
It’s good for getting one up and running, but not anywhere near as pro looking as the ones you have restored! Very nice work.
-Brannon
I’m doing a Model U now, just finishing the paint. I personally do take it completely apart as you’re unable to paint properly if you leave it assembled. Any good mechanic knows that.
I personally think that it’s worth the time to make it like new, and then print with it. I run a clean shop, and always have. it’s how I was taught. When my father bought his 4’ foot-shear, I had to wire-brush the entire thing before laying on new paint. Same with our 8’ break.
A clean shop is a happy shop and is one that pays attention to detail.
I’ve got to agree with the “it’s better to disassemble before painting” crowd on this one…… BUT only if you are a careful worker, and understand how fragile cast iron can be.
Like Forme has pointed out, cast iron is not very tolerant of tapping on misaligned pins…. and you can indeed easily break something if you are not careful. I cost myself a lot of grief recently while disassembling a classic old Pilot.
However, there is a lot to be said for a machine that has been completely disassembled and repainted correctly.
A lot also depends on which press you are talking about. i’ve found Craftsmen to be a lot sturdier than Pilots…. and Kelsey 3x5s to be much easier to take apart than 5x8s…. so the decision about whether to totally disassemble vs repaint while partially assembled should always be made on a press to press basis.
forme, your advice on how to use vinegar and lemon juice to remove the rust on an old Kelsey Excelsior Model N….it worked MIRACLES!!!! You rock!