Slight Adjustment exporsure steps: help needed
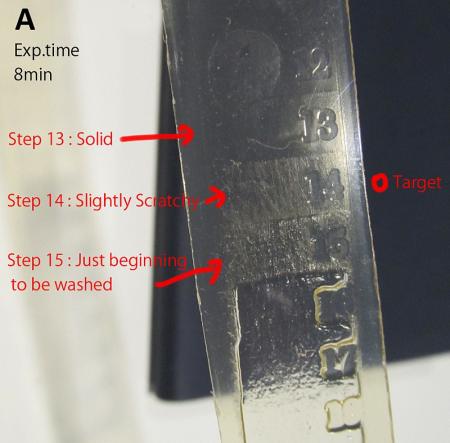
In Photo A, My target exporsure is STEP 14. I got 13 Solid with 8min exporsure so far.
Step 14 is Slightly scracthy. Would this mean that I got 13 Solid , more closer to 14?
With this indication, should I make a slight adjustment to the Stouffer correction table?
8min x 1.4 = 11.2min
But my Step 13 is closer to Step 14.
So Does “8min x less than 1.4” would help?
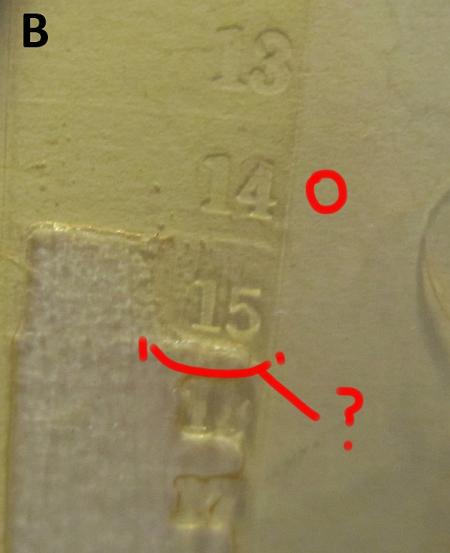
I have another question, In Photo B attached.
My scale ended like Step 14 and a half left 15.
Do I read this Step 14.5?
If so How can I adujust 0.5 up/down .
Sorry, I am not good at maths.
*Exporsure unit used in Photo B is different to used in A.
IMG_9480.JPG
IMG_9478.JPG
Hello,
You are understanding it slightly wrong.
What they mean with a “solid 14” is a solid developed and nicely washed out relief, as you can probably start to see on picture A at about 18, 19, 20 or 21. I can’t see the rest of the photo.
So you want to lower your exposure so that what happens at number 18 happens at 14, which is the recommended number from your platemaker or plate supplier.
So in order to decrease the step 18 to the 14, you need to decrease 4 steps of exposure, which means you should multiply your original exposure of 8 min. times .25, which means basically, divide by 4 = 2 min.
Try it again with 2 mins and see if you get a nice solid and cleanly washed out relief on 14.
How are you making your negatives?
Hi Thank you enriquevw.
I am shocked with what I have been doing wrong!!
I guess this is a lerning process.
I attach the photo of 2min exporsure time plate which i have done before the 8min baked plate.
*** Okay I try Re-reading the scale ***
In the plate (Plate A in the photo), Step 14 looks ok.
But in close look of the letter “14”, I see the small triangle (intaglio) within the letter 14 is less detailed and not deepend.
So I pick Step 18 which I think is the better detailed than the rest.
Therefore, I got Step 18 from the 2min exporsured plate.
In this case, I should 4 steps down.
2min times .25 = 30sec.
**********
Am I doing it correctly?
In Plate B (Exptime 2min wash time 1:30)
*diffent exposure unit is used to Plate A,
I found hard to pick the best one with this plate.
Step 14 looks ok.
Step 18 less sharp
Step 19 is loosing
Step21 is washed out.
IMG_9491.JPG
Hello, The Arm NYC
I use a transparent sheet (OHP sheet )
and a laser printer.
You are onto the right track, but your washout time is too short, you need to wash it until everything that has not been exposed to light on the plate is removed, that is all the clear space, but the counters in numbers are not necessarily going to be really deep, because when the light hits the plate and refracts and a sort of pyramid or shoulder is formed, and you want that to have structure on the relief and thus strength.
I am not concerned with your negative on these tests because it is directly from Stoufer, but a laser printer doesn’t generally produce the right density to make nice polymer plates.
Also, do you have a vacuum table or how do you make your negative stick to your plate tightly?
We use 4 mins of washout. Try 4 or 5 mins and see what you get.
why dont use a positive image with positive plates and mirrored in this case the toner fixes on the back thats the way you expose positive images on offset plates otherwise you need to mask everything out
hi, phase4
I didn’t know about positive plates.
Hi Sepia- is there a good source for Imagesetter style negative film in Japan? I doubt it’s disappeared there yet.
If so, I would suggest you purchase some imagesetter negatives from a supplier. You should find someone who you can send your file to and have them output for you.
If you cannot, I suggest you print (using your current film method) a copy of a test image (several sizes of type, several lines both floating and connected in random grids, some straight and some curved) and begin to test plates like this, rather than using the scale you’re using. Start with 3:00 exposure and 1:00 washout, see what happens, and move from there to longer and shorter exposures, longer and shorter washouts.
Also, you didn’t ask about this, but water temp is a big deal, as is brush pressure during washout. A good exposure will give you an image on your plate that is durable and able to withstand the washout, but without the correct agitation and light pressure on the brush/a steady hand in consistently correct water temp, you’ll run into issues.
I’m sure you can find the info-sheet on the plate you’re using, and they usually recommend both washout times and exposure times, but also a temp the water would optimally be during the washout.
Hi, HavenPress
I use a temp adjustable fish tank Heater and the info-sheet.
I found that problems I have is brush pressure during washout. (note: I am using a shoe brush )
When I apply harder pressure than before, there is no left over polymer on the clear space. I guess my brush pressure before was too gentle.
Experiment:
I tried to process some hand drawn illustration:
*3:00 exposure and 4:00 washout
Result: some lines are washed out.
(I don’t know whether pressure was too hard, washout time is too long or exporsure time is not enough.. )
Then
*4:00 exposure and 3:00 washout with more pressure on brush. Result: image did withstand the washout.
I did not use the 21 step scale this time.
I have to find out what number I am in with the scale.
Meanwhile, I orderd a laser printer, better resolution than one I am usin now. I am not sure this purchase will contribute to a darker and dense nagative film or not.
I am sure supplier sell Imagesetter film but finding someone who can print is too much hustle for me.
So I will stick to a film method.
hi the resolution will not change your darkness at 600 dpi you should be fine.this kind of products does change it makes the toner more black.
http://www.caseyspm.com/cgi-bin/casey/Fixative
http://www.rayzist.com/magicdark.php
i would try to mirror the image as well so taht the toner is as close to the surface possible and the vacum table should be glass crystalclear
hi, phase4
Thanks for your advice.
I cancelled the laser printer.
I searched how to darken laser toner for instead.
Using Benzyne Vapor would be the cheapest option , though it is a bit risky.
I am interested in Krylon K1311 Matte Finish Spray.
But They are hard to find in Japan.
Hi Sepia,
Sorry for the long absence. You’ve been getting some great advice. Mirroring the image so the “emulsion” sits on top, so that’s what’s in contact with your plate is a great tip.
Also maybe try to get one of the toner darkeners from china, I know I’ve seen them online. So maybe that’s a little closer to you, and probably even Japan sells them.
Making Benzene Vapor doesn’t sound safe at all.
I don’t think you need the Krylon Matte Spray, because Vellum paper is matte, and also most of the plates already have a matte surface.
I think at this point your best bet is to get the toner darkening spray or get someone in your city to process you a couple negatives.
Then, 4:00 exposure and 3:00 washout seems reasonable, depending on the amount of light on your exposure and the amount of pressure you use on your washout should be fine.
Also, don’t give up on the stouffer scale, keep using it, it’s the only proper tool so you know for certain what the adequate exposure time is.
The number they ask you for as a solid (16 or 17, I forget which one) is because that one has the density a negative should have.
So you need to figure out what time gives you that exposure, and then get a source of dense enough negatives (or you use the toner darkening spray).
I think you are definitely very close to getting decent plates, maybe a laser negative won’t be as detailed as a digital imagesetter one, but for a lot of the jobs it will do.
Hi enriquevw
Thanks for your advice.
I will look for the toner darkeners.
Do you know the link or products name in china?
I searched them in Japan but non of such darkening spray priducts is found.