Printing on Tympan Paper
I’m printing up a storm here on my wonderful Heidelberg Windmill GT (13×18). But I have the slightly annoying issue that there is ink offset on my tympan paper — even when running the machine with only a tightly mounted tympan sheet and 1 red pressboard as packing.
I’m using the following:
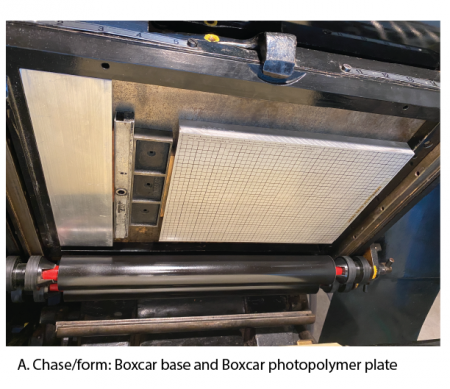
A. Chase/form: Boxcar base and their photopolymer plate;
B. Packing: Very tightly packed Tympan paper backed by a red pressboard (no other packing);
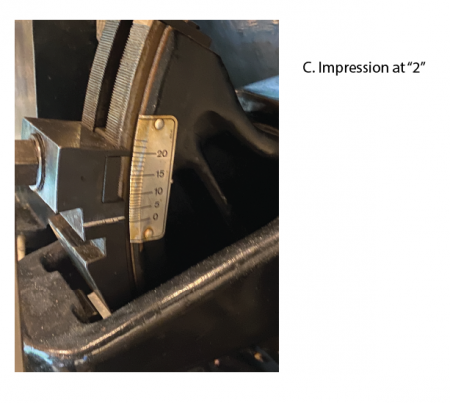
C. Impressional strength set at e.g., “2”
Am I correct in assuming that there should be *no* ink offset on the tympan even if I run it without paper? And if so, how would one correct this short of making some major fundamental adjustments.
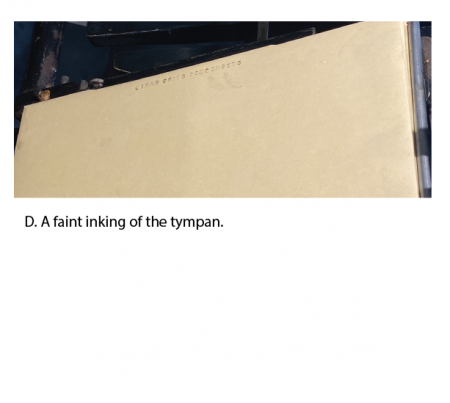
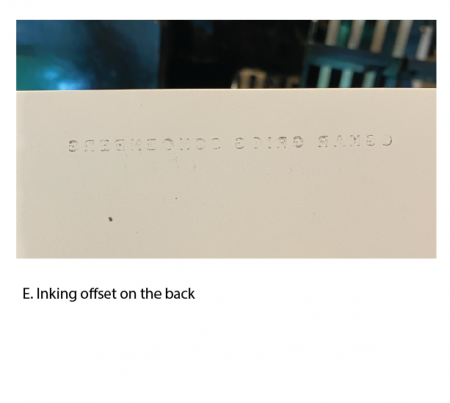
As things stand, there is a slight ink offset onto the tympan (D), which in turn inks the back of whatever I’m trying print (E).
It is clearly not the packing. Any thoughts out there?
a.png

b.png
c.png
d.png
e.png
Is the press all the way off impression?
Does the counter advance (possible clue to not being all the way off impression) it’s been a while since I’ve been around one of these
Is the press all the way off impression?
Does the counter advance (possible clue to not being all the way off impression) it’s been a while since I’ve been around one of these
Hi Ted,
I did the first cycle off impression (i.e., with the handle disengaged/in the down position) and that placed no ink on the tympan. But at “0” and engaged (handle up) it left a slight bit of ink/impression. Am I going crazy here - but the type/polymer shouldn’t touch the tympan at all when at “0”, right? Here’s a photo of the platen as it kisses the photopolymer at the “2” setting…
I’m pretty sure the counter would advance, but I’ll take a look when I go in tomorrow.
Thanks for now!
Christian
IMG_9885.JPG
Most likely your rollers are too low, use a Lollipop to check roller height, you should have a small stripe like 2 dimes thick.
rollerG_Close.jpg
I checked the roller height and it looks fine. I doubt that roller height is related to this - they merely kiss the form as they should. What I’m worried about is that the platen touches the base even at a very low impressional setting (e.g., “2”) and that that would crush type/polymer.
I mean, it doesn’t leave much room for packing and makeready if, at present and using only red pressboard + tympan, they’re already touching.
2 is not a “low” impressional setting. A Windmill, with correct packing, should be printing text or light line art very well at 1/2. 2 should be reserved for printing heavy solids and be start to make your press “grunt”. You may have a bad shear collar, which will allow you to print light forms, but will be a miserable exercise if you try to print larger forms.
13x18 More of a pin than a shear collar
Half (1/2) is not an option on the GT (see scale above in (C), and I’ve used impressional force up to “10” on projects without hearing any “grunting.” I’m pretty sure it shouldn’t leave an impression on just pressboard and tympan at “0”.
Hi, Just a few thoughts. I own a 10 x 15 and both machines work in the same way. Are you using the correct thickness Polymer with the base you have? don’t forget the total height should be .918 ” high, if you’r over you may well get the problem you are getting. The Platen Packing should be .40” including the stock you are printing and the packing should really be made up of more thinner sheets, if you have an original handbook samples of packing are included at the back of the book. If there is a question on the base and the plate, try a line of type instead and see if you get the same problem. If you are over height, you may have reset your rollers. Hope this helps.
Hi Frank,
Thanks for your thoughts.
Even as the two versions share a manual, there are actually enough dissimilarities between the two machines to merit individual manuals/handbooks (as, I’m sure, every GT(X) owner would attest. But that’s another discussion altogether ;-)).
The base + polymer are type-high (.918) - I’m using the correct thickness polymer specified for Windmills. the rollers kiss the polymer at 3/32 (lollipop method). And I’m using only red pressboard which is .02” thick and tympan as packing.
“Offset” (or set-off if you prefer) is ink transferred from the back of the sheet during impression. If it happens when no paper is being fed, it can’t be offset. It can only be direct inking from the form.
TollundPress, one quoin lockups are like skydiving with one parachute. james
@James Bourland - ha, yes - good point. This happens even when locking up with two counter-locking quoins so I don’t think that’s it. But thanks.
Whenever the press is engaged, the image might transfer to the top sheet. It is “on impression” at that point. You should start the press “off impression, then engage after a sheet has been fed, otherwise you will print on the top sheet.
John Henry
Cedar Creek Press
@jhenry Thanks. Does that apply even when impression’s engaged at “0”?
The press should not be “on impression” unless you intend to print.
Of course it will print on the tympan with “on” impression if no sheets are being fed.
Michael
I think I might have figured out what the issue is. My chase, when empty and on a completely flat stone surface, rocks ever so slightly (perhaps 1 or 2 points) when pressing one corner. Perhaps it was dropped or otherwise damaged by a previous owner. I’m thinking that the form flexes a bit when locked up. I’ll sand it completely flat and report back ;-)
@Michael… thanks - ok, wasn’t entirely sure just what to expect.
I would be inclined to set that chase aside (toss it) and get a different one. If you sand it so it’s flat, the sides may not be a perfect 90 degrees, and you’ll still have a difficult time with your lockups.
@bppayne I fear you might be right but I’ll see how it goes. 13x18 chases are not that easy to find. But maybe I can have a couple CNC machined. If anyone is in the same pickle, let me know and perhaps we can get a discount. I even thought of just producing a CAD-drawn chase with the base incorporated (i.e., one solid aluminum piece) just for polymer work. Good idea?
That an Original Heidelberg chase for either a T or a GT might not be flat, is nothing new. In our shop, which has three Ts, we have about fifteen chases, two of which have the register corner out of square, and I have seen one with a very slight level problem. These came out of the factory MADE this way (a passed error), so it’s not impossible for your GT chase to be out-of-flat! Nota bene: if you are having trouble getting a form square in the lockup, check out the chase. The same applies to the levelness of the form or lockup. This also applies to ANY chase, for any press, so everyone would be well advised to check out any chases, particularly when acquiring a press, BEFORE difficulty is encountered. If the bottom of the chase lifts and you place it into the press, it is actually up on the chase support lugs and if far enough up, might come out while the press is running! Unmitigated disaster! This is true for all presses. Happy lockups, guys and gals! Frank.
@Frank Thanks for that! Now you’ve scared the bejeezsus out of me. I’ll have nightmares of crushed chases now ;-)
Really good point regarding the registration corner/lugs - I’ll try brass guide registration to see how the chase behaves. (I used commercial registration for the sample in the images as you can tell. It’s good enough for most of my purposes so it didn’t actually occur to me ;-).)
Just to follow up on this old thread - the issue seemed to be that the Heidelberg GT provides an option to vary the makeready steel plate placed atop the ground-out platen (2mm, 2.5mm, and 3mm). I suppose it offers more flexibility to produce crazy-levels of impressions/scoring/die cutting at 3mm thickness). My GT came with 2.5mm - I guess I need a 2mm plate to avoid the issue described above.
Are you supposed to use the die cutting plate when printing?
It’s not a die cutting jacket as such, if that’s what you mean. If you don’t use the makeready steel plate at all when printing, you have to add a ton of pressboard to get it anywhere close to printing. Is that what you meant?
All I do is basic, inked crash numbering, on multi carbonless forms. Not the beautiful prints i see on here. So, no, I do not use the plate. I hit against a piece of phenolic and do MR under that. I run a 10x15 redball so not sure of the impression level. I don’t get any traces off impression tho, even on 5 or 6 page forms.
Looking at the first photo I don’t see any a plate attached to the base. Since the rollers only touch the plate there would be nothing to make the offset with unless the rails are not set to the proper height. Since the lockup is only from one side the base might be shifting or twisting. Lock up on a good flat stone from both top and left. Not sure about the steel plate. If plate has any twist it would explain the high point of contact you are getting. Remove the plate and use packing. Forget about how much packing it takes since the bottom layers of the packing can be reused unless damaged. If the problem goes away the steel plate may be the problem.
That’s the issue. You can’t see it because it’s covered with makeready. Under the tympan paper and pressboard there is a 2.5mm steel plate screwed onto the platen. It should be only 2mm to avoid the issue.