Ink not sticking to the Polymer Plates
Hi all!
I’m working on my first job on my *new* Pearl #3. I have a lot of experience with a Vandercook but very little with a Pearl (though I don’t believe that’s really the issue here).
I have discovered a problem that I never had on the Vandi. When I ink the Pearl, the polymer plate only stays inked enough for one print. I’ve attached 2 photos to show the first and second print.
How clue what I’m doing wrong? Any help is much appreciated!
Thanks,
-erin
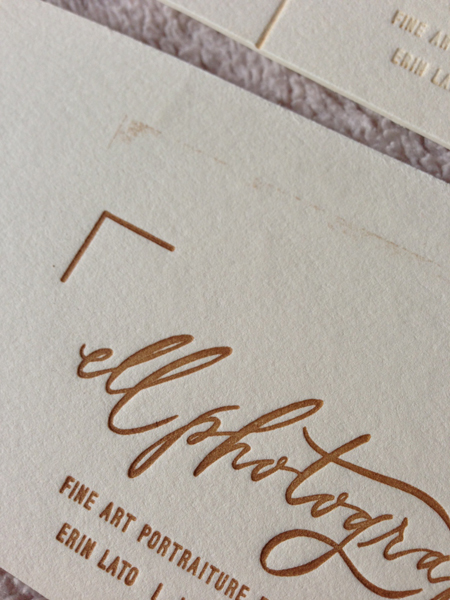
EllPhoto1sm.jpg
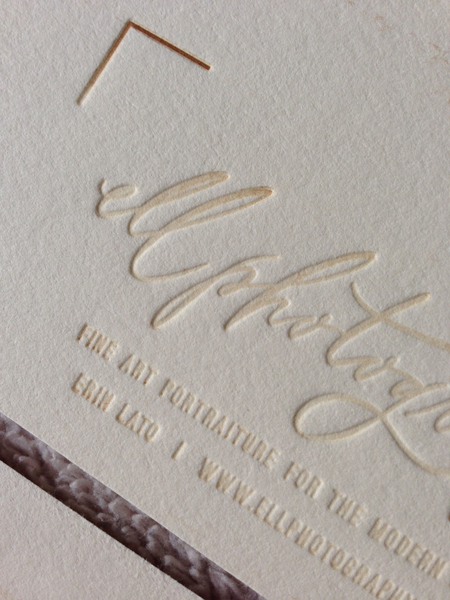
EllPhoto2sm.jpg
Visually this looks to be a bit more strange/tangental of a problem than your typical “my polymer plate has a little bit of oily residue on it” sort of problem, so I’m skipping past that, but be sure to clean your plate of all residue with a degreasing solvent like alcohol. Denatured Alcohol is what I recommend.
Are you certain the inking rollers are touching the plate upon pass number two? It looks like a corner inked up, could there be something on the rails that is lifting the ‘trucks’ or ‘roller bearings’ up off the inking rails, creating a high spot in the inking of the plate?
Could they have skipped above/over it somehow, did you change any of the settings you might have applied to the rails, are your springs pulling your inking rollers into adequate contact so things in the inking system are nice and tight? Or is there some play? It could be worn springs, or springs that need lubrication or tensioning; get into the spring area with some lubrication (3o wt machine oil) and see if that helps. If that area is binding up, it won’t allow for adequate contact where there should be adequate contact.
Good luck.
Thanks so much for the feedback! Wow, I’m totally overwhelmed. HA! I didn’t even notice that the corner was inked up. Thank you for pointing that out. I’m going to try to clean the plate again with alcohol and maybe even try another plate. I may be back with more questions if not. Thanks again!
Are you working with new rollers and trucks or some combination of new and old? Another source of trouble could be the rollers are not truly concentric with the cores or the trucks are not concentric. Photopolymer is very unforgiving of slight unevenness in the ink train — it’s one reason older presses frequently have problems printing from photopolymer.
Bob
This is not part of your question but I thought I would mention it to hopefully save you some anguish in the future. Printing with deep impression requires a relatively large amount of printing pressure. Pearl #3 presses are relatively lightly built. They were not designed for deep impression, which did not become popular until long after production of Pearls ended. Pearls, like most all presses of the time, are built of cast iron which is brittle. Other presses like C&Ps have much more cast iron in them and are therefore stronger and much less prone to breaking.
My Pearl #3, for instance, before I got it, had one of its sideframes cracked right through from the shaft which holds the platen, all the way down to the bottom. Luckily it was repaired well and I have no trouble printing on it.
Most letterpresses are designed to take a total image area of only 1/4 to 1/3 the chase size. In other words, if you group all the printing area together with no white space, it should not be more than 1/4 to 1/3 of the chase size. And don’t forget, this is for “kiss impression” printing, where you just contact the paper hard enough to transfer the ink and try not to make any impression on the paper at all. With your deep impression, I would say that the printing area should be MUCH less with your lightly built Pearl, and actually I would recommend that you don’t use it for deep impression at all.
If you want to hear this from another group of Pearl users (as well as the big group of Pearl users on Briar Press), there is a Yahoo Pearl group which you can join and ask about this.
http://groups.yahoo.com/neo/groups/PearlRestor/conversations/messages
With all good intentions, I wish you luck.
Be aware that even after the drying cycle photopolymer plates contain some water (this varies with local humidity, length of storage etc. and has a direct effect on hardness) and that use of alcohol draws water from the plate, something other solvents don’t do. And never use rubbing alcohol which is diluted with water.
About water content of pp material. Is some moisture needed to maintain hardness and keep from becoming brittle? I ask because a customer of mine is a plastic injection molding co and when I was at their plant one day they were molding pieces & tossing them into a large tote bag container. when it was full of parts they also tossed in a bucket of water & sealed the bag explaining that it would be absorbed by the plastic parts making them less brittle. Does the same apply to ppl?
-Ted Lavin
Thanks for all the comments! I haven’t had a chance to get back on the press since giving it a good cleaning. I’ll be back with either a success story or one in which I’m pulling my hair out!
Ted
There are all kinds of different plastics, even with photopolylmer plates. Likely I would assume the water would prevent oxygen from effecting plastic, some printers even put water in their ink cans for the same reason.
There is a lot of commonsensical nonsense out there regarding the extent of water absorption and plastics.
Even nylon plates have different resistances. Dispersed (step growth) photopolyer has different characteristics than soluble (chain growth) photopolymer.
Toyobo plates formulated for letterpress are chain growth, those formulated for stamping may not. The only part of chain growth nylon resin that reacts to water is the soluble part. Which is why it works, and works so well. If the surface area and thickness of a plate was effected by water absorption, we’d likely not be using photopolymer for printing purposes.
Gerald
I had a Kelsey Star that did that once…. and the problem turned out to be exactly what Haven described: the ink rollers were not making constant contact with the plate. The problem was sticky springs and rods. After tweaking the springs and oiling the rods, it printed like a charm.
IF that’s not the problem, and it really IS a compatibility problem then it should be easy to fix. I’ve gotten a number of e-mails over the years from folks who are using Crisco or veggie oil for cleaning up, and then the ink won’t stick. If that’s the case, use mineral spirits and clean the plate well….. then let it dry completely before inking it. That should do the trick.
If you are using water-based ink…. I can’t help you. I never use water based ink with PP plates…. it just doesn’t seem right.
@Winking Cat Press I think it may be my springs and rods. I’m now working with a different plate and finding that the ink is only sticking to part of it. Would you mind sharing how I can checked / fixed your springs and rollers. I’ve never messed with them before. The press was restored for me with all new everything. Thanks!
If springs that need lubrication or tensioning are exposed, or you note the area where the shaft that bears tension on the rollers extends/slides in and out, simply add oil at this point and work the press; get the oil into the spring area via oil holes as well, if you see them/can find them. They may be clogged, but they are likely present. Otherwise, find the moving points/friction points and apply lubricant.
If I had a picture of your press and it’s inking system in profile, I could maybe point out the area of focus.
Awesome! Thanks, HavenPress! I’ll take and post a pic tomorrow.
as general proposal re polymer, has anyone just very very very slightly sanded with a block of 1200 wet and dry the relief surface of a polymer plate to increase adhesion of ink, would it make a difference?
Or is that a daft idea??
It’s just from my experience of lino printing, a sanded lino can stop ink skidding about…………….also I don’t see much reference here to people spraying a plate after exposure and printing with “platekote” to “seal” in the polymer.
@HavenPress - Ok, here she is! Thanks again!
press3.JPG
press2.JPG
press1.JPG
Not sure why the first and last pics are sideways. Sorry! The middle one is the right direction.
I probably should know this already, but can I (or should I) remove my rollers for cleaning?
Initial cleaning of the rollers can be done on the press. They should be removed for the final and very thorough cleaning. Clean ends very thoroughly. Ink tends to migrate to the ends and will get between the rubber and the core. This will cause the end to swell if not cleaned thoroughly. Store rollers in a simple box frame with U shape cutouts for core ends.
Thank you, @inky!
@HavenPress - could you possibly point out the areas I need to oil on my pics? Thank you!
You need to oil wherever two pieces of metal rub together
EXCEPT where the trucks roll on the rails.
Simple as that.
Some places have oil holes, and some do not.
Turn the press slowly by hand and see what moves. Oil where the two pieces come together, or in the oil hole that serves.
I learned that if you didn’t have some oil on the floor, you were not oiling often enough. If I printed yesterday, I oiled yesterday. If I print today, I oil today. I also wipe up some of the oil on the floor.
Oil is cheap. Wear is not nice.
Get some ink on your shirt.
Thank you so much! I just took the rollers off, oiled everything, cleaned and re-cleaned and it seems to have helped very much.
About how many prints should I be able to pull without re-inking?
Thank you all for your help thus far!
Slightly unrelated question … can I clean my rags I’m using to clean my ink plate and rollers with? Or is a use and toss situation? I’m spoiled by using a press in a studio where they handled that type of thing. Now that it’s my own, I’d sure like to reuse whatever I can!
I have just tossed a clean-up rag (an old tee shirt) I had used for cleaning the rollers and ink disc for about 3 years. If you wash up your platen press using old newspaper pages cut down to the width of the ink disc, with a modest amount of solvent like mineral spirits (lay the paper on the disc, run the rollers up onto it while squirting solvent ahead of them from where they first touch, roll them back down and discard the paper, repeat with a fresh sheet three or four times, and then wipe down the rollers and ink disc) you can make one rag last quite a while. Hardly worth cleaning the rag after 2 or 3 years!
Bob
You might be not using good quality polymer or else such type of issue don’t come
Read on this page
jonathanjeclipse
I don’t think you’d want to dare sand down the surface of a photopolymer plate (that would end up badly) nor do you need to “seal” it in any way (it’s plastic). The issues at play with the OP here have little to do with the plate.
Gerald
ps: apologies to postsimple for interrupting his spamming efforts.
MaureenBecker
Folks here are buying manufactured plates, they are not in the business of manufacturing them. Heaven help them if they are.
Gerald
Evincedesign -
I took your original note differently than everyone else. I took it from your note that you inked the plate, printed a print, and then printed another print without reinking the plate.
6 notes above this one you ask “About how many prints should I be able to pull without re-inking?
The answer is NONE. You have to re-ink between every print.
I will say that we did a piece in our Tour de Lead Graffiti 2013 project this past July where we inked the type, printed it, and then without reinking moved and printed the type another 7 times.
tdlg13-04-orica-greenedge-370.jpg