a small experimental press
Good Morning ALL…. and Happy Holidays!
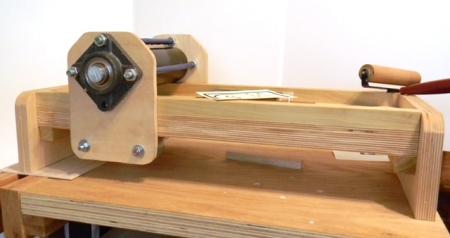
While working on my new Etching Press (which you all will get to see when it’s completed) , I made some experimental rollers and wound up with a very nice 10” x 3” hard (shore 95a) polyurethane roller. Even though it was just an experiment, it turned out too nice just to throw it away…. so I used it as the basis for a small press.
As you can see, it’s based on the Showcard Press design, but modified to be easier to construct. The bed is 1 1/2 inch thick laminated birch, with an 8” x 12” print area. It’s the same material I’ve used for many of my presses, so I know it will stay nice and flat for many years to come. The idler wheels were scavenged from casters, and the bearings were bought at the local Tractor Supply store. All in all, I spent about $100….. not counting the roller, the cost of which gets chalked up to the other project.
The 1” cylinder core, and the bearings are WAY overkill for this little machine, but since the roller was an experiment for a much larger machine that’s what I wound up with. If I were to build another one from scratch, I’d use a 3/4” or maybe even a 1/2” core.
One thing that I was concerned about was the possibility of the polyurethane developing a flat spot from constantly resting on the rails. Part of my experiment was to test for that problem, which I did by subjecting the roller to constant high pressures for ten weeks. As luck would have it, the material performed beautifully and is just as perfectly round as it was when I first made it. (other materials did not work so well…. but that’s another story!)
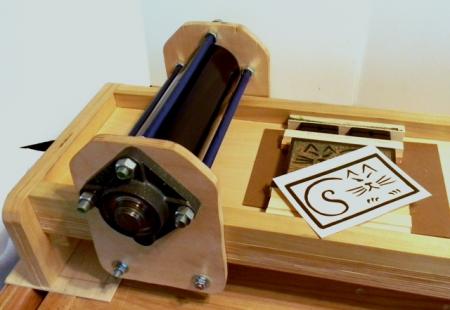
How does it print? It prints GREAT! The little Winking Cat lino cut was something I had laying around the shop last night, so I did a trial press run. I also did a “Happy New Year!” card using metal type, which I forgot to photograph. As you can see, it prints just fine. It’s actually smoother than my Showcard Press, and puts down just as nice an image. The 95A hardness has just a tiny bit of resilience, but not too much. It gives a nice even impression with almost no effort.
So… there you have it: an experiment that turned out better than I expected. I think my next test will be a set of grippers for close register, again based on the Showcard design. Once they’re built, I’ll post a few pics.
Dave
aka Winking Cat Press
ps- yes, I know the lock-up with quoins on just one side is bad practice. BUT since the press bed didn’t have rails on the ends when it was first constructed, that was the best I could do. Since these pic were taken, end rails (with Kelsey-style set screws) were added…. so a proper lock up is now possible.

press 9.jpg
press 10.jpg

press13- rollers.jpg
press12.jpg
Nice work. Thank you for sharing.
Simple and quite suited for the purpose intended.
This is the type of press that could start some new and aspiring printers on their way. Especially if they are short on money and space.
Dave,
That’s great and looks very capable. Did I have any part in inspiring you to make yet another press? I sure hope so!
You can’t go wrong with the 1” shaft and bearings; 3/4 would be okay but 1/2 would definitely allow the roller to flex in the middle which would be a drag. 1” ain’t going anywhere and is not adding much extra weight or expense …you did the right thing! Also, the birch ply is great material !
Please show some more prints when you can.
Peace and Happy Holidays!
To address any concerns regarding the cylinder resting on the rails for extended periods of time, you could simply create a “docking” situation where the rails could be cut down a bit in the far left position and blocks made to support the rollers from beneath. This would be a simple mod and would allow the cylinder to spin freely in the docked position.
Thanks for kudos, Inky. This little press will probably be used for just what you suggested: to teach young, aspiring printers the fundamentals of relief printing.
Billy- I’m always inspired by the good workmanship of others. It motivates me to improve my own creations… .and yes: birch ply is great stuff if used in thick enough sections. I’ve got presses made out of the stuff dating back to around 2001, and they are still perfectly flat.
The Docking Station is not a bad idea at all. I don’t think it’s going to be required, but I might add it as a feature, just in case. The bigger project I’m working on has adjustable roller pressure, and a positive lifting mechanism…. so the roller will never be left under pressure.
both- enjoy your holiday!
Dave,
Looking forward to seeing the main project too!
I would have built it with slightly lower rails, and then a set of bearings on top of the rails as well, that way the main roller wouldn’t rest on the rails. Pretty sure that is the case for the larger showcard/line-o-scribes, though I might be wrong, its been a while since I took one apart.
My Nolan’s roller follows this design, but has metal ends on the roller to avoid the roller being under pressure.
I have a Line-o-scribe bed with gripper assembly, so I need to figure out a roller design to make that one a complete press.
If I may ask, what polyurethane did you use for this and what did you use for a mould? It’s a very impressive little press!
—
Michael Hurley
Titivilus Press
Memphis, TN
This is a great little press.
Kimaboe- the Showcard Press’s rails are type high, and the roller has trucks on the ends. I seriously thought about using trucks on this press’s roller… but after my tests indicated that flat-spotting would not be an issue I decided to leave them off. After all, this press is more of a test bed for my large project.
What is the diameter of your Line-o-scribe roller?
Michael- thanks for the thumbs up! The roller was an experimental piece to test out material properties for my larger press. While it certainly looks promising, until I’m 100% + certain of it’s long term stability I’m reluctant to give out specific details of how it was made. I don’t want folks spending time and money making a roller that might have some unforeseen funky properties. BUT…. after I’m done with my testing, and am confident that it’s a truly viable material / process, I’ll post a complete description.
Lasimp- thanks!
That’s fine. I’ll be interested to see how this lasts.
—
Michael Hurley
Titivilus Press
Memphis, TN
Hey WinkingCat, did you grind the poly after moulding, or have you not found it to be an issue?
-M
Good Morning HavenP…. no I didn’t have to grind the roller at all. As constructed, the diameter and centricity stayed within .020 for the entire length, so no grinding or turning were required. Since the material has a slight amout of resiliance, the .020 tollerance doesn’t seem to be creating a problem.
One thing that did pose a few problems were air bubbles. On the press shown in the post, there is a 1/8” bubble right at the surface. Fortunately, the bubble falls at the edge of the roller and thus is outside of the print area.
The other thing that might be problematic are simple surface defects…. and this roller has a few. Since they are less than .010 in depth, they don’t seem to be causing a problem, but if I were going to print on very thin stock, I think I’d use a tag-stock “blanket” to spread out the impression.
I’m so intrigued by your roller build! Any tips on how you manages this?
I cast mine in ABS plumbing pipe, didn’t get the release right; had to butcher the pipe away from the polyurethane. (Was using Reoflex 20 Trial Size for a tabletop Hohner.)
https://www.flickr.com/photos/fundyheather/8279118439/
thanks
jim
Now that’s a great looking - and obviously great working - press! I’m thinking that such a configuration would lend itself well to a kit-type product. Given the precision lazer cutters available, plus the off-the-shelf components, that little gem could easily be the hottest item under this year’s Xmas tree. And to keep it proprietary - don’t reveal the roller makeup. :o)
Forme- thanks for the positive waves! The little press has proven itself to be a very nice performer. Just this last week I printed four different 2-color postcard runs of 250 each and had no issues at all with the impression….. The roller seems to be functioning perfectly. I’ll be posting a complete description with pics and details in the next few days.
You are right that the press would be a great little machine for kitting out, or maybe publishing the plans for profit. BUT that would entail actually working, making money, and being generally business-like, which is not the “Winking Cat way”. ;)
Put me down for a kit if it ever happens.
thanks for the vote of confidence, JB! It’s good to know that people appreciate my work….. but I’m probably not going to do a kit for that particular press. I might however do a detailed drawing for it, IF time permits. I’ve had quite a few folks ask about a drawing so I might take a few hours to sketch it up. If I do, I’ll post it here.
Before you decide to build one however, you’ll want to wait and see the main project I’m working on. Remember, the little press in this post was just a test-bed for a larger, more capable (but still easy to construct) machine. The fabrication on that press is now completed, and it’s in the “de-bugging” and testing phase. After I’m satisfied that it all that I want it to be, I’ll post a complete description with photographs.