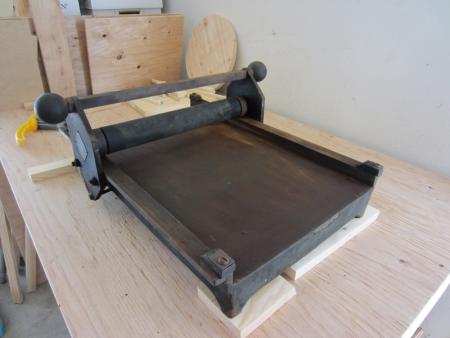
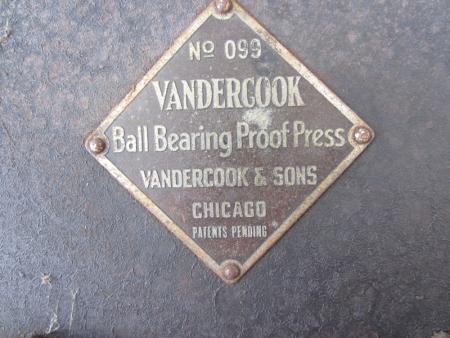
Vandercook No. 099 Proof Press
Hi all,
I have bought my first proofing press. I’ll be using it for wood block printing. As you can see, the press in rough shape. I’m a little bit overwhelmed and don’t really know where to start. I’m afraid to take it apart and not being able to put it back together due to old nuts/bolts etc. Anyone have any experience with this? What should I use to clean the roller/surface rust/paint? Any help would be greatly appreciated. Thanks, Harry.
IMG_1393.jpg
IMG_1396.jpg
IMG_1392.jpg
I restored a Nolan No.2 this fall, pretty much the same assembly of parts. These type of presses are very simple and if you choose to, it should be quick and easy to disassemble.
I tore mine down the day I got it. Cleaned the bearings. Got the worst grease and rust off the rest by scrubbing with brillopads and WD40, soaked parts that could be soaked in Evaporust. Then I took the painted parts, masked off the bed, sandblasted them and repainted. Replaced all the nuts with shiny new ones.
It doesn’t look spotless, the bed was pitted in areas, but it looks pretty damned good for having been stored less than ideally for parts of its life.
The big thing with mine was that the rubber had expanded slightly in the middle of the roller, probably delaminated from the steel. But it doesn’t really impede performance. When I print, the pressure is even across the width of the bed.
If this is the one in LA, that has been on eBay for a couple of months, it looked to me like the roller was slightly warped, either from the middle shrinking or the ends expanding. For the type of work these presses do, you should be perfectly fine with that.
Edit: If you want I can post some before/after shots.
-Kim
Hi Kim,
Yes this is the one you saw in l.a. I was able to get it the price way down, in case this was a total loss. Yes it would be great to see the before and after photos! I’m going to take a good look next week and document the process. What should I use for cleaning the roller?
@Diazha,
You could start with simple green to quickly wipe away the grime and dust.
It depends on how deep you want to restore it, like Kim says, you could go all the way down to stripping the paint and repainting it.
The roller itself is recoverable, it’s vulcanized rubber of a hardness somewhere between 60 and 70.
You could take it to a roller restoration business and they know the drill. That is, if you want a perfect roller.
Take a look at some before and after photos of my Vandercook 03 restoration: http://www.flickr.com/photos/enriquevw/sets/72157629648086775/
For me, painting it was the way to go, since it had already been painted on before.
I also, like Kim, changed the nuts for new shiny ones, although you could keep the original and get them shiny with Never Dull, but I was missing one, so I might as well replaced them all.
Also this Nolan no. 1 is very similar to yours, it’s a breeze to disassemble, just note and photograph everything in case you are unsure later on how to reassemble.
@Kimaboe,
When taking my Nolan apart I noticed some nasty stuff inside the bearings, do you have any clue on wether these are replaceable or not?
They had some sort of plastic or ceramic cover that has decomposed and its now broken in pieces.
I could snap a photo and post it here to show you what I mean.
Enrique:
The four bearings that moves the roller carriage along the rails were fairly rusty and dirty, I soaked them with WD-40 at regular intervals and rubbed them with a rag to clean the rust. While they were shielded well, I didn’t want to use an abrasive that would leave particles that could get into them. On the Nolan, the bearing itself is attached to the shaft that bolts to the side plates, they are not centered, not sure if they would be easy to replace? I decided it was easier to keep them once I got them all to run smoothly. For a couple of days I kept spraying them full of wd-40 and rotating them every time i walked past them.
The two tapered bearings inside the roller-assembly itself were greasy and grimy, I got as much of it as I could with a shop towel, then more soakings with WD-40 until they were nice and clean. Before reassembling the roller I applied teflon-grease to keep them moving smoothly. These should be easy to replace, but since I was able to get them pretty much looking and spinning like new, I didn’t bother.
Diazha:
I’ve been looking at the posting seeing if it would come to a price that would make it worth taking on as a restoration project for summer =) On the roller, I just wiped it down to get the dirt off. Considered recovering it for a second, but after I saw it printed fine there was really no need.
I didn’t have a photo on hand of the assembled press once finished. But here are some before and after shots taken during the process. Hoping these work.
Edit: they showed up in reverse order.
carriage.jpg
cleaned.jpg
roller.jpg
disassembled.jpg
before.jpg
Those two plastic protectors! That’s what I’m talking about.
At least one side is broken into pieces, the other side I haven’t even been able to take it off.
So, yeah, I was mostly referring to the tapered bearings inside the impression cylinder. I’ll see if I can manage to take them off for further inspection and see if I can find those plastic covers.
You did a wonderful job on the bed. Did you use EvapoRust on the bed?
The paint job is also very nice! Is it Rustoleup Hammered?
My bearing covers aren’t plastic, the sides are also metal, but I see what you mean. You should be able to just order new bearings by noting the dimensions and looking it up in an industrial supply catalogue. Inner and outer diameter and width, I guess…
I put the base upside down, bed facing downwards, into an improvised bath of EvapoRust overnight. The paint is Rustoleum, not sure about the finish, these plates are cast iron, so they were fairly textured already.
The base itself was the only part I’d actually have to sandblast, and with my low-budget blasting solution I still had to take the inside welds using a wire-brush. These things are held together by very rough spot welds… they didnt even bother to hammer off the slag before painting them.
Well, what material are they? Some sort of ceramic material maybe?
I do have some bearing suppliers near, and catalogs to look for the part. Hopefully I’ll find it.
There were no replacements for my Vandercook No. 03, though.
That’s a good idea for the evapoRust bath.
I had thought of building walls at the edges and doing more of a localized pool of EvapoRust.
Yeah, the base of the beds are pretty rough, but you never get to see them anyways.
:)
You guys, this is very helpful! I’m going to keep this thread updated with the process.
Enrique: I also considered building walls, but trying to plug the mounting-holes for the rails was an issue, so I turned it upside down on my bathroom floor instead. Built a pool from thick cardboard, double-lined it with trash bags and poured Evaporust into it. For the rails I cut a long shipping tube in half and made a channel to fill.
Diazha, I’m glad I could be of help :)
Kim.. Aha! the rails, that’s true.. In these presses the rails are mounted separately..
Apparently on my Vandercook 03, the rails are part of the main cast.
I sure don’t see any locking parts or any gaps. Look at the attached photo. Definitely one whole piece.
That’s a good idea for the upside down bath. Thanks for sharing your tips!
vandy3.jpg
Kimbo:
That Nolan looks really nice after all the hard work!
Very nice job!
Enrique, you’ll need a lot of evaporust then =)
You can buy 5 gallons worth of Evapo-Rust without the water added and then mix it in a bucket. You’d save a lot on shipping!
Dan
the bed and underneath is all rust, should I just dunk the whole thing in evaporust?
Kimaboe, I don’t plan on submerging the whole press in EvapoRust bath.. the sides will be painted. I don’t even think the bed needs any EvapoRust, actually.
It might be better left alone.
I’m not referring to Kimbos’ press, I’m talking referring to my first post.
You could if you are up for it, but I would remove the impression roller, you might not want evapoRust getting inside your bearings.
But like Kimaboe said, you’ll need a looot of evapoRust.
And as Dan said, your cheapest choice is to buy it concentrated, get a tub that can fit, and cover the press with EvapoRust, I would probably put it upside down, to make sure no air is trapped underneath.
Leave it overnight, you should have a beautiful looking press by next morning.
Thanks, I was able to take it apart this morning. Just ordered Evap-o-rust (concentrate).
IMG_1415.jpg
IMG_1412.jpg
I am an old sailor and hate rust. I have removed much rust over the years. Having said that, who cares about the rust on the underside of the bed? Will a pretty and clean underside improve the printing — or detract from it? I suggest that you clean and repair the machine to print well, and to be attractive to your eye when you see it.
Rust can be removed without expensive chemicals. Put on a dust mask and go at it with a hand operated wire brush. It is inexpensive and good exercise. If you must get all the rust off, use some Naval Jelly. Follow directions and use eye protection. Paint soon after all is clean and dry. In a humid/marine atmosphere rust will start again soon if unprotected.
Get some ink on your shirt and get printing.
Thanks for the feedback Inky. I’m working on some new screen prints at the moment ( I also have set up for screen printing) so I have plenty of time to get this press looking right and working properly before I make some wood cuts.
-Harry
Rust on the underside really doesn’t matter, true, but once you start removing rust on the bed, you don’t need much extra effort to pour EvapoRust in there as well, or sandblast it, or go at it with a wire brush. I’m printing in a rented apartment, with the Nolan taking up half my kitchen table, so having a press without rust and grime is nice. Also a nice distraction from the digital grind of everyday work.
Harry, screen printing definitely gets a lot of ink on your shirt.
-Kim
Well, there you go, different points of view, do what you think works best for what you want to achieve.
Good luck, and please update us with photos of your restoration.
@Kimaboe,
How do I get out the bearings inside the impression cylinder?
I couldn’t figure it out.
Oh, and those plastic things, well, it turns out it was just dried up grease.
I see the nut I could unscrew, but I have no way to reach it.
I want to give those bearings a good clean-up and re-grease them.
I did lube them with WD-40 and Lithium grease, and at least they move, but it is messy in there.
Could you post a photo of the cylinder? I’m guessing its a different assembly than the Nolan. Look at the photo I posted up there, on the Nolan you just unscrew the nut on each side and everything comes apart.
Does anyone know if I can clean the parts with the name plates with Evap-o-rust? Will the paint from the plate dissipate along with the rust?
No, the enamel isn’t affected, EvapoRust only attacks iron-oxide. That being said, on the back of the plate, there should be two holes allowing you to remove the nameplate by knocking the pins out from the reverse side.
@Kimaboe, well, the one I’m talking about I can’t get the bearings off is a Nolan No.1, similar to the one you restored but smaller.
On the Vandercook I was able to remove everything and clean it. I even painted it.
I will try to snap a photo tomorrow.
And on another note, the one Diazha is restoring is a Vandercook, and at least on my Vandercook 03, the nameplate is riveted, which means it can’t come off. And it seems it’s also riveted on his/her Vandercook.
vandyrestore.jpg
nolan.jpg
Ah.
Does it look like the attached photo? From the photos I’ve seen, the roller is the same on both the old and new style Nolans. I used two socket wrenches, one on each side to remove the nuts.
roller.jpg
Yeah, that’s it. I guess it needs to be the long socket.
I’m short of that tool. So I’ll have to wait.. Is it 3/4 ?
Not sure, and I’d have to pull the press apart again to check. Use a caliper to confirm before you buy. You might be able to get them loose using a pair of normal, cheaper wrenches, depending on how stuck the nuts are, but a socket wrench is very useful anyway.
So I was lucky enough to have some free time in between client projects so I worked on this non stop, before I get busy again. Here is the before and after plus some process photos. Thanks to everyone for the tips/help on this.
IMG_1481.jpg
IMG_1452.jpg
IMG_1448.jpg
IMG_1441.jpg
IMG_1438.jpg
IMG_1431.jpg
beforeafter.jpg
Congrats, looks great now. Time to start carving some plates to print!
Edit: and the underside of the Vandercook looks like quite a solid construction compared to the Nolan… have a look at the spot-welding on mine =)
-Kim
under.jpg
wow, yeah. This press is one solid piece.
Haha, yeah, even with my very limited welding-skills, I could have pulled off something better. I guess they were putting them out there as fast as they could.
What is the size of the bed on yours?
The bed on this one is 13 x 22 nice size. I plan on making 9 x 12 inch prints with it.
Looking forward to seeing what you print.
wonderful! congratulations!
I don’t know if you detailed the nameplate, but a little brasso really makes it shine.
:)
wonderful! congratulations!
I don’t know if you detailed the nameplate, but a little brasso really makes it shine.
:)
Thanks Enrique. I made a big mistake using Naval Jelly to clean the name plate as removed, along with the rust, most of the original paint off. I’ll leave them bee for a bit. :)
whoops.. I have no idea how that could be restored.. or repaired.
But it’d be cool to be able to make a new nameplate.
Naval Jelly is pretty aggressive. You need to follow directions to the letter or you may end up with pitted metal. But even then the pits are smaller than your smallest handset type, and certainly smaller than any plate base, and so would have no perceivable effect.
Random question to anyone, is this a good deal?
http://inlandempire.craigslist.org/atq/2953421242.html
I’m willing to put the time and money into re-searching this and fixing it up.
Based on recent prices for a complete 5x8 Kelsey, it’s a pretty good deal. However, it’s hard to tell in the photo if it has a chase, an important part for printing, and it’s missing the grippers, which can be made pretty easily. It’s an OK press if you’re thinking about printing with it, and a fine paper weight otherwise.
Bob
Missing both the chase and the bed, if you can find those, then it is a good price. I’ve seen them in worse shape than that.
Thanks for the info.
Fixing presses is addictive, isn’t it?
It sure is. :)
Haha yes! I wan’t to move on to the next one and haven’t even bothered to print with this one.
Although I did start cutting my block yesterday.