Uneven Inking - Even Impression? (Help Please!)
Good morning -
We’re in need of some help, thank you in advance for your responses. I’ve taken several pictures to walk you through our steps - they are numbered.
I bought the press - a Chandler & Price 10x15 - last year, and have printed mainly invitations for the last year with a boxcar base/polymer plates. In the last invitation, we noticed that towards the bottom of the chase, the printing is heavier than towards the top. To correct this temporarily we’ve added in a sheet of packing to even it out. Then on this invitation, it was noticeable again - so my printing partner for the last year, who is also my boyfriend and an engineer/fix everything type of guy - adjusted the platen slightly to correct this.
It changed a little bit, but the odd part was that now it looked like the ink wasn’t being deposited on the plate, but the plate was making an impression on the paper. We then took used the roller gauge to determine if the rollers were off - we taped the rails to fix the 4/32” stripe in three of the corners. We thought the ink was bad, so we tried another color - same thing happened. When we rotated the rollers they unintentional blind impression moved. Then thinking it was the rollers we tried each one at a time - and were left with the same blank spot on the same part of the print. My rollers do not lie flat anywhere, but propped up. We also tried another polymer plate with the same problem.
Does the problem lie with the rollers? We didn’t notice any inconsistent inking on the ink disk. Also, we use white plastic trucks (saw the other post about uneven inking).
Sorry for the long write up - I wanted to put as much of what we did to fix it as soon as possible. Thank you again for your help!
Christa
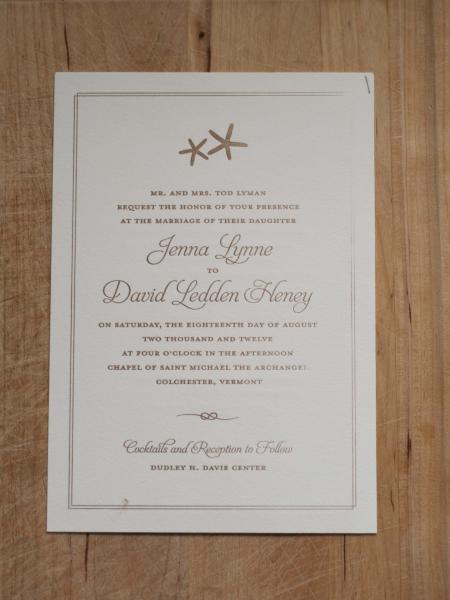
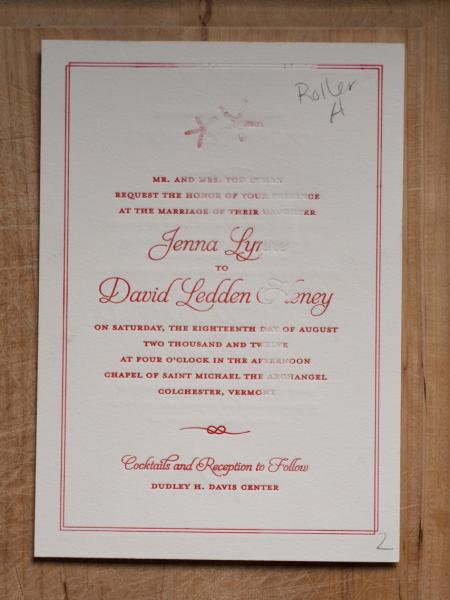
Before Adjustment
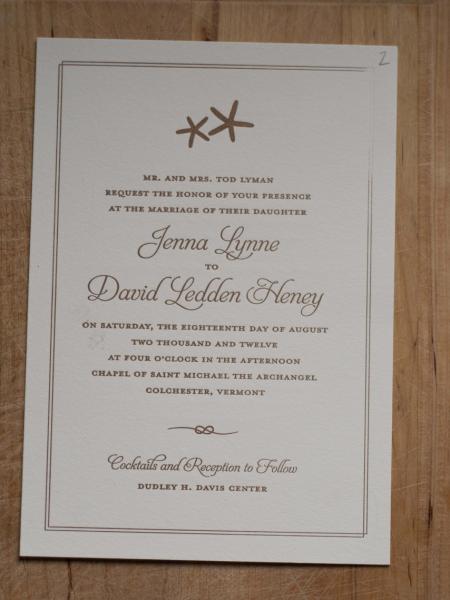
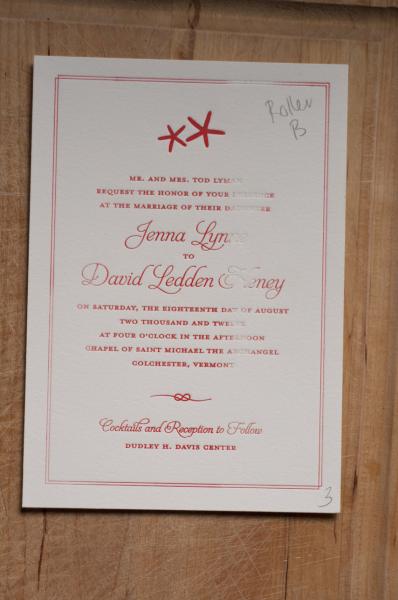
After Adjustment
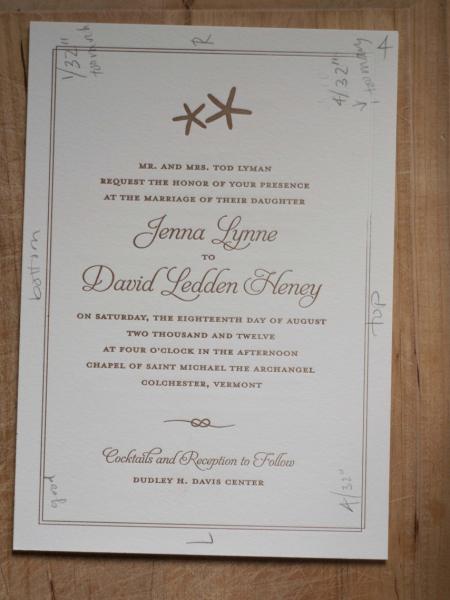
Roller Height Measurement
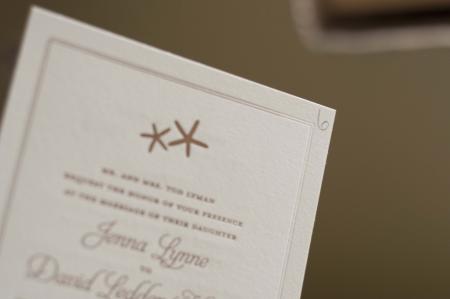
Impression but no ink
One roller at a time - 1st Roller
One roller at a time - 2nd Roller

Both Rollers

Different Polymer Plate

Print with both plates, light on the right side and border
Do you have a rider/vibrating roller you could put on? Are your roller ends keyed so they don’t slip/skid across your forme? Do you have a different cut to put in your chase and try?
You didn’t say whether the rollers are rubber or composition. Did you by any chance leave the rollers sitting on the ink disc for some length of time? At least a couple of the images look like perhaps the rollers have flat spots, which can be caused by either sitting on the ink disc or on the plate for an extended period (a few hours or so will do it).
Bob
I’m using 2 rubber rollers from NA Graphics. I’m always careful to not leave them sitting, always down towards the bottom of the rails.
And I don’t have a rider/vibrating roller. The rollers turn well with no slippage, or hesitation, but on one side of the rollers, the area to insert them is a little worn, and we took two zip ties to fill the extra space to see if that fixed the problem. Unfortunately, the problem continued.
I will try a mag plate I have tonight to see if it’s the rollers on the polymer creating the problem.
Find a good, flat surface on which you can roll the rollers with trucks in place and see if you see a peek of light under the rollers at any point. This would indicate that the rollers have some flat spots, or the trucks are not quite round. If the position of the non-inking changes when you rotate the rollers, logic would indicate that something is out of round somewhere.
John Henry
Thanks John. We took your advice and tried it out, no light is getting through.
We also tried this (from a previous post):
“If you want to check your rollers, I do the following:
Pull them out of the press.
Put them on the bed of your, or someone else’ s paper cutter. A marble or granite counter top is good too.
Shine a light from behind the roller.
Get eye level with the counter or table.
Roll the roller back and forth and see if there is light between the table and the roller.
If there is a constant light then the trucks are too big or the roller has shrunk.
If there is a gap between the truck and the table, then the truck is worn, the roller is too large or swollen.
This works in offset to check water rollers (sans the trucks). It should follow for letterpress.”
http://www.briarpress.org/8653
We tried them without trucks and inked on a piece of paper to see if there was any gaps in the ink rolling onto the paper. Apparently it all looks good.
I have one theory - let me know what you think…
We built a small insulated room in our garage to house the letterpress we could print in the winter. It is pretty damp now that’s it’s spring and I’ve noticed that light rust will develop over a few days. Could it be that the spring that pulls on the rollers is clogged with rust (not allowing it to reach it’s potential)? We had oiling all of it yesterday, but if there’s some sort of debris inside that area - maybe it’s causing this?
Or anybody have any other ideas? I’m at a loss. Thanks again for the help everyone!
I think it would help if we could see some pics of your press set up as we might spot something askew. It seems as though you were pretty close with the gold ink and when you went to red ink everything went down hill…..not blaming the ink but it seems as though something changed quite a bit.
What do you use as a type wash on your poly plates and are you wiping them down a lot as it looks like your “light ink” areas keep moving around from sample to sample?
Also, are some of the 1st red picture/samples done on the back side of the ones you did previous in gold ink? The 1st sample just looks like it and was wondering if that is so.
It sure isn’t plug and play is it?
You know it isn’t an impression issue. You know it is an inking issue and you are focused there. Good.
The plate is taking ink in some places and apparently taking little in other places. You have checked the rollers with a light and you have rolled an ink roller over paper off the press. Good troubleshooting so far. Trouble shooting is to be done only one change at a time and then check for results. You have pretty much narrowed it down to the plate or the ink.
You questioned spring tension. That is not likely the problem, but rule it out. With rollers off the press, pull the saddles out and feel for even tension. There should be quite a bit of spring tension. Note the piston that slides in and out of the roller arm. Oil pistons.
Back to ink and plate.
Are you using rubber or oil base ink? Rubber base hates any oil or oil residue. Any oil residue (as from mineral spirit solvent) can contaminate the plate and make it go blind (refuse to take ink) The solution is to curse, wave arms, and clean the plate with alcohol. It dries rapidly.
Re-ink the plate and remove chase from press to examine the plate carefully. Is there one place, or a strip from top to bottom where it is not taking ink? Note that place or strip. Clean plate with alcohol. Put chase back in upside down. Ink plate and remove from press to carefully check again. Results will probably tell you something. If you need to take more steps, only one at a time, you may wish to turn the plate 90 degrees on the base and try.
Alcohol is not the normally used solvent. It is only used when you want a quick clean and quick dry to get back on the press.
Rubicon327 - Thanks for writing. I can try to take some pictures tonight. Good catch on the ink, we probably were impatient and didn’t wait to get a 100% perfectly inked until after the first one. By the end of these (after both rollers were back on), we had wiped off much of the ink to try and test it rolling over the plate to check for gaps - the last couple might not be the strongest examples. It really was leaving literally nothing but an impression from the plate, not even the lightest amount of ink.
I was wiping them down with a dab of 99% alcohol on a blue shop cloth to get rid of the ink. The first ink we used was Van Son Gold ink, and then second was a rubber base - a Pantone mix I’d order a few weeks ago.
On the backside of the first one we printed with the red again on the other side (we were still thinking that I was going to be printing invitations with all the paper I cut, so I was trying to save a few sheets - I gave that up after realizing it wasn’t getting any better).
Inky - Many thanks for you advice as well. I mainly use rubber ink (which we tried as the second ink), but for this job, it’s the Van Son Gold ink - which I’m pretty sure isn’t rubber based. I will try the steps you mentioned about re-inking the plate and remove chase from press, the trying again upside down. It’d be interesting to see if that shows the same results.
Another thought I had - I use baby oil to clean off the rollers - could this be the culprit? We really try to make sure that everything is wiped off completely and dried. It’s never been an issue in the past…I might pick up some mineral spirits - I’ve seen many other posting about this.
In the meantime I’ve ordered another set of rollers - I suppose it’s always good to have a back up set. I will also let you all know whether that changes anything.
Do your rails have tape on them? If so what type tape and how long since replace…especially if humidity change. I know you checked stripe with a roller guage but did you do this in several places on the rail to see if the rail (or tape) is inconsistant?
i stand corrected
have not used
plastic
yours truly
mac
The weak areas are from light contact between roller and form, jhenry is right on the mark. Testing for out-of-round requires more accuracy than you might imagine, and you need to test the roller surface relative to the truck surface, not independantly. New rubber rollers are not the most likely cause, but eccentric trucks and low tracks are quite common. If the light area moves up and down the form, it is probably the trucks. Getting roller/truck/track adjustments right when using photopolymer plates is very difficult because it requires a much lighter roller setting than do metal forms. Printers who have only used metal type and plates have absolutely no idea about it.
Polluted ink will not cause the problem seen here because distribution will mix everything to a uniform problem.
If you are using Morgan expansion trucks, and you have worn tracks, then you end up over-expanding the trucks into eccentricity; the tires were not meant to expand 1/8” beyond normal, yet that is a common difference. Accurate setting means bringing up track height to about type-height, and setting trucks to about roller diameter.
Christa,
Couple of thoughts. If the issue of using baby oil to clean the rollers and plates did not work there may be a mechanical solution that the “engineer” will enjoy.
You don’t say two things. One, which side of the image goes into the press, long or short. If it is the long side and you see the void move across the sheet in a progression up the sheet -that is the void starts parallel to the rollers and moves up the sheet, and then starts again at the bottom and progresses again, you could have one of two
issues. A) the rollers and/trucks are different diameter from the other rollers and moving at different speeds, because their circumfrence is different. This will cause a slur, (squeegee of the roller across the plate, therefore stripping ink, rather than depositing ink. B) the key in the main gear on the right is loose. This causes the gears to slip ever so slightly, causing the same effect as in A. This is called a “gear slur”. In offset printing you get a smudged or mis- shapped dot. In letterpress you get the squeegee effect.
Good luck, judging from your website you do outstanding work.
Steve V
I want to thank everyone for their input - it’s definitely been a valued learning experience.
I’m happy to report, I have successfully printed the invitations! As I had mentioned, I’d ordered new rollers. When we tried them out, the problem seemed somewhat better - but the inking was not totally fixed. Just a note, I picked up some odorless mineral spirits to clean them - as suggested by some.
At this point, we had narrowed the problem down to the one section of the press: trucks, Boxcar Base, chase or the rails. We examined the Boxcar Base, and there was nothing off or indented about it. The plastic trucks seemed to measure consistently all the way around. We did try another chase - which also seemed to make a tiny difference. I can’t in confidence say it was the chase though (in case anyone has this issue in the future) because the inking was so sporadic and random in general - ensuring your base is nestled snugly into the chase and flush to press is important, so clearly this was one more step we took. What did finally make a HUGE difference and allowed me to print was a $10 fix. I ran to the hardware store, picked up some strapping tape and re-taped the rails using a roller gauge to measure. It was finally back to normal!
The invitations look gorgeous and thanks to everyone here - I’m not pulling my hair out anymore :) Many, many thanks to everyone who pitched in!
Hooooooray Christa
You are now an accomplished troubleshooter
Your initial post lead to a good thread from which others may benefit.
Now get some ink on your shirt and keep printing.
Christa
It sound as crazy as it may seem that your quoins are too tight causing the plate to lift from the bed of the press.
This will cause a wobble that you can not detect.
If the inking problems move from to to bottom and the impression is good (as your photos show) this could be the problem.
Before touching the quoins remove 1 piece of packing from under the tympan and place it squarely behind the base.
Run 5 consecutive impressions. your impression should not have changed but you might be now over inking. Now would be a good time to tape the rails.
If the above does not work then on a flat surface lightly loosen the quoins and try again.
As we have said many times. Bring the form to the rollers (with under packing) then bring the sheet to the plate (makeready).
Doug
When you have locked up your form lay it on the stone and bang it with the heel of your hand you can usually hear the block knock on the stone if its riding up , assuming the form is large enough .